13
ASSEMBLY
Step 3
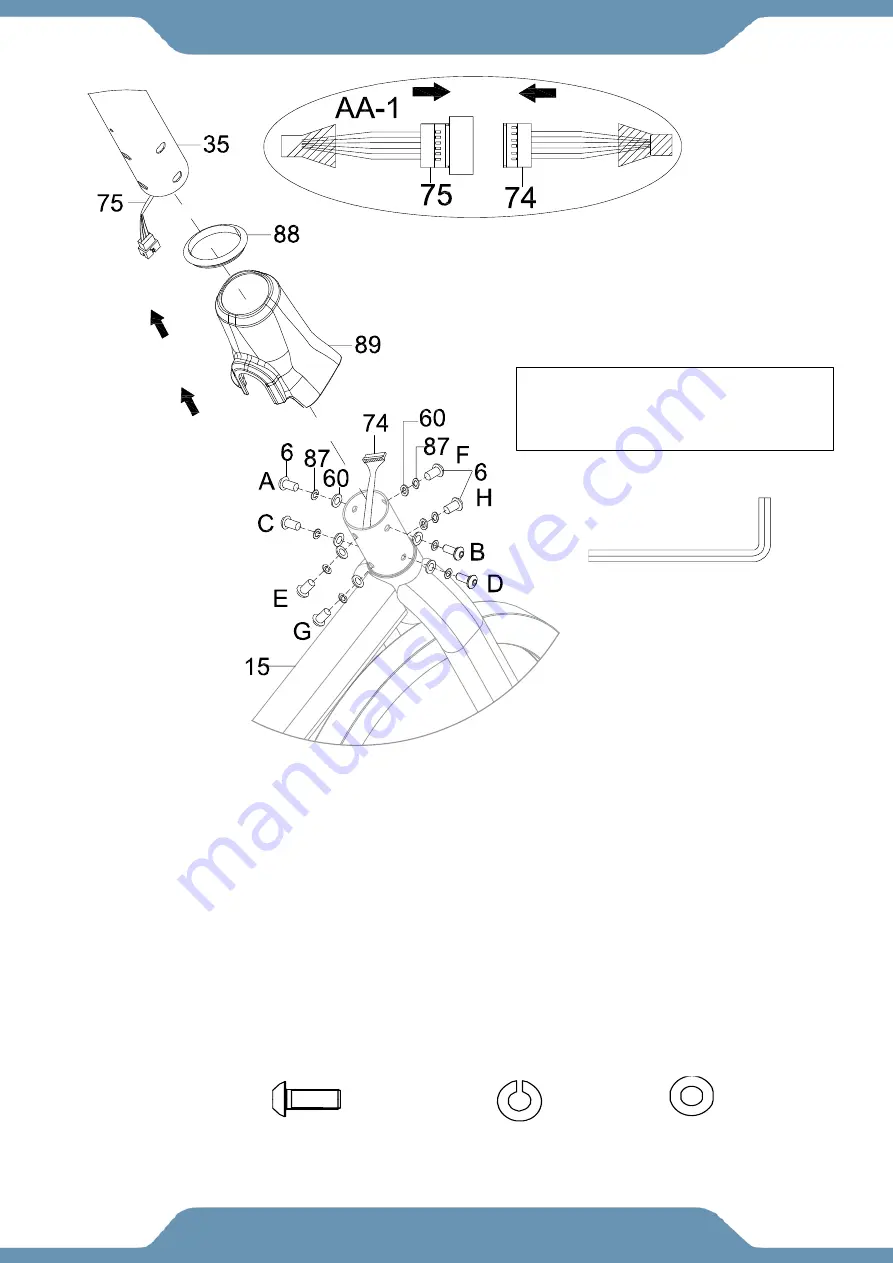
3A. Installing the Upright Cover & Ring –
Slide the
Upright Rubber Ring (88)
and
Upright
Cover (89)
onto the
Upright Post (35)
. Hold the parts above the bolt holes for the steps 3b and 3c.
3B. Connecting the Wires
–
Connect the
Upright Wire (75)
to the
Mainframe Wire (74)
. After
connecting the wires carefully tuck the wires inside the tubes and slide the
Upright Post (35)
fully
onto the
Main Frame (15)
.
3C. Installing the Upright Post -
Secure the
Upright Post (35)
to the
Main Frame (15)
by hand
tightening the eight
Hexagon Socket Bolts (6)
, eight
Spring Washers (87)
, and eight
Curve
Washers (60)
.
WAIT
:
Fully tighten the bolts in STEP 7 in the following sequence using the 6mm Allen
Wrench provided:
A, B, C, D, E, F, G, and H.
6mm Allen Wrench 1PC
Tool:
Hardware:
(6) Hexagon Socket Bolt
8pcs
(87) Spring Washer
8pcs
WARNING:DO NOT FULLY
TIGHTEN THE BOLTS UNTIL
TOLD TO DO SO IN STEP 7.
(60) Curve Washer
8 PCS
Summary of Contents for X-Class 710ST
Page 5: ...3 LABEL PLACEMENTS ...
Page 8: ...6 OVERVIEW DRAWING ...
Page 9: ...7 OVERVIEW DRAWING ...
Page 12: ...10 HARDWARE TOOLS PACK ...


