- 1 -
1.
1.
1.
1. Attention!
Attention!
Attention!
Attention! Before
Before
Before
Before Installation:
Installation:
Installation:
Installation:
1.1
1.1
1.1
1.1 Check
Check
Check
Check Your
Your
Your
Your Shipment
Shipment
Shipment
Shipment for
for
for
for Damage:
Damage:
Damage:
Damage:
1.1.1 Check to see that the hoist or trolley (unit) has been
delivered in good condition and that there are no visible signs
of damage. Prior to shipment from the manufacturer every
hoist and trolley is subjected to a strict quality control check.
However, unseen damage could occur during handling so it is
recommended that the customer perform the following tests.
1.1.2 Check the plug-in power cable to the hoist and/or trolley
with an Ohmmeter. The minimum resistance should be one
million Ohms as measured to ground.
1.1.3 Please check the plug-in push button and/or trolley motor
cable in the same manner.
1.2
1.2
1.2
1.2 Check
Check
Check
Check the
the
the
the Hoist
Hoist
Hoist
Hoist Load
Load
Load
Load Chain:
Chain:
Chain:
Chain:
1.2.1 Is the load chain twisted or damaged? Check to see that
the chain links that are 90
°
to the lifting sprocket have the
Welds facing (away) out.
1.2.2 Is the load chain oiled? If not, please oil it.
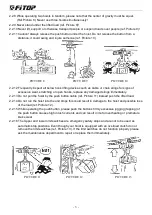
1.2.3 See Picture 1 for proper chain bag installation.
1.3
1.3
1.3
1.3 Electrical
Electrical
Electrical
Electrical Hookup:
Hookup:
Hookup:
Hookup:
1.3.1 The plug-in power input cable is a four wire (R, S, T&E)
“
SO
”
type cable equipped with a four-
conductor plug for your convenience. Connect the wires marked R, S and T the incoming power
source. If one of the three phases of the power source is connected to ground (Grounded Delta),
the wire marked S should be connect with the phase which is grounded.
1.3.2 The Green or E wire is the unit ground and must be securely connected to a clean-grounded
surface.
1.3.3 When installing a trolley care must be taken to see that the rail is properly grounded and the
contact surface (rail to wheel) is clean to minimize resistance.
1.4
1.4
1.4
1.4 After
After
After
After installation:
installation:
installation:
installation:
1.4.1 Check to see that the unit is phased properly. Depress the Up button, if the hook is lowered stop
immediately; disconnect the power and change phase, i.e., switch the R and T wires.
1.4.2 Test, does the hoist sound quite? If it is growling or sluggish stop immediately and disconnect the
incoming power! Check to see that the voltage is correct for this unit.
1.4.3 Test the upper and lower limit with the hoist unloaded.
1.4.4 Instruct operators to perform these three testes at the beginning of each shift.
PICTURE 1


