

OPERATION & MAINTENANCE
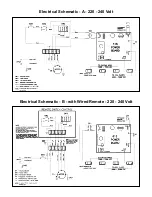
Wiring
All wiring must comply with applicable codes and
standards. See unit rating label for correct voltage and
amperage.
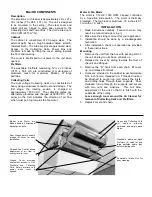
1. A knockout is provided on top of the unit, adjacent to
the wiring compartment. For convenience, a wall
switch may be installed near the Air Cleaner, in series
with the power source, to turn the unit on and off.
2. Remove the cover of the wiring compartment to locate
the input leads and ground stud. The Air Cleaner
must be grounded for proper operation and safety.
3. Once the unit is mounted and wired, the cover can be
replaced on the hinge and the chain replaced on the
"S" hooks. Close the cover by sliding it forward, lifting
the cover over the front flange and sliding it back into
place.
Operation Check
1. With the cover closed and in place, turn the system
switch on.
2. Adjust the fan speed with the slide switch. Insure the
unit functions on all speeds.
3. The Performance Indicator Light should be lit, which
indicates the Power Board is functioning properly.
When the Air Cleaner is new it may arc or periodically
make "snapping sounds". A slight odor of ozone may be
noticeable. The arcing and odor are due to rough edges
and burrs on the cells. These symptoms will disappear
during the first few weeks of normal operation. The ozone
levels are well below government standards for indoor air
concentration.
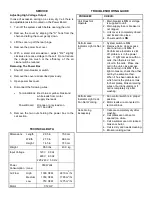
Maintenance Schedule
The Collecting Cells and Prefilters must be cleaned on a
regular basis for the unit to function at its peak efficiency.
The frequency of cleaning will vary from one environment
to another. The following is an average wash cycle:
Stores, Offices, Computer & Conference Rooms =
4
Weeks
Cafeterias, Restaurants, Lounges =
3-4 Weeks
Bars, Bingo halls =
1-3 Weeks
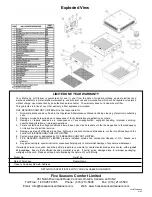
Cleaning & Service
1. Turn off the system switch and wait 15 seconds for
high voltage to dissipate.
2. Open the cover and cell access door and remove
collecting cells and prefilters.
Cell plates are sharp.
Handle with care.
3. Place Cells in tub and spray completely with
DAX
Detergent
, allowing detergent to run down both sides
of plates and ionizing wires. Let sit for 5 minutes.
Rinse Cells well with hot water (140ºF / 60ºC
maximum). Repeat washing process 3 times.
4. If dirt or nicotine remains on plates, let Cells soak in
hot soapy water for 30 minutes.
Never use any
instrument to clean the cell, as this may damage
the ionizing wires or bend cell plates.
5. Spray Prefilters with
DAX Detergent
and rinse well.
6. To dry cells, tilt on 45º angle against wall with arrows
pointing sideways. Allow to dry completely for 10-24
hours. Place in sunlight for faster drying time.
7. When the Cells and Prefilters are dry, place them
back into the unit. The arrow on the cell points up.
The red fiberboard on the Cell should line up with the
contacts in the cabinet. Close door and cover. If the
Cells arc when the switch is turned on or if the
Performance Indicator Light does not come on, then
the Cells are still wet. Allow more time for drying.
The use of
DAX Detergent
is strongly recommended for
cleaning as it is a heavy-duty solution used expressly for
removal of accumulated pollutants on Cell plates. If used
as directed,
DAX
will not harm aluminum or steel. Any
problem arising out of the use of another cleaning agent
will void the warranty. Do not use detergents that are
corrosive or abrasive or detergents containing chlorine or
ammonia.
DAX Detergent
is available in 1 gallon (4.54L) and 4.8
gallon (22L) containers as well as 45 gallon drums (204L).
Service Maintenance
1. Determine if the Air Cleaner is performing properly by
seeing that:
System switch is
ON
Performance indicator is
ON
2. A simple test to check hi-voltage would be to blow
dust or cigarette ash into the intake grill. An audible
arc or snapping sound should be heard, ensuring
good hi-voltage.
3. If in doubt, and if the Cells are not collecting any
carbon or nicotine tars, then see
"Troubleshooting
Guide"
or consult your installation dealer.
WARNING
Electrical shock can cause injury or death. Be certain
main line disconnect switch is off before wiring.
CAUTION
Make sure Air Cleaner switch is
OFF
before
performing any maintenance or removing any
components.
CAUTION
Damage to Cells may occur if improperly handled or
washed. Do not wash Cells in a dishwasher. Never
use any object to clean between the cell plates, as
this may cause damage to plates or ionizing wires.
Never place cell in oven to dry. The edges of the cell
may be sharp - handle with care.
WARNING
Electronic Air Cleaners use high voltage (low
amperage). Only trained personnel should perform
service. Use caution. Electric shock can cause injury
or death.


