background image

11

of the electronic system.

On

sealed burner models

, if equipped

with flame sensing ignitors, the
clicking sound stops after ignition.

Each time a knob is placed in the
“LITE” position all electrodes will
spark. There are electrodes under the
top for each pair of burners and one
for the griddle. There is one electrode
in each broiling section for the oven
burner. In the event of a power failure
you may light the top burners with a
match. Hold lighted match near the
surface burner and turn knob counter-
clockwise to the “LITE” position. See

Oven and Griddle Burners

section

for instructions to light the oven
burner in the event of a power failure.
Page 14.

Final Preparation
Stainless Steel

New units are wiped clean with
solvents at the factory to remove any
visible signs of dirt, oil, grease, etc.
remaining from the manufacturing
process, then coated with a thin film of
mineral oil. Some stainless steel parts
may have a plastic protective wrapper
which must be peeled off. The range
should be washed thoroughly with hot,
soapy water to remove these film
residues and any installation dust or
debris before being used for food
preparation, then rinsed and wiped dry.
Solutions stronger than soap and water
are rarely required. All stainless steel
body parts should be wiped regularly
with hot, soapy water and with a liquid
cleaner designed for this material. If
buildup occurs, do not use steel wool,
abrasive cloths, cleansers, or powders!
If it is necessary to scrape stainless
steel to remove encrusted materials,
soak with hot, wet cloths to loosen the
material, then use a wood or nylon
scraper. 

Do not use a metal knife,

spatula, or any other metal tool to
scrape stainless steel! Scratches are
almost impossible to remove.

A light coat of oil such as Johnson’s
Baby Oil may be applied periodically
to the stainless steel surfaces. This
will help prevent moisture from
penetrating the stainless surfaces.

Once the unit is installed as outlined in

the Installation Instructions (pages 3-6)
it is important that the air supply to the
unit remains open. The oven air supply
comes through the front floor area
under the range. The surface burners
get air from the area below the control
panel. THESE AREAS MUST
REMAIN OPEN. See Figure 2.

Operation of Ranges

Cooking Utensils

Most cooking utensils are suitable for
use on the FiveStar and it is not
necessary to replace your present
domestic utensils with commercial
cookware. This is a matter of personal
choice. Cookware should be in good
condition and free from excessive
dents or bulging on the bottom to
provide maximum performance and
convenience.

Before You Cook

Before staring to cook, clean the
range thoroughly with hot, soapy
water. Turn the oven to 400 degrees
for approximately one hour to burn
off the “binder” from the insulation.
There will be a slight odor.

Reversible Griddle/Grill

The griddle is equipped with a cast
iron plate that is reversible for use as
a grill. Simply life the griddle by the
front edge, flip over the plate, and
replace it back into the housing.

The griddle plate is pre-seasoned cast
iron and is ready for use.

Griddle Cooking

• Preheat griddle at 450˚ for 12

minutes, then turn to selected
temperature.

• Use liquid cooking oil, cooking

sprays, or butter for eggs, pancakes,
French toast, fish, and sandwiches.
This will help to reduce sticking.
Meats usually have enough natural
oils.

• Remove food particles with a metal

spatula during cooking to make the
clean up easier and to avoid
including those particles in the
cooked food. Be sure to keep the
spatula flat. The corners can scratch.

• Direct the flow of grease to the

center of the grease well.

• Do not over-heat the griddle. Turn it

off when not in use, or lower heat
between cooking loads.

Griddle Knob Settings

Food

Built-In

Portable

Eggs

250-300°

Low

Bacon

325-350°

Med

French Toast,
Pancakes

375-400°

Med

Fish fillets

350°

Med

Hamburgers

350°

Med

Steaks

350°

Med

Griddle Clean Up

For the Portable FiveStar Griddle
accessory, refer to page 29 for care
and cleaning instructions.

The reversible, cast iron griddle/grill
should be cared for and maintained as
follows:

1.

Rinse with hot water (do not use

soap), and dry thoroughly.

2.

Before cooking, prepare the surface

with cooking spray or vegetable
oil.

3.

After cooking, clean griddle with a
stiff brush and hot water. Using
soap is not recommended, and
harsh detergents should never be
used.

4.

Towel dry immediately and apply a

light coat of cooking spray or
vegetable oil while griddle is still
warm.

5.

Store in a cool dry place. If you

keep the cover over your griddle,
placed a folded paper towel
between the cover and the griddle
to allow air to circulate.

6.

Do not wash in dishwasher.

WARNING!!!

ALWAYS ALLOW GRIDDLE TO

COOL PRIOR TO CLEAN UP

OR REMOVAL FOR STORAGE.

Summary of Contents for TTN031

Page 1: ... 24 30 and 36 Range Models 48 and 60 Range Models 36 and 48 Cooktop Models Your exact model may not be pictured ...

Page 2: ...epending on the features of your range the label may be under the griddle or on the side wall Model Number Manufacturing Type Number Serial Number Use these numbers in any correspondence or service calls concerning your range If you received a damaged range Immediately contact the dealer or builder that sold you the range CONTENTS Do not store or use gasoline or other flammable vapors and liquids ...

Page 3: ...damage The standard top not sealed burners are held in place with a screw to protect them while in transit These shipping screws are to be removed to give proper top burner operation and allow easy removal INSTALLATION OF ANTI TIP BRACKET ON 24 30 AND 36 MODELS 1 PLACE RANGE IN PROPER LOCATION WITH BACK OF RANGE AGAINST REAR WALL 2 ADJUST LEG LEVELERS TO MATCH COUNTER HEIGHT 3 REMOVE RANGE AND INS...

Page 4: ... Unit should be connected to a supply line with 1 2 inch black iron pipe or a certified flexible connector See Figure 3 4 5 For U S A installations flexible connectors must comply with ANSI Z21 69 latest edition or for Canadian installation CAN CGA 6 16 latest edition revision with suitable strain reliefs Manifold pressure should be checked with a manometer For natural gas 4 wcp is required with S...

Page 5: ...ut off valve taking care to back up the shut off valve to keep if from turning 4 Connect flexible metal appliance When using test pressures greater than 1 2 psig to pressure test the gas supply system of the residence disconnect the range and individual shut off valve from the gas supply piping When using test pressures of 1 2 psig or less to test the gas supply system simply isolate the range fro...

Page 6: ... alpha prefix letter in the model number The letter T indicates a natural gas setting The letter P indicates a propane LP setting ALL ADJUSTMENTS AND OR CONVERSIONS MUST BE MADE BY THE INSTALLER OR SERVICING UTILITY DURING INSTALLATION SEALED TOP BURNER MODELS ARE FACTORY SET FOR THE GAS FOR WHICH THEY ARE TO BE USED THEY CANNOT BE CHANGED FROM ONE GAS TO ANOTHER WITHOUT FACTORY AUTHORIZATION FIG ...

Page 7: ...lding the valve stem in the LOW setting with a pair of pliers turn the adjusting screw until a flame of approximately 1 8 is obtained High flames on surface burners are inefficient and unsafe The flame should always be adjusted so that it is no larger than the bottom of the pan Pilot is out when control dial is OFF Spark electrode is directly above CHUTE Vari Flame FiveStar Standard front burners ...

Page 8: ...y result in burns from steam Do not let pot holders touch hot surfaces of the range Do not use a towel or other bulky cloth as a pot holder WARNING Never use this appliance as a space heater to heat or warm the room Doing so may result in carbon monoxide poisoning and overheating of the oven and valve components When preparing your meals a great deal of heat is generated consequently some parts of...

Page 9: ...s ceramic earthenware or other glazed containers are suitable for range top service others may break because of the sudden change in temperature Oven Don t bake in a gas oven unless the broiler pan is in position and free of grease Be careful when handling the pan especially when hot Grease left in the pan can catch fire if the oven is used without removing the grease from the broiler pan Keep ove...

Page 10: ...ds may be installed above the range Provide properly sized exhaust fans for efficient operation no sprinklers are required If this range is removed for any reason service or cleaning etc it must be replaced as outlined in the installation instructions before placing the range back in operation Field Adjustments All ranges are tested before leaving the factory Field adjustments are necessary for pr...

Page 11: ...nsils Most cooking utensils are suitable for use on the FiveStar and it is not necessary to replace your present domestic utensils with commercial cookware This is a matter of personal choice Cookware should be in good condition and free from excessive dents or bulging on the bottom to provide maximum performance and convenience Before You Cook Before staring to cook clean the range thoroughly wit...

Page 12: ... Make certain that vents or air openings aren t covered by the foil If the vents located along the sides of the oven bottom are blocked poor cooking and burner performance will result Never cover a rack with aluminum foil Oven Temperature Selection It s important to select a proper temperature setting Never set the dial to a higher degree than needed with the intention of lowering the setting at a...

Page 13: ...in the LITE position all electrodes will spark at a rate of about 21 2 sparks a second This is normal To light oven pilot manually in the event of a power failure You light the pilot not the burner 1 CAUTION Make certain the oven is cool when manually lighting oven pilot 2 Open broiler door Oven pilot is located on the left side of the oven burner at the back of the burner See Figure 13 If the ove...

Page 14: ...d serviceman CLEANING YOUR RANGE Make certain all parts of the range are cool before cleaning Be sure to replace the parts correctly Knobs Pull forward to remove the knobs Wash in a water solution with a mild detergent mix Do not use an abrasive cleaner or any abrasive action Abrasive action will scratch away the knob markings If the knobs become loose on the valve stem spread the valve stem sligh...

Page 15: ...or easy cleaning within the oven to escape without the forming of visible moisture on the range The amount of moisture will depend upon the humidity of the air and water content of the food being cooked Fogging and even dripping water will usually occur in geographic locations of high humidity Oven Door Hinges The oven door hinges are properly set before leaving the factory The springs are adjuste...

Page 16: ...pillovers may require cleaning with a mild abrasive cleaner Soapy wet metal pads may also be used Do not allow food spills with a high sugar or acid content such as milk tomatoes sauerkraut fruit juices or pie filling to remain on the surface They may cause a dull spot even after cleaning If necessary you may use an oven cleaner Follow package directions Outside of door Use soap and water to thoro...

Page 17: ...ulling away from the pan Do not rely on time or brownness as only indicators Use good quality baking utensils and the size recommended in the recipe Dull dark enameled or glass utensils will generally produce a brown crisp crust Shiny metal utensils produce a light golden crust Frozen pies in shiny aluminum pans should be baked on a cookie sheet on rack 1 or be removed to a dull or glass pan prior...

Page 18: ...od tube 2 375 21 23 30 40 Pound Cake loaf 2 325 30 37 40 50 Snacking Cake 8x8 2 375 19 22 30 35 Cupcakes 3 350 12 15 15 20 Sheet Cake 15x10 3 350 16 19 20 25 PIES Two Crust Fruit fresh 9 2 400 425 26 33 35 55 Fruit frozen 9 1 400 425 33 41 45 60 One Crust Custard fresh 9 3 350 33 38 35 40 Custard frozen 9 1 375 38 60 65 Pie Shell 9 2 425 450 8 12 8 12 COOKIES Chocolate Chip 3 350 375 6 9 8 12 Pean...

Page 19: ...broil with the oven door closed The oven thermostat will maintain the termperature while your food is broiled 3 Place food on roasting broiler pan provided with oven After top broil element is red place food in oven Preheating takes a few minutes or until element glows a bright cherry red 4 TO RESET THE OVEN FOR BAKING IT IS NECESSARY TO TURN THE OVEN CONTROL DIAL TO OFF AND THEN BACK TO THE TEMEP...

Page 20: ...eak 1 4 Rare 3 3 Medium 4 4 Well 5 5 Hamburgers 3 4 4 Rare 3 Medium 4 Well 4 3 PORK TO BROIL AND BACK TO 500 F Bacon 4 5 no turning Chops 1 2 4 3 3 Chops 1 4 9 8 Ham Steak 4 3 2 Sausage Links 4 5 3 Sausage Patties 4 5 1 LAMB TO BROIL AND BACK TO 500 F Chops 1 4 Medium 5 3 Well 5 5 Patties 3 4 4 Medium 4 3 Well 5 4 POULTRY TO BROIL AND BACK TO 500 F Breast Halves 4 7 4 SEAFOOD TO BROIL AND BACK TO ...

Page 21: ... paper or a small amount of baby oil This will allow the racks to slide easier on the rack supports 4 Remove excess spillovers from the oven cavity prior to starting the self cleaning cycle To pre clean use hot soapy water and a cloth REMOVE large spillovers as they can cause heavy smoke or fire when subjected to high temperatures Do Not allow food spills with high acid or sugar content milk tomat...

Page 22: ...ree hours before restarting This allows the remote timer to reset itself INDICATOR LIGHTS The oven indicator light is on anytime the oven control is in the on position It will cycle at knob setting or at the clean temperature approximately 875 F The door locked indicator light will come on only when the door is locked during a self cleaning cycle oven above 400 F THE SELF CLEAN CYCLE Broil element...

Page 23: ...23 MODEL NO ...

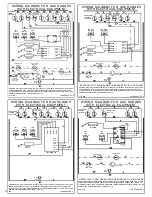
Page 24: ... WITH A THREE PRONG GROUNDING PLUG FOR YOUR PROTECTION AGAINST SHOCK HAZARD AND SHOULD BE PLUGGED DIRECTLY INTO A PROPERLY GROUNDED THREE PRONG RECEPTACLE DO NOT CUT OR REMOVE THE GROUNDING PRONG FROM THE PLUG 310 330 188 6C002 REV 8 WIRING DIAGRAM FOR GAS RANGES WITH ELECTRICAL EQUIPMENT TOP LEFT IGNITION TOP BURNER IGNITION SWITCHES TOP RIGHT IGNITION TOP CENTER IGNITION WALL PLUG GRIDDLE IGNITI...

Page 25: ...DDLE REIG 4 REIG 3 REIG 2 REIG 1 GROUND LINE NEUTRAL REIG 4 REIG 3 REIG 2 REIG 1 REIG 4 REIG 3 M035 ONLY NOTE REFER ONLY TO FEATURES EQUIPPED ON YOUR RANGE WIRING DIAGRAM FOR GAS RANGES WITH ELECTRICAL EQUIPMENT TOP LR IGNITION TOP BURNER IGNITION SWITCHES TOP RR IGNITION REIG 4 REIG 3 REIG 2 REIG 1 GROUND LINE NEUTRAL REIG 4 REIG 3 REIG 2 REIG 1 OVEN IGNITION SWITCH WARNING ELECTRICAL GROUNDING I...

Page 26: ... INSTALLATION INSTRUCTIONS 275 325 188 6C047 REV 0 WIRING DIAGRAM FOR GAS RANGES WITH ELECTRICAL EQUIPMENT GROUND NOTICE WARNING FRAME GROUNDED TO NEUTRAL OF APPLIANCE THROUGH A LINK IF USED IN A MOBILE HOME OR IF LOCAL CODES DO NOT PERMIT GROUNDING THROUGH THE NEUTRAL DISCONNECT THE LINK FROM THE NEUTRAL AND USE GROUNDING TERMINAL OR LEAD TO GROUND UNIT IN ACCORDANCE WITH LOCAL CODES CONNECT NEUT...

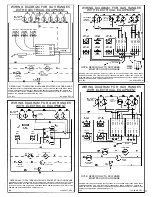
Page 27: ...IES MUST BE REPLACED BY 4 CONDUCTOR CORD ASSEMBLIES SEE RATING PLATE FOR TOTAL WATTAGE AND VOLTAGE USE ONLY COPPER OR ALUMINUM CONDUCTORS SEE INSTALLATION INSTRUCTIONS 525 188 6C049 REV 0 WIRING DIAGRAM FOR 48 SELF CLEAN 188 6C049 MODEL NO 525 WARNING THIS APPLIANCE MUST BE CONNECTED AS SHOWN IN FIGURE 1 OR 2 IF A CORD IS UTILIZED IT MUST BE RATED AT 250 VOLTS 40 AMPERES AND CERTIFIED FOR USE ON H...

Page 28: ...ION INSTRUCTIONS 535 188 6C050 REV 0 WIRING DIAGRAM FOR SELF CLEANER NOTE REFER ONLY TO FEATURES EQUIPPED ON YOUR RANGE GROUND NOTICE WARNING FRAME GROUNDED TO NEUTRAL OF APPLIANCE THROUGH A LINK IF USED IN A MOBILE HOME OR IF LOCAL CODES DO NOT PERMIT GROUNDING THROUGH THE NEUTRAL DISCONNECT THE LINK FROM THE NEUTRAL AND USE GROUNDING TERMINAL OR LEAD TO GROUND UNIT IN ACCORDANCE WITH LOCAL CODES...

Page 29: ... hazard could occur Rub the surface of a warm griddle with unsalted solid shortening or vegetable oil Wipe it with burlap or another rough cloth to remove any residue Stubborn spots may be removed by rubbing the surface with a rough grained nylon scrubbing pad soaked with cooking oil If cooked in food spots can t be removed with the scrubbing pad you may need to use a pumice grill stone that is av...

Page 30: ...op grade meat Meat that is at least 3 4 inch will grill better than thinner cuts Score fat on edges of steak to prevent curling while cooking For the attractive branded look on steaks be sure grill is preheated Allow one side of meat to cook to desired doneness or until juices appear on the top surface before turning It takes fewer minutes to cook the second side Turn steaks and hamburgers just on...

Page 31: ...Note 2 For island installations model numbers RBT024 030 036 and 048 See Note 3 Side trim only models See Note 4 NOTE 4 Model SST002 See part description NOTE 1 4 Backguard Models BKG024 030 036 048 and BKT060 See part description NOTE 2 Flush Island Trim Models TBT036 048 Cooktops ONLY See part description NOTE 3 4 Island Trim Models RBT024 030 036 and 048 See part description After installation ...

Page 32: ...e problem wait a few minutes and attempt to light the OGG by turning the OGG control dial on If sparking occurs at the electrode to ignite the pilot and within sixty seconds ignites the OGG burner then moisture build up was the problem If the OGG burner doesn t ignite within 60 seconds turn the control off and call the serviceman Accessories Wok Ring For standard burners remove any burner grate an...

Page 33: ... Figure 22 a Re adjust low setting See Page 7 b Normal air movement in kitchen a Clean ports with straight pin b Remove pan from burner Pan obstructs free air flow Try again a Have serviceman adjust burner b Remove pan from burner Pan obstructs free air flow Try again a Connect range to wall outlet check circuit breaker or fuse box b Check selector screw See page 6 Figure 7 c See page 27 a Preheat...

Page 34: ...34 NOTES ...

Page 35: ...NOTES 35 ...

Page 36: ...HE SAME TIME PERIOD STATED HEREIN FOR THE EXPRESSED WARRANTIES AND 2 WE SHALL NOT BE LIABLE FOR ANY INCIDENTAL OR CONSEQUENTIAL DAMAGES UNDER ANY EXPRESSED OR IMPLIED WARRANTIES RELATING TO THE APPLIANCE The warranty obligation on appliances outside the contiguous 48 U S states and the District of Columbia shall be LIMITED STRICTLY to furnishing replacement parts and shall EXCLUDE service labor FE...

Reviews: