background image

PRODUCT SIZE


 :  

 920mm x 1930mm 

Thank you for purchasing this product. Before starting assembly we suggest you spend a short time reading 
through this leaflet, then follow the simple step by step guide.
Two persons are needed to assemble this product.

ASSEMBLY INSTRUCTIONS

MODEL             :   CK 6285

1

20

* Approximately 2 Hours

* 2 People Required

* WARNING : Top Bunks and elevated Beds are dangerous and are not recommended for children

   under the age of 6.
   The upper bunk must be more than 2 m from any ceiling fan.

IMPORTANT INFORMATION

1.  This bunk bed is suitable for a single mattress or foam bed 920mm x 1870mm.Thickness of mattress should not exceed 200mm.

2.  Children should be discouraged from playing on this bunk bed.
3.  The bunk bed should be checked periodically by the owner to ensure that the guardrail, ladder and other components are

   maintained in the correct position and state of repair and that all connectors are tight.

4.  A bunk bed is not to be placed near a ceiling fan unless the distance between the closest points on the ceiling fan and bunk 
     bed is at least 2 metres.
5.  Use guardrails on both sides of upper bunk.

6.  Prohibit horseplay on or under bed(s).
7.  Prohibit more than one person on upper bunk.
8.  Use ladder for entering and leaving upper bunk.
9.  If the bunk bed will be placed next to the wall, the guardrail that runs the full length of the bed should be placed against the wall to

prevent entrapment between the bed and the wall.

10. Fall from elevated beds can be fatal and death have occurred where children have fallen from elevated beds. This is 
      relevant for all ages.The risk is greater for younger children.

 The risk of injury or death from a fall from an elevated bed compared to a non elevated bed is :

10 x greater for 7-8 year olds

7  x greater for 9-10 year olds

 3  x greater for 11-12 year olds 

11.Top Bunks and elevated Beds are dangerous and are not recommended for children under the age of 6.

STRANGULATION HAZARD: 

12. Never attach or hang items to any part of the bunk bed that are not designed for use with the bed for example, but not limited to  

hook, belt, and jump ropes.

Tools Required For Assembly

Philips Screw Driver

DO NOT USE POWER TOOLS 
TO ASSEMBLE THIS PRODUCT.
USE OF POWER TOOLS WILL 
INVALIDATE ANY CLAIM AND
MAY DAMAGE THIS PRODUCT
MAKING IT UNSAFE.

DO NOT USE HAMMER

Tools Not Use

Summary of Contents for Jasper CK 6285

Page 1: ...east 2 metres 5 Use guardrails on both sides of upper bunk 6 Prohibit horseplay on or under bed s 7 Prohibit more than one person on upper bunk 8 Use ladder for entering and leaving upper bunk 9 If the bunk bed will be placed next to the wall the guardrail that runs the full length of the bed should be placed against the wall to prevent entrapment between the bed and the wall 10 Fall from elevated...

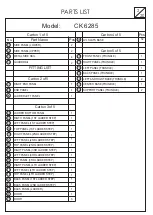
Page 2: ...ANEL 3RD LADDER STEP 14 1 TOP PANEL 3RD LADDER STEP 15 1 RIGHT PANEL 4TH LADDER STEP 16 1 17 1 TOP PANEL 4TH LADDER STEP 18 1 BACK PANEL 1ST LADDER STEP 19 1 20 1 BACK PANEL 2ND LADDER STEP 21 1 DOOR 22 1 DOOR 23 3 LVL SLATS BASE 35 32 TOP PANEL 1ST LADDER STEP 09 1 LEFT AND RIGHT BASE TRUNDLE 30 2 CENTER BASE TRUNDLE 31 1 SUPPORT PANEL TRUNDLE 32 2 GUARDRAIL 34 2 Carton 3 of 5 RIGHT PANEL 2ND LAD...

Page 3: ...PARTS LIST 20 3 Model CK 6285 35 x16 34 02 03 01 02 34 01 04 30 31 30 32 29 28 27 26 23 22 19 20 07 09 10 12 15 18 21 05 x4 33 06 08 11 14 17 13 16 x3 x2 2 set ...

Page 4: ...whilst assembling your unit As an extra precaution screw cover caps should be permanently fixed in position Where applicable Fitting List A 60 Pcs Part Name No B C D E F G J K L 60 72 12 20 8set M N 16 P Cam Stud 5137 Cam M8 x 25mm Wood Dowel 22 H 8 38 Q 14mm Chipboard Screw 64 6 M6 x 15mm Allen Bolt M6 x 13mm Baller 45mm Chipboard Screw 60 M6 x 45mm Allen Bolt M6 x 30mm Allen Bolt 2 M6 x 50mm All...

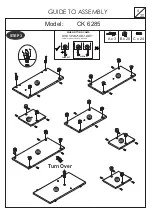
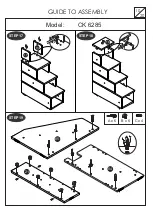
Page 5: ...5 GUIDE TO ASSEMBLY 20 Model CK 6285 STEP 1 D D L Dx 32 L x 8 08 11 14 17 08 11 14 17 B x 12 C x 12 A x 2 STEP 2 C ...

Page 6: ...SEMBLY 20 Model CK 6285 STEP 3 07 10 13 16 WHEN FITTING CAMS ENSURE STARTING POSITION IS CORRECT BEFORE YOU INSERT CONNECTING BOLT TURN CLOCKWISE UNTIL SECURE CORRECT WRONG 19 20 Turn Over B x 20 C x 24 A x 3 06 06 ...

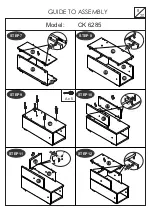
Page 7: ...7 GUIDE TO ASSEMBLY 20 Model CK 6285 STEP 4 STEP 5 STEP 6 15 12 09 18 C x 8 A x 16 19 06 06 07 ...

Page 8: ...8 GUIDE TO ASSEMBLY 20 Model CK 6285 STEP 7 STEP 8 STEP 9 STEP 10 STEP 11 STEP 12 A x 5 06 08 09 08 07 06 07 09 11 10 20 11 10 12 ...

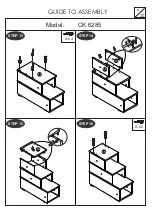
Page 9: ...9 GUIDE TO ASSEMBLY 20 Model CK 6285 STEP 13 STEP 15 STEP 14 STEP 16 A x 4 A x 2 15 15 12 14 13 ...

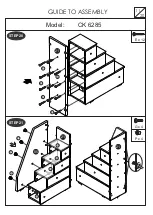
Page 10: ...10 GUIDE TO ASSEMBLY 20 Model CK 6285 STEP 17 STEP 19 STEP 18 B x 6 C x 4 A x 6 05 04 21 18 17 16 ...

Page 11: ...11 GUIDE TO ASSEMBLY 20 Model CK 6285 STEP 20 STEP 21 E x 12 21 05 21 21 G x 4 P x 4 E E E E E P G G G G P P ...

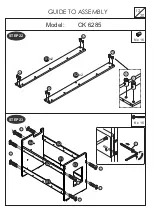
Page 12: ...12 GUIDE TO ASSEMBLY 20 Model CK 6285 STEP 22 02 N N x2 N N 01 N N x2 N x 16 02 02 01 01 03 04 STEP 23 K x 16 K K K K K K K ...

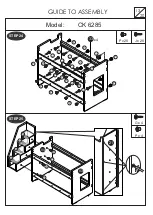
Page 13: ...13 GUIDE TO ASSEMBLY 20 Model CK 6285 STEP 25 STEP 24 J x 20 P x 20 33 x4 P P P J J J J J J J J J J J P P P P P P P P P J G x 4 P x 4 21 P P P P G G G G 04 03 ...

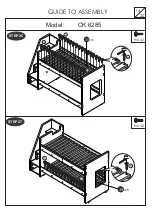
Page 14: ...14 GUIDE TO ASSEMBLY 20 Model CK 6285 STEP 27 STEP 26 H x 32 35 x16 H H H H H x 32 H 35 x16 H H ...

Page 15: ...15 GUIDE TO ASSEMBLY 20 Model CK 6285 STEP 28 STEP 30 P 34 G 34 G x 1 P x 1 STEP 29 F x 4 P x 4 F P P F G x 1 P x 1 34 P G ...

Page 16: ...16 GUIDE TO ASSEMBLY 20 Model CK 6285 STEP 32 STEP 31 22 23 x3 D x 16 L x 8 D D L 23 23 23 22 STEP 33 34 F x 4 P x 4 P P F F ...

Page 17: ...17 GUIDE TO ASSEMBLY 20 Model CK 6285 STEP 35 STEP 34 C x 24 B x 22 A x 22 Turn Over Turn Over Turn Over 28 28 30 x2 31 29 29 27 27 26 ...

Page 18: ...18 GUIDE TO ASSEMBLY 20 Model CK 6285 STEP 38 STEP 36 STEP 37 30 29 30 28 29 30 29 27 30 STEP 39 ...

Page 19: ...19 GUIDE TO ASSEMBLY 20 Model CK 6285 STEP 42 STEP 40 31 STEP 43 STEP 41 26 G x 12 D x 12 M x 6 32 x2 G G G G G G D M G ...

Page 20: ...20 GUIDE TO ASSEMBLY 20 Model CK 6285 STEP 44 ...

Reviews: