5
ASSEMBLING THE GUITAR
1. NECK/BODY ATTACHMENT
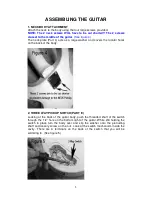
Attach the neck to the body using the four large screws provided.
NOTE: The 2 neck screws WILL have to be cut shorter!!! The 2 screws
closest to the middle of the guitar.
(See figure 4)
The neck plate (Part L) acts as a large washer and covers the locator holes
on the back of the body.
2. THREE WAY PICKUP SWITCH (PART E)
Looking at the back of the guitar body, push the threaded shaft of the switch
through the 1/2” hole on the bottom right of the guitar. While still holding the
switch in place turn the body over and slip the washer onto the protruding
shaft and loosely screw on the nut. Look at the switch mechanism inside the
cavity. There are 3 terminals on the back of the switch that you will be
soldering to. (See figure 5)
Summary of Contents for SPR01
Page 11: ...10...


