background image

Maintenance

8.2 Maximum permissible wear

48

Edition 09/2022

M3302-01en

Model

Initial maintenance

Follow-up maintenance

EST

3 months after commissioning

1)

Every 12 months 

1)

Table 8-1: 

Maintenance intervals

1)

 According to the Explosion Protection Directive, need only be inspected if a failure of the rubber disk

element 5 (5) and/or 6 (6) and shutdown of the drive as a result of this failure could give rise to a risk of
explosion. We recommend that the wear is checked regularly.

Shorter maintenance intervals

If necessary, set shorter maintenance intervals depending on actual wear.

8.2

Maximum permissible wear

8.2 Maximum permissible wear

Wear results in cracks on the surface of the rubber disk elements 5 (5) and/or 6 (6). To in-
spect the wear, measure the visible cracks on the surface of the rubber disk elements 5 (5)
and/or 6 (6).

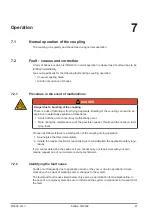
If the cracks reach a length of 20 mm or a depth of 5 mm, replace the rubber disk ele-
ments 5 (5) and/or 6 (6).

8.3

Replacing wearing parts

8.3 Replacing wearing parts

 DANGER

Danger due to bursting of the coupling

If you do not observe the information stipulated here regarding replacement of wearing
parts, this can lead to bursting of the coupling during operation. There is a risk of fatal in-
jury from flying fragments. Bursting of the coupling can lead to an explosion in potentially
explosive atmospheres.

Please observe all the stipulations concerning the replacement of wearing parts.

If the maximum permissible wear is reached, replace the rubber disk element 5 (5) or 6 (6).
For types ESD, ESDR and ESDW, replace both rubber disk elements 5 (5) and 6 (6).

The method used to replace the rubber disk elements 5 (5) and/or 6 (6) varies according to
the coupling type.

• Replace rubber disk elements 5 (5) and/or 6 (6) on types ESNR, ESDR, ESNW and

ESDW (Page 49)

• Replace rubber disk elements 5 (5) and/or 6 (6) on types ESN and ESD (Page 49)

• Replacing rubber disk element 5 (5) on type EST (Page 49)

Summary of Contents for ELPEX-S

Page 1: ...ESD ESDR ESN ESNR ESNW ESDW EST Assembly and operating instructions M3302 01en Edition 09 2022 ELPEX S ...

Page 2: ...Original assembly and operating instructions M3302 01 Edition 09 2022 Copyright 2022 Flender GmbH V1 11 10 2022 10 13 17 ...

Page 3: ...ory work 27 5 1 1 Milling the finished bore 28 5 1 2 Mill the parallel keyway 29 5 1 3 Machining an axial locking mechanism 29 5 1 4 Balancing the coupling 31 5 2 Assembling the coupling 32 5 2 1 Mounting coupling parts 1 1 and 2 2 with shaft and hub connected by a parallel key 33 5 2 2 Mounting coupling parts 1 1 and 2 2 with shaft and hub connected by a pressurised oil in terference fit 34 5 2 3...

Page 4: ...ing the changed alignment 44 8 Maintenance 47 8 1 Maintenance intervals 47 8 2 Maximum permissible wear 48 8 3 Replacing wearing parts 48 8 3 1 Replace rubber disk elements 5 5 and or 6 6 on types ESNR ESDR ESNW and ESDW 49 8 3 2 Replace rubber disk elements 5 5 and or 6 6 on types ESN and ESD 49 8 3 3 Replacing rubber disk element 5 5 on type EST 49 8 4 Removing coupling parts 1 1 2 2 3 3 or the ...

Page 5: ...1 A 1 12 Technical data of type ESDW 71 A 1 13 Dimension drawing of type EST 72 A 1 14 Technical data of type EST 72 A 1 15 Permissible deviations for the clearances A S LG T LX 73 A 2 Shaft misalignment values during operation 74 A 3 Tightening torques and widths A F 75 A 3 1 Tightening torques and widths A F for the screw connection of coupling part 3 3 to the motor flywheel 75 A 3 2 Tightening ...

Page 6: ...Table of contents 6 Edition 09 2022 M3302 01en ...

Page 7: ... type ESD 64 Table A 2 Geometry data and weights of type ESDR 65 Table A 3 Geometry data and weights of type ESN 67 Table A 4 Geometry data and weights of type ESNR 68 Table A 5 Geometry data and weights of type ESNW 70 Table A 6 Geometry data and weights of type ESDW 71 Table A 7 Geometry data and weights of type EST 72 Table A 8 Permissible deviations for the clearances 73 Table A 9 Maximum perm...

Page 8: ...List of tables 8 Edition 09 2022 M3302 01en ...

Page 9: ...in the hub 30 Figure 5 3 Position of the balancing bore for single plane balancing 31 Figure 5 4 Position of the balancing bore for two plane balancing 32 Figure 5 5 Possible misalignment 37 Figure 11 1 Spare parts drawing for types ESN ESNR EST ESD ESDR ESNW and ESDW 61 Figure A 1 Type ESD 63 Figure A 2 Type ESDR 65 Figure A 3 Type ESN 66 Figure A 4 Type ESNR 68 Figure A 5 Type ESNW 70 Figure A 6...

Page 10: ...List of figures 10 Edition 09 2022 M3302 01en ...

Page 11: ...cal injury will occur if the relevant precautionary meas ures are not taken WARNING means that death or severe physical injury may occur if the relevant precautionary meas ures are not taken CAUTION means that mild physical injury may occur if the relevant precautionary measures are not taken NOTICE means that damage to property may occur if the relevant precautionary measures are not taken If mul...

Page 12: ...d documentation must be followed Trademarks All designations marked with the trademark symbol are registered trademarks of Flender GmbH Other designations in this document may be trademarks whose use by third parties for their own purposes may violate the rights of the owner Liability disclaimer We have assessed the contents of these instructions for compliance with the hardware and software descr...

Page 13: ...ash is used for lists at the second level 1 Numbers in brackets are part numbers 1 4 Copyright1 4 Copyright The copyright of these instructions is held by Flender These instructions must not be used wholly or in parts without our authorisation or be given to third parties If you have any technical queries please contact our factory or one of our service outlets refer to Service and support Page 55...

Page 14: ...Introduction 1 4 Copyright 14 Edition 09 2022 M3302 01en ...

Page 15: ... damage or personal injury Flender does not accept any liability for damage or operating fail ures that are due to non adherence to these instructions State of the art The coupling described here has been designed in consideration of the latest findings for de manding technical requirements This coupling is state of the art at the time of printing these instructions In the interest of further deve...

Page 16: ...pling The relevant occupational safety and environmental protection regulations must be complied with at all times during transport assembly installation dismantling operation and mainten ance of the coupling Only qualified personnel may operate assemble maintain and repair the coupling Informa tion about qualified personnel can be found in the legal notes at the beginning of these in structions I...

Page 17: ...o liability or warranty whatsoever for damage occurring as a result of the use of non approved replacement parts The same applies to any accessories that were not supplied by Flender If you have any queries please contact our customer service organisation see Service and support Page 55 2 3 Safety instructions for a coupling for use in potentially explosive atmospheres2 3 Safety instructions for a...

Page 18: ... IIA IIB and IIC Conditions of use for products with TX marking The maximum ambient temperature stated in the following tables applies to the temperature in the direct vicinity of the coupling and the temperature of adjacent components 1 Gases vapours or mists Check the ambient temperature for use of the coupling in the relevant temperature class Max ambient temperature Temperature class Vibratory...

Page 19: ...harges is to be expected with a paint layer thickness of less than 200 μm Only use TAPER clamping bushes with parallel key in potentially explosive atmo spheres Insert the screws for fastening the TAPER clamping bushes with liquid screw locking agent If you are not using an original FlenderTAPER clamping bush make sure that the TAPER clamping bush you are using fully meets the technical requiremen...

Page 20: ...ling parts can lead to an explosion in potentially explosive atmospheres Wear suitable protective equipment gloves safety goggles Ensure that the area is not at risk of explosion WARNING Risk of chemical burns due to chemical substances There is a risk of chemical burns when handling aggressive cleaning agents Please observe the manufacturer s information on how to handle cleaning agents and solve...

Page 21: ...he assembly and operation of an ELPEX S coupling arranged horizontally with a shaft hub connection made by a cylindrical or conical bore with parallel key pressurised oil interference fit or TAPER clamping bush with parallel key and or a flange coupling part 3 Please consult Flender if you want to use a different type of installation Application ELPEX S couplings are suitable for drives with highl...

Page 22: ...Description 22 Edition 09 2022 M3302 01en Structure ...

Page 23: ...Description M3302 01en Edition 09 2022 23 The diagrams show the various types with their constituent parts and their part numbers Figure 3 1 Types ESN ESNR EST ESD ESDR ESNW and ESDW ...

Page 24: ... ESDR Type ESNW Type ESDW Coupling part 3 3 size 680 for the types ESD ESDR and ESDW Coupling part 3 3 size 770 for the types ESDR and ESDW 1 Coupling part 1 2 Coupling part 2 3 Coupling part 3 5 Rubber disk element 5 6 Rubber disk element 6 25 Bolt 31 Bolt 101 Flange 105 TAPER clamping bush 125 Bolt 310 Bolt 320 Nut ...

Page 25: ...aring capacity for transport Please observe the symbols applied on the packaging If not specifically contractually agreed otherwise the packaging complies with the HPE Pack aging Directive 7KLV ZD XS UDJLOH HHS GU HHS GU HQWUH RI JUDYLW R QRW XVH KDQG KRRN WWDFK KHUH Figure 4 1 Transport symbols 4 2 Storage of the coupling4 2 Storage of the coupling NOTICE Property damage due to improper storage N...

Page 26: ...lease observe the specifications on long term storage 1 You can find the required type of preservative agent in the following table types of pre servative agents for long term storage 2 Remove the elastomer components These must not come into contact with cleaning agents and long term preservative agents 3 Clean the coupling parts 4 Apply the stipulated preservative agent 5 Store the coupling part...

Page 27: ...y sequence Please ensure that there is sufficient space at the assembly location and that the loca tion is tidy and clean in order to be able to assemble and maintain the coupling without any risk If a dimension drawing has been created for the coupling please observe the informa tion it contains as a matter of priority 5 1 Preparatory work5 1 Preparatory work Please consult Flender if you want to...

Page 28: ... J7 K7 H7 H7 H7 M7 Table 5 1 Recommended assigned fits for bores with parallel key connection Bore hole diameter WARNING Danger if the coupling fractures If you exceed the maximum diameter of the finished bore then this can cause the coupling to fracture in operation There is a risk of fatal injury from flying fragments Bursting of the coupling can lead to an explosion in potentially explosive atm...

Page 29: ... coupling is intended for reversing operation mill the parallel keyway according to DIN 6885 1 ISO P9 If you want to mill a parallel keyway that does not correspond to DIN 6885 1 please con sult Flender 5 1 3 Machining an axial locking mechanism5 1 Preparatory work The coupling part is secured by a set screw or an end plate to prevent axial movements Please consult Flender if you want to use an en...

Page 30: ...bore Finished bore Tapped hole d1 Tightening torque TA Nm Width across flats Hexagon socket wrench mm over mm up to mm 8 30 M6 4 3 30 75 M8 8 4 75 95 M12 25 6 95 110 M16 70 8 110 150 M20 130 10 150 230 M24 230 12 230 260 M30 470 14 Table 5 2 Tapped hole tightening torque and width across flats Apply the specified tightening torques as listed in section Tightening procedure Page 77 Position of the ...

Page 31: ...tes on balancing the coupling NOTICE Damage to coupling part 1 1 or 2 2 If you completely drill through the flange on coupling part 1 1 or 2 2 then coupling part 1 1 or 2 2 is no longer allowed to be used for operation Please observe the stipulations about machining the balancing bore Please note the following when balancing the coupling Select the balancing quality according to the application bu...

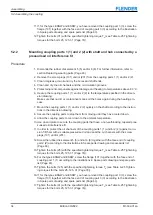
Page 32: ...the elastomer components do not come into contact with cleaning agents NOTICE Property damage Damage to the shaft end the coupling parts the TAPER clamping bush and or the parallel key Note the handling instructions regarding assembly of the coupling parts The procedure for assembling the coupling parts varies depending on the selected shaft hub connection Mounting coupling parts 1 1 and 2 2 with ...

Page 33: ...you can heat coupling part 1 1 or 2 2 with cylindrical bore up to a maximum of 120 C if required Note when doing this the temperature range of the rub ber disk element 5 5 and or 6 6 see Rubber disk elements 5 5 and or 6 6 Page 77 Remove the rubber disk element 5 5 and or 6 6 if necessary Protect adja cent components against damage and heating to temperatures above 80 C 5 Secure the coupling part ...

Page 34: ...the dimension drawing 8 Secure the coupling parts to stop them from moving until they have cooled down 9 Allow the coupling parts to cool down to the ambient temperature 10 Use an end plate to secure the coupling parts that have a non self locking tapered pres surised oil interference fit 11 In order to protect the oil channels of the coupling parts 1 1 and or 2 2 against corro sion fill them with...

Page 35: ... medium strength to the screws of the TAPER clamping bush 5 Insert the screws for the TAPER clamping bush 105 into the blind hole threaded hole combination and tighten them slightly 6 Position the rubber disk element 5 5 together with the TAPER clamping bush 105 on the shaft The shaft must not be set back from the inner side of the hub For motor and generator connection dimensions according to the...

Page 36: ...t connection of coupling part 3 3 with the motor flywheel Page 75 or Table A 25 Tightening torques for the bolts 25 125 31 Page 76 4 Apply a few drops of liquid screw locking agent e g Loctite 243 to the screws 310 Screw the two parts of coupling part 3 3 with the bolts 310 and 310 or 320 5 Tighten the bolts with the specified tightening torque TA see Table A 26 Tightening torques for the bolts 31...

Page 37: ... motor enclosure For shaft couplings you determine angular and radial misalignment between the coupling halves by measuring with a dial gauge 5 3 2 1 Axial misalignment5 3 Aligning the coupling Set the gap ΔKa to a value within the permissible tolerance range of dimension S LG A The values for the dimension S LG A can be found in Geometry data and weights Page 63 5 3 2 2 Angular misalignment5 3 Al...

Page 38: ...Assembling 5 3 Aligning the coupling 38 Edition 09 2022 M3302 01en ...

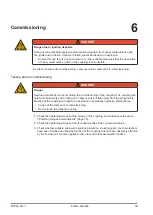
Page 39: ...missioning of the coupling The coupling can burst and metal parts can be flung out There is a risk of fatal injury from flying fragments Bursting of the coupling can lead to an explosion in potentially explosive atmospheres Carry out the tests prior to commissioning Do not touch the rotating coupling 1 Check the tightening torques of the screws of the coupling in accordance with section Tightening...

Page 40: ...Commissioning 40 Edition 09 2022 M3302 01en ...

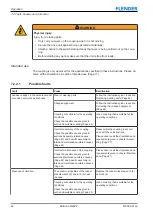
Page 41: ...e atmospheres Switch off the unit at once if any malfunctions occur Note during the maintenance work the possible causes of faults and the notes on recti fying them Proceed as follows if there is a malfunction of the coupling during operation 1 De energise the drive immediately 2 Initiate the required action for repair taking into consideration the applicable safety regu lations If you cannot dete...

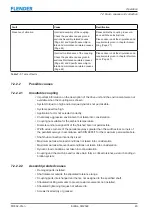
Page 42: ...ing not suitable for the operating conditions Check the possible causes given in section Unsuitable coupling Page 43 Use a coupling that is suitable for the operating conditions Incorrect assembly of the coupling Check the possible causes given in sections Assembly related causes Page 43 and Specific assembly re lated and maintenance related causes Page 44 Reassemble the coupling in accord ance wi...

Page 43: ...upling was chosen System torque too high and or torque dynamics not permissible System speed too high Application factor not selected correctly Chemically aggressive environment not taken into consideration Coupling not suitable for the ambient temperature Diameter and or assigned fit of the finished bore not permissible Width across corners of the parallel keyways greater than the width across co...

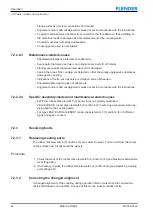
Page 44: ...ignment values not set in accordance with the instructions 7 2 2 2 4 Specific assembly related and maintenance related causes7 2 Fault causes and correction ELPEX S rubber disk element 5 5 and or 6 6 no correctly positioned Fitted ELPEX S rubber disk elements 5 5 and or 6 6 heated up excessively when ap plying heat to the coupling parts For types ESD ESDR and ESDW rubber disk elements 5 5 and or 6...

Page 45: ...n Edition 09 2022 45 Procedure 1 Correct the cause for the change in alignment 2 Check the wearing parts for wear and replace them as required 3 Check the locking elements that prevent axial movements and correct these as required 4 Realign the coupling ...

Page 46: ...Operation 7 2 Fault causes and correction 46 Edition 09 2022 M3302 01en ...

Page 47: ...ragments Bursting of the coupling can lead to an explosion in potentially explosive atmospheres Note also the actual wear of the elastomer components WARNING Physical injury Injury from rotating parts Only carry out work on the coupling when it is not moving Secure the drive unit against being operated accidentally Attach a notice to the switch stating clearly that work is being carried out on the...

Page 48: ...h a length of 20 mm or a depth of 5 mm replace the rubber disk ele ments 5 5 and or 6 6 8 3 Replacing wearing parts8 3 Replacing wearing parts DANGER Danger due to bursting of the coupling If you do not observe the information stipulated here regarding replacement of wearing parts this can lead to bursting of the coupling during operation There is a risk of fatal in jury from flying fragments Burs...

Page 49: ...d or 6 6 on types ESN and ESD8 3 Replacing wearing parts To replace the rubber disk elements 5 5 and or 6 6 move the coupled machines Procedure 1 Secure the coupling parts to prevent them from falling 2 Move the coupled machines apart 3 Unscrew the screw connection 25 and remove the rubber disk element 5 5 and or 6 6 4 Install a new rubber disk element 5 5 and or 6 6 Please observe the information...

Page 50: ...able protective equipment gloves safety goggles Ensure that the area is not at risk of explosion Procedure 1 Secure the coupling parts to prevent them from falling 2 Move the coupled machines apart 3 Unscrew the screw connection 25 and remove the rubber disk element 5 5 and or 6 6 4 On types ESNW and ESDW you can pull off the complete assembly comprising the coupling part 1 1 with the mounted flan...

Page 51: ...ad to an explosion in potentially explosive atmospheres Please observe the manufacturer s information on handling the following tools ð Pulling fixtures ð Pumps WARNING Risk of injury as a result of coupling components or the pulling fixture working loose Coupling components or pulling fixtures can work loose and fall when dismantling work is in progress Use suitable hoisting gear to hold the coup...

Page 52: ...event them from falling 7 Remove the screw plugs 101 or 201 from the oil channels 8 Deaerate an oil pump and connect it to the oil channel in the centre 9 Pressurise the oil pump to the pressure specified in the dimension drawing until oil starts to escape from the adjacent connections or the front faces Keep the pressure constant 10 Deaerate the next oil pump and connect it to the adjacent oil ch...

Page 53: ... please observe the information in chapters Assembling Page 27 and Commissioning Page 39 8 4 4 Removing coupling part 3 3 with a flanged connection8 4 Removing coupling parts 1 1 2 2 3 3 or the rubber disk element 5 5 of type EST Coupling part 3 3 is available in one and two piece designs For sizes 680 and 770 of types ESD ESDR and ESDW the coupling part 3 3 is a two part component You can find an...

Page 54: ...Maintenance 8 4 Removing coupling parts 1 1 2 2 3 3 or the rubber disk element 5 5 of type EST 54 Edition 09 2022 M3302 01en ...

Page 55: ...ou have any technical queries contact our factory or one of our Customer Service addresses Flender GmbH Schlavenhorst 100 46395 Bocholt Germany Tel 49 0 2871 92 0 Fax 49 0 2871 92 2596 Flender GmbH http www flender com More information Further information about service and support can be found on the Internet Service Support https www flender com service ...

Page 56: ...Service and support 9 1 Contact 56 Edition 09 2022 M3302 01en ...

Page 57: ...M3302 01en Edition 09 2022 57 Disposal 10 Disposal of the coupling Dispose of the coupling parts according to applicable national regulations or recycle them ...

Page 58: ...Disposal 58 Edition 09 2022 M3302 01en ...
Page 59: ... Page 60 You can find our contact data for ordering replacement parts here Service and support Page 55 Information required when ordering replacement parts Flender order number with item Flender drawing number Coupling type and size Part number refer to Spare parts drawing and spare parts list Page 60 Dimensions of the replacement part for example Bore Bore tolerance Parallel keyway and balancing ...

Page 60: ...Spare parts 11 2 Spare parts drawing and spare parts list 60 Edition 09 2022 M3302 01en 11 2 Spare parts drawing and spare parts list11 2 Spare parts drawing and spare parts list ...

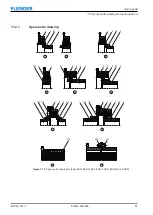
Page 61: ...pare parts drawing and spare parts list M3302 01en Edition 09 2022 61 11 2 1 Spare parts drawing11 2 Spare parts drawing and spare parts list Figure 11 1 Spare parts drawing for types ESN ESNR EST ESD ESDR ESNW and ESDW ...

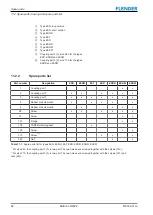
Page 62: ... ESN ESNR EST ESD ESDR ESNW ESDW 1 Coupling part 1 x x 2 Coupling part 2 x x x x x x 3 Coupling part 3 x x x x x x x 5 Rubber disk element 5 x x x x x 6 Rubber disk element 6 x x x x 25 Screw x x x x x x 31 Screw x x 101 Flange x x 105 TAPER clamping bush x 125 Screw x x 310 Screw 1 2 x x x 320 Nut 2 x x Table 11 1 Spare parts list for types ESN ESNR EST ESD ESDR ESNW ESDW 1 For size 680 the coupl...

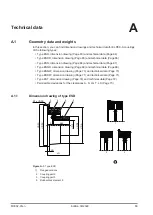
Page 63: ... ESN dimension drawing Page 66 and technical data Page 67 Type ESNR dimension drawing Page 68 and technical data Page 68 Type ESNW dimension drawing Page 70 and technical data Page 70 Type ESDW dimension drawing Page 71 and technical data Page 71 Type EST dimension drawing Page 72 and technical data Page 72 Permissible deviations for the clearances A S LG T LX Page 73 A 1 1 Dimension drawing of ty...

Page 64: ...0 560 1 170 560 316 210 60 270 18 21 571 5 673 1 542 9 641 4 35 25 12 12 17 17 140 150 580 1 200 585 310 250 100 350 21 24 673 1 733 4 641 4 692 2 26 26 12 12 17 21 170 175 680 2 3 220 682 380 250 17 267 21 24 673 1 733 4 641 4 692 2 85 20 12 12 17 21 265 275 Table A 1 Geometry data and weights of type ESD 1 Maximum bore for parallel keyway in accordance with DIN 6885 1 2 Weight applies to one cou...

Page 65: ...ghts Size Flanged version D2 1 mm DA mm ND2 mm NL2 mm P mm Q mm S mm LG mm Flanged connection SAE J620d Weigh t m 2 kg Size DFA g7 mm DFK mm FB mm ZF mm DFB mm 520 1 150 525 227 226 10 498 83 309 18 21 571 5 673 1 542 9 641 4 25 18 12 12 17 17 105 110 560 1 160 560 240 240 10 498 100 340 18 21 571 5 673 1 542 9 641 4 35 25 12 12 17 17 135 140 580 1 160 585 240 250 10 560 100 350 21 24 673 1 733 4 ...

Page 66: ...40 555 600 Table A 2 Geometry data and weights of type ESDR 1 Maximum bore for parallel keyway in accordance with DIN 6885 1 2 Weight applies to one coupling with maximum bore 3 Similar to DIN 6288 You will find the permissible deviations for the clearance S and LG in Permissible deviations for the clearances A S LG T LX Page 73 A 1 5 Dimension drawing of type ESNGeometry data and weights ෘ ෘ ෘ ෘ ...

Page 67: ...0 105 13 56 161 29 92 11 5 14 352 4 466 7 333 4 438 2 54 15 8 8 10 5 13 24 5 27 5 420 3 100 420 185 102 10 72 174 26 92 14 16 18 466 7 517 5 571 5 438 2 489 0 542 9 18 18 18 8 8 6 13 13 17 36 38 40 465 2 3 3 120 465 222 125 2 39 164 33 92 14 16 18 466 7 517 5 571 5 438 2 489 0 542 9 85 27 18 8 8 6 13 13 17 56 57 61 520 3 165 514 250 142 0 83 225 16 159 18 21 571 5 673 1 542 9 641 4 18 18 12 12 17 ...

Page 68: ...onnection SAE J620d Weig ht m 2 kg Size DFA g7 mm DFK mm FB mm ZF mm DFB mm 265 1 2 2 50 263 78 65 10 225 0 42 107 8 10 11 5 263 5 314 3 352 4 244 5 295 3 333 4 33 10 10 6 8 8 10 5 10 5 10 5 5 5 3 5 6 290 2 50 290 78 65 15 276 2 59 124 10 11 5 314 3 352 4 295 3 333 4 16 16 8 8 10 5 10 5 8 1 8 4 320 2 65 318 98 87 20 310 0 74 161 11 5 14 352 4 466 7 333 4 438 2 16 16 8 8 10 5 13 13 5 16 360 1 2 85 ...

Page 69: ...21 571 5 673 1 542 9 641 4 35 20 12 12 17 17 75 85 580 1 2 160 580 240 200 10 498 0 102 302 18 21 571 5 673 1 542 9 641 4 104 26 12 12 17 17 80 84 680 1 2 200 682 300 210 10 584 0 102 312 21 24 673 1 733 4 641 4 692 2 85 20 12 12 17 21 155 165 770 2 260 780 390 255 10 750 0 134 389 3 3 3 860 0 920 0 995 0 820 0 880 0 950 0 26 27 27 32 32 32 21 21 21 330 350 375 Table A 4 Geometry data and weights ...

Page 70: ... 219 22 320 65 365 98 87 84 92 105 279 32 360 85 353 5 123 88 85 96 123 299 43 420 100 480 155 85 82 94 134 304 75 465 130 480 190 119 116 119 125 363 89 520 150 585 227 162 159 161 123 447 155 560 150 585 240 180 174 174 132 492 160 580 160 685 240 200 195 198 145 545 185 680 200 685 300 210 205 201 150 570 315 770 260 870 390 255 250 253 180 690 500 Table A 5 Geometry data and weights of type ES...

Page 71: ... ND1 ND2 mm NL1 NL2 mm L3 mm L4 mm S mm LG mm Weight 2 m kg 520 150 585 227 226 201 135 100 552 215 560 160 585 248 240 215 133 114 594 250 580 160 685 240 250 220 140 120 620 300 680 200 685 300 250 218 134 125 625 440 770 260 870 390 300 265 238 220 820 720 Table A 6 Geometry data and weights of type ESDW 1 Maximum bore for parallel keyway in accordance with DIN 6885 1 2 Weight applies to one co...

Page 72: ...rding to DIN 6281 3 Coupling part 3 5 Rubber disk element 5 A 1 14 Technical data of type ESTGeometry data and weights Size TAPER Clamping bush D1 DA mm NL2 mm A mm LG mm T 1 mm LX 1 mm Weight 2 m kg min mm max mm 220 2012 14 50 222 32 0 52 43 43 43 81 73 38 30 3 6 3 5 3 7 4 2 265 2517 16 60 263 45 3 42 81 73 58 6 41 31 16 5 9 6 2 6 5 290 2517 16 60 290 64 3 6 58 73 58 6 14 0 8 5 8 8 320 3030 35 7...

Page 73: ...6281 2 Weight applies to one coupling with maximum bore 3 Length of TAPER clamping bush 2517 45 mm You will find the permissible deviations for the clearances A LG T and LX in Permissible de viations for the clearances A S LG T LX Page 73 For the flanged version and flange dimensions for size DFA DFK FB DFB and ZF see di mension drawing Page 66 and technical data Page 67 of type ESN A 1 15 Permiss...

Page 74: ...es in mm rounded Size Permissible shaft misalignment ΔK1500 at n 1500 rpm Radial ΔKr 1500 mm Angular ΔKw 1500 degrees 220 1 2 0 5 265 1 2 0 5 290 1 2 0 5 320 1 2 0 5 360 1 2 0 5 420 1 3 0 4 465 1 3 0 4 520 1 4 0 4 560 1 4 0 4 580 1 5 0 3 680 1 5 0 3 770 1 5 0 3 Table A 9 Maximum permissible shaft misalignment values during operation The maximum permissible radial and angular misalignment depends o...

Page 75: ...ue TA Nm 6 1 2 215 9 M8 25 5 16 18 24 7 1 2 241 3 M8 25 5 16 18 24 8 263 5 M10 49 3 8 16 42 10 314 3 M10 49 3 8 16 42 11 1 2 352 4 M10 49 3 8 16 42 14 466 7 M12 86 1 2 13 102 16 517 5 M12 86 1 2 13 102 18 571 5 M16 210 5 8 11 203 21 673 1 M16 210 5 8 11 203 24 733 4 M20 410 3 4 10 340 1 860 M20 410 3 4 10 340 1 920 M20 410 3 4 10 340 1 995 M20 410 3 4 10 340 Table A 11 Tightening torques for bolt ...

Page 76: ...80 17 19 410 710 8 8 14 210 8 8 770 ESNR ESNW 36 1 710 8 8 17 410 8 8 770 ESDR ESDW 36 1 1 000 10 9 17 410 8 8 Table A 12 Tightening torques for the screws 25 125 31 1 Hexagon head Apply the specified tightening torques as listed in section Tightening procedure Page 77 A 3 3 Tightening torques and widths A F for set screws 310Tightening torques and widths A F Coupling size Part 310 Width across fl...

Page 77: ...ap plied at the tool Tightening procedure As a rule the tightening procedures listed are within the spe cified tool torque scatter 5 Hydraulic tightening with mechanical screwdriver Torque controlled tightening with a torque spanner or a torque spanner that gives a signal Tightening with a precision mechanical screwdriver with dynamic torque measurement Table A 15 Tightening procedure The tighteni...

Page 78: ... age A 5 2 ELPEX S rubber disk elements 5 5 and or 6 6 Rubber disk elements 5 5 and or 6 6 Material Hardness Marking Ambient temperat ure Approved for explosion group Natural synthetic rubber mixture 50 to 55 Shore A WN 40 C to 80 C IIA IIB IIC Natural synthetic rubber mixture 60 to 65 Shore A NN 40 C to 80 C IIA IIB IIC Natural synthetic rubber mixture 70 to 75 Shore A SN 40 C to 80 C IIA IIB IIC...

Page 79: ...ct mentioned above The object of the declaration described above is in conformity with the relevant EU harmonisation legislation Directive 2014 34 EU Official Journal L 96 29 March 2014 Pages 309 356 Harmonised standards or other technical specifications on which the Declaration of Conformity is based EN 1127 1 2019 EN 1127 2 2014 EN ISO 80079 36 2016 EN ISO 80079 37 2016 EN ISO IEC 80079 38 2016 ...

Page 80: ...ELPEX S Assembly and operating instructions M3302 01en Edition 09 2022 Flender GmbH Alfred Flender Straße 77 46395 Bocholt Germany ...

Reviews: