Maintenance
8.4 Removing coupling parts 1 (1), 2 (2), 3 (3) or the rubber disk element 5 (5) of type EST
M3302-01en
Edition 09/2022
53
8.4.3
Removing rubber disk element 5 (5) on type EST using a TAPER clamping
bush with a parallel key
8.4 Removing coupling parts 1 (1), 2 (2), 3 (3) or the rubber disk element 5 (5) of type EST
Procedure
1. Secure the coupling parts to prevent them from falling.
2. Move the coupled machines apart.
3. Remove the screws from the TAPER clamping bush (105).
4. Insert one of the screws as a withdrawal screw into the thread of the TAPER clamping
bush (105) and tighten the screw.
Use two withdrawal screws for no. 3535 TAPER clamping bushes (105) or larger.
5. Pull off the rubber disk element 5 (5). Use suitable lifting gear when doing this.
6. Check the rubber disk element 5 (5), the TAPER clamping bush (105) and the shaft for
any damage and protect them against corrosion.
7. Replace any damaged parts.
When reinstalling the coupling parts please observe the information in chapters Assembling
(Page 27) and Commissioning (Page 39).
8.4.4
Removing coupling part 3 (3) with a flanged connection
8.4 Removing coupling parts 1 (1), 2 (2), 3 (3) or the rubber disk element 5 (5) of type EST
Coupling part 3 (3) is available in one- and two-piece designs.
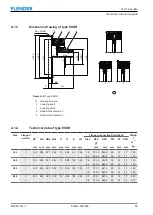
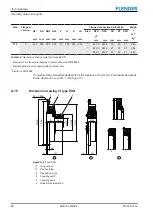
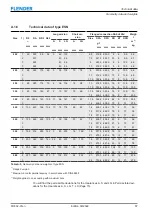
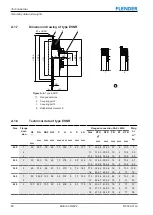
For sizes 680 and 770 of types ESD, ESDR and ESDW, the coupling part 3 (3) is a two-part
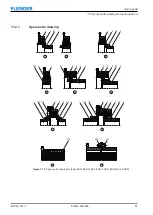
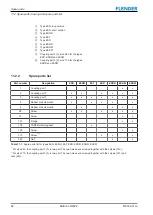
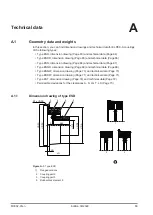
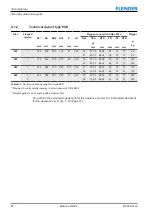
component. You can find an illustration of the designs in the drawings in Geometry data and
weights (Page 63).
Procedure
1. Secure the coupling parts to prevent them from falling.
2. Move the coupled machines apart.
3. For the two-part version, remove the bolt connection (310 or 310 and 320) and remove
the first half of the coupling part 3 (3). Use suitable lifting devices.
4. Remove the bolt connection of coupling part 3 (3) with the mating part and separate the
parts. Use suitable lifting devices.
5. Check the coupling part 3 (3) for damage and protect it against corrosion.
6. Replace damaged parts.
When reinstalling the coupling parts please observe the information in chapters Assembling
(Page 27) and Commissioning (Page 39).
See also
2
Summary of Contents for ELPEX-S
Page 6: ...Table of contents 6 Edition 09 2022 M3302 01en ...
Page 8: ...List of tables 8 Edition 09 2022 M3302 01en ...
Page 10: ...List of figures 10 Edition 09 2022 M3302 01en ...
Page 14: ...Introduction 1 4 Copyright 14 Edition 09 2022 M3302 01en ...
Page 22: ...Description 22 Edition 09 2022 M3302 01en Structure ...
Page 38: ...Assembling 5 3 Aligning the coupling 38 Edition 09 2022 M3302 01en ...
Page 40: ...Commissioning 40 Edition 09 2022 M3302 01en ...
Page 46: ...Operation 7 2 Fault causes and correction 46 Edition 09 2022 M3302 01en ...
Page 56: ...Service and support 9 1 Contact 56 Edition 09 2022 M3302 01en ...

