background image

Spare parts

11.2 Spare parts drawing and spare parts list

60

Edition 09/2022

M3600-02en

11.2.2

Types RFN and RFS

11.2 Spare parts drawing and spare parts list

Figure 11-3: 

Replacement parts drawing for RFN and RFS types

Types RFN and RFS

Bolt connection for coupling sizes 105 to
400

Bolt connection for coupling sizes 450 to
630

Bolt connection for coupling sizes 710 to
800

Information

Arrangement of the buffers

The buffers (5) are arranged on one side in the coupling part 1 (1) up to coupling size 360.
With coupling size 400 or larger, the buffers (5) are arranged alternately in coupling
part 1 (1) and coupling part 20 (20).

Part number

Designation

1

Coupling part 1

4

Bolt

5

Buffer

6

Washer

7

Hexagon nut, self-locking

8

Washer

11

Hexagon head screw

12

Locking ring

Summary of Contents for RUPEX

Page 1: ...RWN RWS RFN RFS Assembly and operating instructions M3600 02en Edition 09 2022 RUPEX ...

Page 2: ...Original assembly and operating instructions M3600 02 Edition 09 2022 Copyright 2022 Flender GmbH V5 20 10 2022 09 30 12 ...

Page 3: ...torage of the coupling 23 5 Assembly 25 5 1 Preparatory work 25 5 1 1 Milling the finished bore 26 5 1 2 Milling the parallel keyway 27 5 1 3 Machining an axial locking mechanism 27 5 1 4 Balancing the coupling 29 5 2 Assembling the coupling 30 5 2 1 Assembling coupling parts with shaft and hub connected by a parallel key 30 5 2 2 Assembling coupling parts with shaft and hub connected by a pressur...

Page 4: ...placing wearing parts 45 8 3 1 Replacing buffers 5 up to coupling size 400 45 8 3 2 Replacing buffers 5 as of coupling size 450 to 630 46 8 3 3 Replacing buffers 5 as of coupling size 710 46 8 3 3 1 Replacing buffers 5 without removing the bolts 4 46 8 3 3 2 Replacing buffers 5 with removal of the bolts 4 47 8 3 4 Pressing out bolts 47 8 3 4 1 Pressing out bolts 4 with the demounting box 47 8 3 4 ...

Page 5: ... and weights 63 A 1 1 RWN type 63 A 1 2 RWS type 66 A 1 3 RFN type 68 A 1 4 RFS type 70 A 2 Shaft misalignment values during operation 71 A 3 Tightening torques and widths A F 72 A 3 1 Bolt connection 72 A 3 2 Coupling part 20 to the mating part 73 A 4 Tightening procedure 74 A 5 Buffers 5 74 A 5 1 Use and storage of the buffers 5 74 A 5 2 RUPEX buffers 5 75 B Declaration of Conformity 77 B 1 UK D...

Page 6: ...Table of contents 6 Edition 09 2022 M3600 02en ...

Page 7: ...f faults 38 Table 8 1 Maintenance intervals 43 Table 8 2 Maximum permissible torsional backlash for the types RWN RWS and RFN RFS sizes 105 500 44 Table 8 3 Maximum permissible torsional backlash for the types RWN RWS and RFN RFS sizes 560 2 000 44 Table 11 1 Spare parts list for types RWN and RWS 58 Table 11 2 Spare parts list for types RFN and RFS 60 Table A 1 Speed geometry data and weights for...

Page 8: ...List of tables 8 Edition 09 2022 M3600 02en ...

Page 9: ... 5 3 Position of the balancing bore for two plane balancing 30 Figure 5 4 Possible misalignment 33 Figure 8 1 Markings for calculating the torsional backlash 44 Figure 11 1 Replacement parts drawing for RWN and RWS types 58 Figure 11 2 Screw plug 59 Figure 11 3 Replacement parts drawing for RFN and RFS types 60 Figure 11 4 Screw plug 61 Figure A 1 Dimension drawing RWN type 63 Figure A 2 Dimension...

Page 10: ...List of figures 10 Edition 09 2022 M3600 02en ...

Page 11: ...cal injury will occur if the relevant precautionary meas ures are not taken WARNING means that death or severe physical injury may occur if the relevant precautionary meas ures are not taken CAUTION means that mild physical injury may occur if the relevant precautionary measures are not taken NOTICE means that damage to property may occur if the relevant precautionary measures are not taken If mul...

Page 12: ...d documentation must be followed Trademarks All designations marked with the trademark symbol are registered trademarks of Flender GmbH Other designations in this document may be trademarks whose use by third parties for their own purposes may violate the rights of the owner Liability disclaimer We have assessed the contents of these instructions for compliance with the hardware and software descr...

Page 13: ...ash is used for lists at the second level 1 Numbers in brackets are part numbers 1 4 Copyright1 4 Copyright The copyright for these instructions is held by Flender These instructions must not be used wholly or in parts without our authorisation or be given to third parties If you have any technical queries please contact our factory or one of our service outlets refer to Service and support Page 5...

Page 14: ...Introduction 1 4 Copyright 14 Edition 09 2022 M3600 02en ...

Page 15: ... damage or personal injury Flender does not accept any liability for damage or operating fail ures that are due to non adherence to these instructions State of the art The coupling described here has been designed in consideration of the latest findings for de manding technical requirements This coupling is state of the art at the time of printing these instructions In the interest of further deve...

Page 16: ...he relevant occupational safety and environmental protection regulations must be complied with at all times during transport assembly installation dismantling operation and mainten ance of the coupling Only qualified personnel may operate assemble maintain and repair the coupling Informa tion about qualified personnel can be found in the legal notes at the beginning of these in structions If hoist...

Page 17: ...y or warranty whatsoever for damage occurring as a result of the use of non approved replacement parts The same applies to any accessories that were not supplied by Flender If you have any queries please contact our customer service organisation see Service and support Page 53 2 3 Safety instructions for a coupling for use in potentially explosive atmospheres2 3 Safety instructions for a coupling ...

Page 18: ...the Explosion Protection Directive is suitable for the following conditions of use Equipment group I Category M2 Equipment group II Category 2 and 3 Group of substances G zone 1 and 2 Group of substances D zone 21 and 22 Explosion group IIA IIB and IIC Explosion group IIA and IIB when electrically insulating buffers are used Conditions of use for products with TX marking The maximum ambient temper...

Page 19: ...h EN 80079 36 No build up of electrostatic charges is to be expected with a paint layer thickness of less than 200 μm 2 4 General warning notices2 4 General warning notices DANGER Danger due to bursting of the coupling The coupling may burst if it is not used properly There is a risk of fatal injury from flying fragments If a coupling bursts in an area at risk of explosion then this can result in ...

Page 20: ...ling parts can lead to an explosion in potentially explosive atmospheres Wear suitable protective equipment gloves safety goggles Ensure that the area is not at risk of explosion WARNING Risk of chemical burns due to chemical substances There is a risk of chemical burns when handling aggressive cleaning agents Please observe the manufacturer s information on how to handle cleaning agents and solve...

Page 21: ...ub connection made by a cylindrical or conical bore with parallel key or by a pressurised oil interference fit Types RWN and RWS have two shaft hub connections Types RFN and RFS have one shaft hub connection and a flange Please consult Flender if you want to use a different type of installation Application RUPEX couplings are designed for use in all kinds of machines They are designed to with stan...

Page 22: ... 02en Figure 3 2 Bolt connection Bolt connection for sizes 105 to 400 Bolt connection for sizes 450 to 630 Bolt connection for sizes 710 to 2 000 4 Bolt 5 Buffer 6 Washer 7 Hexagon nut self locking 8 Washer 11 Hexagon bolt 12 Locking ring ...

Page 23: ...d bearing capacity for transport Please observe the symbols applied on the packaging If not specifically contractually agreed otherwise the packaging complies with the HPE Pack aging Directive 7KLV ZD XS UDJLOH HHS GU HHS GU HQWUH RI JUDYLW R QRW XVH KDQG KRRN WWDFK KHUH Figure 4 1 Transport symbols 4 2 Storage of the coupling4 2 Storage of the coupling NOTICE Property damage due to improper stora...

Page 24: ...efully observe the specifications for long term storage 1 You can find the required type of preservative agent in the following table types of pre servative agents for long term storage 2 Remove the elastomer components These must not come into contact with cleaning agents and long term preservative agents 3 Clean the coupling parts 4 Apply the stipulated preservative agent 5 Store the coupling pa...

Page 25: ...mbly sequence Please ensure that there is sufficient space at the assembly location and that the loca tion is tidy and clean in order to be able to assemble and maintain the coupling without any risk If a dimension drawing has been created for the coupling please observe the informa tion it contains as a matter of priority 5 1 Preparatory work5 1 Preparatory work Please consult Flender if you want...

Page 26: ...es with parallel key connection Bore diameter WARNING Danger due to bursting of the coupling If you exceed the maximum diameter of the finished bore then this can cause the coupling to burst in operation There is a risk of fatal injury from flying fragments If a coupling bursts in an area at risk of explosion then this can result in an explosion Adhere to the maximum diameters specified The maximu...

Page 27: ...ding to DIN 6885 1 ISO P9 If you want to mill a parallel keyway that does not correspond to DIN 6885 1 please con sult Flender 5 1 3 Machining an axial locking mechanism5 1 Preparatory work The coupling part is secured by a set screw or an end plate to prevent axial movements Please consult Flender if you want to use an end plate Note the following when using a set screw Diameter and axial positio...

Page 28: ...cket mm Over mm Up to mm 8 30 M6 4 3 30 75 M8 8 4 75 95 M12 25 6 95 110 M16 70 8 110 150 M20 130 10 150 230 M24 230 12 230 640 M30 470 14 Table 5 3 Threaded hole tightening torque and width A F for types RWS and RFS Apply the specified tightening torques as listed in Section Tightening procedure Page 74 Position of the threaded hole with respect to the parallel keyway The threaded hole for the set...

Page 29: ...roperty damage to coupling part 1 1 2 2 or 20 20 If you completely drill through the flange on coupling part 1 1 2 2 or 20 20 then coup ling part 1 1 2 2 or 20 20 is no longer allowed to be used for operation Please observe the stipulations about machining the balancing bore Please note the following when balancing the coupling Select the balancing quality according to the application but at least...

Page 30: ...he shaft end the coupling parts and or the parallel key Note the handling instructions regarding assembly of the coupling parts The procedure for assembling the coupling parts varies depending on the selected shaft hub connection Assembling coupling parts with shaft and hub connected by a parallel key Page 30 Assembling coupling parts with shaft and hub connected by a pressurised oil interfer ence...

Page 31: ...s 5 Page 75 Remove the buffers 5 if ne cessary For further information refer to section Replacing wearing parts Page 45 Pro tect adjacent components against damage and heating to temperatures above 80 C 5 Secure the coupling parts 1 1 and or 2 2 with a set screw or an end plate When se curing with a set screw the shaft must not protrude or be set back from the inner side of the hub 6 Tighten up th...

Page 32: ...pling part 20 20 with types RFN and RFS5 2 Assembling the coupling Procedure 1 Clean the coupling part 20 20 2 Flange mount the coupling part 20 20 on the mating part 3 Tighten the screws to the specified tightening torque TA see section Tightening torques and widths A F Page 72 5 3 Aligning the coupling5 3 Aligning the coupling 5 3 1 Purpose of alignment5 3 Aligning the coupling The shafts that a...

Page 33: ...ssible tolerance range of dimen sion S You can find the values for dimension S in section Speeds geometry data and weights Page 63 5 3 2 2 Angular misalignment5 3 Aligning the coupling Determine the value ΔS ΔS Smax Smin The determined value ΔS may not exceed the value ΔSperm You can find the values for ΔSperm in section Shaft misalignment values during operation Page 71 If required you can calcul...

Page 34: ... 02en 5 3 2 3 Radial misalignment5 3 Aligning the coupling Determine the value ΔKr The determined value ΔKr may not exceed the value ΔKrperm You can find the permissible radial misalignment ΔKrperm in section Shaft misalignment val ues during operation Page 71 ...

Page 35: ...missioning of the coupling The coupling can burst and metal parts can be flung out There is a risk of fatal injury from flying fragments Bursting of the coupling can lead to an explosion in potentially explosive atmospheres Carry out the tests prior to commissioning Do not touch the rotating coupling 1 Check the tightening torques of the screws of the coupling in accordance with section Tightening...

Page 36: ...Commissioning 36 Edition 09 2022 M3600 02en ...

Page 37: ...e atmospheres Switch off the unit at once if any malfunctions occur Note during the maintenance work the possible causes of faults and the notes on recti fying them Proceed as described below if there is a malfunction of the coupling during operation 1 De energise the drive immediately 2 Initiate the required action for repair taking into consideration the applicable safety regu lations If you can...

Page 38: ...s given in section Correcting the changed alignment Page 40 Coupling not suitable for the operating conditions Check the possible causes given in section Unsuitable coupling Page 39 Use a coupling that is suitable for the operating conditions Incorrect assembly of the coupling Check the possible causes given in sections Assembly related causes Page 39 and Specific installation re lated and mainten...

Page 39: ...the coupling was chosen System torque too high and or torque dynamics not permissible System speed too high Application factor not selected correctly Chemically aggressive environment not taken into consideration Coupling not suitable for the ambient temperature Diameter and or assigned fit of the finished bore not permissible Width across corners of the parallel keyways greater than the width acr...

Page 40: ...not heeded Stipulated tightening torques not adhered to Alignment and or shaft misalignment values not set in accordance with the instructions 7 2 2 2 4 Specific installation related and maintenance related causes7 2 Faults causes and rectification Buffers 5 not fitted Fitted buffers 5 heated up excessively when applying heat to the coupling parts Buffers 5 of different types or age are used Buffe...

Page 41: ...2en Edition 09 2022 41 Procedure 1 Correct the cause for the change in alignment 2 Check the wearing parts for wear and replace them as required 3 Check the locking elements that prevent axial movements and correct these as required 4 Realign the coupling ...

Page 42: ...Operation 7 2 Faults causes and rectification 42 Edition 09 2022 M3600 02en ...

Page 43: ...of the coupling can lead to an explosion in potentially explosive atmospheres Note also the actual wear of the elastomer components WARNING Physical injury Injury from rotating parts Only carry out work on the coupling when it is not moving Secure the drive unit against being operated accidentally Attach a notice to the switch stating clearly that work is being carried out on the coup ling Before ...

Page 44: ...site direction up to the stop The markings on both halves will then move apart The distance between the markings corresponds to the torsional backlash ෙ 6 9 Figure 8 1 Markings for calculating the torsional backlash Size 105 125 144 162 198 228 252 285 320 360 400 450 500 Maximum permissible torsional backlash ΔSV mm 3 0 3 5 4 0 4 5 6 0 7 0 8 5 Table 8 2 Maximum permissible torsional backlash for ...

Page 45: ... Replacing buffers 5 as of coupling size 450 to 630 Page 46 Replacing buffers 5 as of coupling size 710 Page 46 8 3 1 Replacing buffers 5 up to coupling size 4008 3 Replacing wearing parts Procedure 1 Remove the hexagon nuts 7 2 Remove the bolts 4 with the washers 6 and the buffers 5 through the buffer fitting holes 3 Pull the buffers 5 off the bolts 4 4 Clean the bolts 4 the washers 6 the buffer ...

Page 46: ...ge of the buffers 5 Page 74 when replacing the buffers 5 6 Insert the bolts 4 with the washers 6 and the buffers 5 through the buffer fitting holes into the bolt fitting holes Observe any markings that might be provided 7 Push the washers 8 onto the screws 11 8 Apply a small quantity of liquid screw locking agent e g Loctite 243 medium strength to the screws 11 9 Secure the bolts 4 with the screws...

Page 47: ...or 20 20 If old bolts 4 are to be reused the tapped holes and cross bores must be completely free of any residues of grease or liquid screw locking agent 5 Mount new buffers 5 on the bolts 4 Please observe the information in section Use and storage of the buffers 5 Page 74 when replacing the buffers 5 6 Secure the buffers 5 with the washers 6 and the locking rings 12 7 Insert the bolts 4 with the ...

Page 48: ...w 11 or washer 8 WARNING Risk of injury When you are pressing out the bolts 4 grease can escape under high pressure If bolt 4 suddenly works loose fragments can become detached and fly through the air at high speed Wear safety goggles Procedure 1 Remove the hexagon head screws 11 and the washers 8 2 Clean the tapped holes of the bolts 4 until they are free of all residues 3 Fill the tapped hole of...

Page 49: ...2 or 20 20 8 4 Removing coupling part 1 1 2 2 or 20 20 The procedure to be followed depends on the existing shaft hub connection or the flange connection Removing coupling part 1 1 or 2 2 with shaft and hub connected by a parallel key Page 49 Removing coupling part 1 1 or 2 2 with shaft and hub connected by a pressurised oil interference fit Page 50 Removing coupling part 20 20 with flange connect...

Page 50: ... can burst There is a risk of fatal injury from flying fragments Bursting of the coupling can lead to an explosion in potentially explosive atmospheres Do not exceed the maximum oil pressure specified in the dimension drawing Keep the oil pressure constant in all oil channels during the entire procedure DANGER Danger as a result of improper handling of fixtures and pumps Failure to handle fixtures...

Page 51: ...linder with oil pump Note displacement and pressure of the hydraulic cylin der Refer to the dimension drawing for the required axial force Procedure 1 Move the coupled machines apart 2 Remove the buffers 5 For further information refer to section Replacing wearing parts Page 45 3 Use a suitable pulling fixture 4 Secure the coupling part 1 1 or 2 2 and the pulling fixture in position to prevent the...

Page 52: ...damaged parts When reinstalling the coupling parts please observe the information in chapters Assembly Page 25 and Commissioning Page 35 8 4 3 Removing coupling part 20 20 with flange connection8 4 Removing coupling part 1 1 2 2 or 20 20 Procedure 1 Move the coupled machines apart 2 Secure the coupling parts to prevent them from falling 3 Remove the bolt connection from coupling part 20 20 with th...

Page 53: ...ou have any technical queries contact our factory or one of our Customer Service addresses Flender GmbH Schlavenhorst 100 46395 Bocholt Germany Tel 49 0 2871 92 0 Fax 49 0 2871 92 2596 Flender GmbH http www flender com More information Further information about service and support can be found on the Internet Service Support https www flender com service ...

Page 54: ...Service and support 9 1 Contact 54 Edition 09 2022 M3600 02en ...

Page 55: ...M3600 02en Edition 09 2022 55 Disposal 10 Disposal of the coupling Dispose of the coupling parts according to applicable national regulations or recycle them ...

Page 56: ...Disposal 56 Edition 09 2022 M3600 02en ...

Page 57: ... 58 You can find our contact data for ordering replacement parts at Service and support Page 53 Information required when ordering replacement parts Flender order number with item Flender drawing number Coupling type and size Part number refer to Spare parts drawing and spare parts list Page 58 Dimensions of the replacement part for example Bore Bore tolerance Parallel keyway and balancing Special...

Page 58: ...Types RWN and RWS Bolt connection for coupling sizes 105 to 400 Bolt connection for coupling sizes 450 to 630 Bolt connection for coupling sizes 710 to 2 000 Information Arrangement of the buffers The buffers 5 are arranged on one side in the coupling part 1 1 up to coupling size 360 With coupling size 400 or larger the buffers 5 are arranged alternately in coupling part 1 1 and coupling part 2 2 ...

Page 59: ...09 2022 59 Part number Designation 8 Washer 11 Hexagon head screw 12 Locking ring 101 Screw plug 1 201 Screw plug 1 Table 11 1 Spare parts list for types RWN and RWS 1 Screw plugs 101 201 are only used in combination with a pressurised oil interference fit Figure 11 2 Screw plug ...

Page 60: ...400 Bolt connection for coupling sizes 450 to 630 Bolt connection for coupling sizes 710 to 800 Information Arrangement of the buffers The buffers 5 are arranged on one side in the coupling part 1 1 up to coupling size 360 With coupling size 400 or larger the buffers 5 are arranged alternately in coupling part 1 1 and coupling part 20 20 Part number Designation 1 Coupling part 1 4 Bolt 5 Buffer 6 ...

Page 61: ...list M3600 02en Edition 09 2022 61 Part number Designation 20 Coupling part 20 101 Screw plug 1 Table 11 2 Spare parts list for types RFN and RFS 1 Screw plugs 101 are only used in combination with a pressurised oil interference fit Figure 11 4 Screw plug ...

Page 62: ...Spare parts 11 2 Spare parts drawing and spare parts list 62 Edition 09 2022 M3600 02en ...

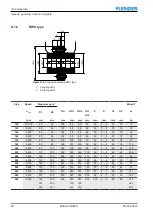
Page 63: ...70 A 1 1 RWN typeSpeeds geometry data and weights 8 ෘ 6 3 8 ෘ1 ෘ ෘ1 1 1 ෘ Figure A 1 Dimension drawing RWN type 1 Coupling part 1 2 Coupling part 2 Size Speed nmax rpm Maximum bore 1 DA mm ND1 mm ND2 mm NL1 NL2 mm P mm S mm U1 mm U2 mm Weight 2 m kg D1 mm D2 mm 105 7 000 35 42 105 53 59 45 30 2 4 13 12 1 8 125 6 000 42 48 125 65 68 50 35 2 4 16 15 3 2 144 5 250 48 60 144 76 84 55 35 2 4 16 15 4 2 ...

Page 64: ...90 4 7 52 52 192 560 1 500 140 180 200 140 180 200 560 250 300 320 250 300 320 220 120 4 8 68 68 280 290 295 630 1 280 140 180 220 140 180 220 630 250 300 355 250 300 355 240 120 4 8 68 68 345 370 400 710 1 150 160 200 240 160 200 240 710 290 330 385 290 330 385 260 140 5 9 80 80 510 515 540 800 1 000 180 220 260 180 220 260 800 320 360 420 320 360 420 290 140 5 9 80 80 670 690 730 900 900 220 260...

Page 65: ... 380 440 480 320 380 440 480 1 600 565 625 720 770 565 625 720 770 540 210 6 12 120 120 3 780 3 870 4 150 4 290 1 800 450 380 440 500 540 380 440 500 540 1 800 660 720 820 870 660 720 820 870 600 240 8 16 140 140 5 550 5 630 6 000 6 250 2 000 400 440 500 560 600 440 500 560 600 2 000 760 820 920 960 760 820 920 960 660 240 8 16 140 140 6 800 7 000 7 350 7 620 Table A 1 Speed geometry data and weig...

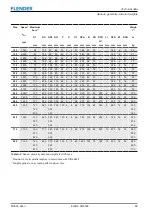
Page 66: ...55 35 2 4 16 15 4 3 162 6 900 60 65 162 85 92 60 40 2 5 20 18 6 5 178 6 300 75 80 178 102 108 70 40 2 5 20 18 9 1 198 5 600 90 95 198 120 128 80 40 2 5 20 18 11 2 228 4 900 95 100 228 129 140 90 50 2 5 26 24 17 5 252 4 400 110 120 252 150 160 100 50 2 5 26 24 23 6 285 3 900 120 130 285 164 175 110 60 3 6 32 30 36 320 3 500 130 140 320 180 192 125 60 3 6 32 30 50 360 3 100 145 150 360 200 210 140 7...

Page 67: ...0 340 900 320 360 425 465 320 360 425 465 320 160 5 10 90 90 907 933 1 000 948 1 000 1 100 230 260 300 380 230 260 300 380 1 000 355 395 460 515 355 395 460 515 350 160 5 10 90 90 1 170 1 208 1 290 1 220 1 120 1 000 240 270 330 410 240 270 330 410 1 120 360 410 495 560 360 410 495 560 380 180 6 11 100 100 1 560 1 660 1 730 1 720 1 250 900 270 300 360 440 270 300 360 440 1 250 410 460 540 610 410 4...

Page 68: ... 8 16 140 140 6 230 6 460 6 770 6 390 2 000 550 500 540 610 710 500 540 610 710 2 000 760 820 920 960 760 820 920 960 660 240 8 16 140 140 8 140 8 430 8 860 8 280 Table A 2 Speed geometry data and weights for RWS type 1 Maximum bore for parallel keyway in accordance with DIN 6885 1 2 Weight applies to one coupling with maximum bore A 1 3 RFN typeSpeeds geometry data and weights ෘ ෘ 3 8 ෘ1 ෘ 1 6 ෘ ...

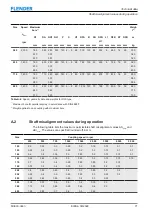
Page 69: ...10 60 3 6 32 380 51 22 348 9 18 37 320 2350 120 320 180 125 60 3 6 32 430 51 25 390 9 22 48 360 2100 130 360 200 140 75 3 6 42 480 66 25 440 10 22 74 400 2050 150 400 230 160 75 3 6 42 520 70 50 380 4 480 10 22 122 450 1 800 170 450 260 180 90 4 7 52 575 80 45 428 6 528 12 26 166 500 1 600 190 500 290 200 90 4 7 52 620 80 45 475 6 570 12 26 200 560 1 500 140 180 200 560 250 300 320 220 120 4 8 68 ...

Page 70: ...00 55 144 76 55 35 2 4 16 200 28 13 180 7 11 4 8 162 6900 60 162 85 60 40 2 5 20 220 34 13 200 8 11 7 1 178 6300 75 178 102 70 40 2 5 20 248 34 16 224 8 14 10 198 5600 90 198 120 80 40 2 5 20 274 34 16 250 8 14 12 228 4900 95 228 129 90 50 2 5 26 314 42 20 282 8 18 19 252 4400 110 252 150 100 50 2 5 26 344 42 20 312 8 18 24 285 3900 120 285 164 110 60 3 6 32 380 51 22 348 9 18 36 320 3500 130 320 ...

Page 71: ...for parallel keyway in accordance with DIN 6885 1 2 Weight applies to one coupling with maximum bore A 2 Shaft misalignment values during operationShaft misalignment values during operation The following table lists the maximum permissible shaft misalignment values ΔSperm and ΔKrperm The values are specified rounded off in mm Size Coupling speed in rpm 250 500 750 1 000 1 500 2 000 3 000 4 000 5 0...

Page 72: ...e shaft misalignment values during operation You can calculate the numerical values in the table and their intermediate values as follows ΔKrperm ΔSperm 0 1 DA 1 000 40 n Coupling speed n in rpm DA in mm see Speeds geometry data and weights Page 63 Radial misalignment ΔKrperm in mm The values in column 250 rpm of the table above apply for speeds of 250 rpm A 3 Tightening torques and widths A FTigh...

Page 73: ...4 500 180 24 560 340 30 630 340 30 710 580 36 800 580 36 900 600 36 1 000 600 36 1 120 1 150 46 1 250 1 150 46 1 400 1 150 46 1 600 1 150 46 1 800 2 000 55 2 000 2 000 55 Table A 6 Tightening torques and widths A F of bolt connection A 3 2 Coupling part 20 to the mating partTightening torques and widths A F Size Bolt size Tightening torque TA Nm 105 M8 25 125 M10 49 144 M10 49 162 M10 49 178 M12 8...

Page 74: ...draulic tightening with mechanical screwdriver Torque controlled tightening with a torque wrench or a torque wrench that gives a signal Tightening with a precision mechanical screwdriver with dynamic torque measurement Table A 8 Tightening procedure The tightening torques apply to screws bolts with untreated surfaces that are not oiled or are only lightly oiled and for screws bolts that are used w...

Page 75: ...fting of the resonant speed rated torque reduced Black buffer with green dot on front face 30 C to 80 C IIA IIB IIC NBR 90 Shore A Special hard shifting of the resonant speed Black buffer with magenta dot on front face 30 C to 80 C IIA IIB IIC NBR 639 80 Shore A Special electrically insulating Green buffer 30 C to 80 C IIA IIB NR 80 Shore A Special low temperature use Black buffer with white dot o...

Page 76: ...Technical data Buffers 5 76 Edition 09 2022 M3600 02en ...

Page 77: ...n refers to the product mentioned above The object of this declaration described above complies with the statutory requirements Regulations 2016 No 1107 Specification of designated standards or other technical specifications on which the Declaration of Conformity is based EN 1127 1 2019 EN 1127 2 2014 EN ISO 80079 36 2016 EN ISO 80079 37 2016 EN ISO IEC 80079 38 2016 Approved Body DEKRA Certificat...

Page 78: ...Declaration of Conformity UK Declaration of Conformity 78 Edition 09 2022 M3600 02en ...

Page 79: ......

Page 80: ...RUPEX Assembly and operating instructions M3600 02en Edition 09 2022 Flender GmbH Alfred Flender Straße 77 46395 Bocholt Germany ...

Reviews: