background image

PD 2G / DD 2G / ID 1/4"

24

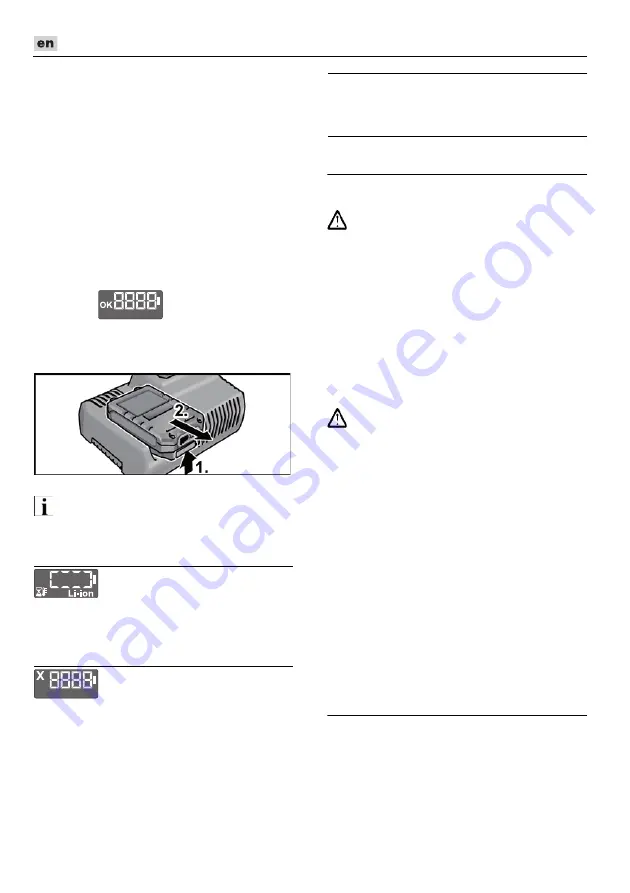
Insert the battery fully into the charger 

until it clicks into place.

– The time remaining in the charging 

process (until the battery is fully 

charged) and a graphic representation 

of the state of charge are shown 

alternately in the display. 

– The display backlighting lights up 

orange when the battery is charged 

less than 80%.

– When the battery charge reaches 80% 

the display lights up green and OK is 

indicated.

The battery is fully charged when the 

display 

 appears. 

The green backlighting goes out after 

a short time.

Remove the battery from the charger.

Pull out the mains plug.

NOTE

If the display flashes after the battery is 

inserted in the charger, there is a fault in the 

battery or in the charger.

Display flashes slowly. 

Backlighting orange.

The battery is too hot or too cold. The 

charging process starts when the battery 

reaches the charging temperature 

(0°C...55°C).

Display flashes rapidly.

Backlighting red.

Remove the battery from the charger and 

insert again. If the same display persists, 

the battery is faulty. Replace the battery or 

have it checked at an authorised repair 

shop.

If this error message is displayed again with 

a different battery, this indicates that there is 

a fault in the charger. Have the charger 

checked at an authorised repair shop. 

Maintenance and care

Cleaning

WARNING!

If metals are worked over a prolonged 

period, electroconductive dust may become 

deposited inside the housing.

Clean the power tool and ventilation slots at 

regular intervals. Frequency of cleaning is 

dependent on the material machined and 

the duration of use.

Regularly blow out the housing interior 

and motor with dry compressed air. Keep 

the power tool running while doing this.

Charger

WARNING!

Before performing any work, pull out 

the mains plug. Do not use water or liquid 

detergents.

Remove dirt and dust from the housing 

with a brush or a dry cloth.

Repairs

Repairs may be carried out by an authorised 

customer service centre only.

Spare parts and accessories

For other accessories, in particular cutting 

accessories, please refer to the 

manufacturer’s catalogues.
Exploded drawings and spare-part lists can 

be found on our homepage: 

www.flex-tools.com

Transport

The lithium equivalent content of the batteries 

contained in the scope of delivery is below the 

relevant limit values. Therefore the battery as 

a separate component and the power tool with 

its scope of delivery are not subject to national 

or international dangerous goods regulations.

Summary of Contents for DD 2G 18.0

Page 1: ...PD 2G 18 0 DD 2G 18 0 ID 1 4 18 0...

Page 2: ...i o originais 65 Originele gebruiksaanwijzing 78 Originale driftsvejledning 91 Originale driftsanvisningen 102 Originalbruksanvisning 113 Alkuper inen k ytt ohjekirja 124 135 Instrukcja oryginalna 148...

Page 3: ...aussetzen Elektrowerkzeug und Akkus in trockenen R umen lagern Entsorgungshinweise siehe Seite 14 Zu Ihrer Sicherheit WARNUNG Lesen Sie alle Sicherheitshinweise und An weisungen Vers umnisse bei der...

Page 4: ...nete Suchger te um verborgene Versorgungsleitungen aufzusp ren oder ziehen Sie die rtliche Versorgungsgesellschaft hinzu Kontakt mit Elektroleitungen kann zu Feuer und elektrischem Schlag f hren Besch...

Page 5: ...ngen sowie Sachsch den durch explodierende Akkus Laden Sie die Akkus nur mit Ladeger ten auf die vom Hersteller empfohlen werden Durch ein Ladeger t das f r eine be stimmte Art von Akkus geeignet ist...

Page 6: ...rbeitsabl ufe VORSICHT Bei einem Schalldruck ber 85 dB A Geh rschutz tragen Technische Daten Ger t PD 2G 18 0 DD 2G 18 0 ID 1 4 18 0 Typ Schlagbohr schrauber Bohr schrauber Schlag schrauber Akku AP 18...

Page 7: ...ngspegel dB A 83 69 86 Unsicherheit K db 3 Schwingungsgesamtwerte Vektorsumme dreier Richtungen Schwingungsemissionswert ah beim Bohren in Metall m s2 2 8 2 8 Schlagbohren in Beton m s2 13 Schrauben m...

Page 8: ...Drehring f r Betriebsart 5 Drehring f r Drehmomenteinstellung 6 Schnellspannbohrfutter 7 Arbeitsplatzbeleuchtung 8 Handgriff 9 Einschubschacht f r Akku 10 Zusatzhandgriff 11 Werkzeugaufnahme Innensec...

Page 9: ...zeug mitgeliefert werden Der Verlust der Kontrolle kann zu Verletzungen f hren Akku einsetzen wechseln Geladenen Akku bis zum vollst ndigen Einrasten in das Elektrowerkzeug eindr cken Zum Entnehmen di...

Page 10: ...eug Betriebsart nur PD 2G 18 0 VORSICHT Betriebsart nur bei Stillstand des Elektrowerkzeugs ndern Drehring f r Betriebsart auf die ben tigte Position stellen Bohren Schrauben Schlagbohren Drehmomentvo...

Page 11: ...n Drehrichtungsvorwahl Schalter auf die ben tigte Position links rechts stellen Probelauf durchf hren um die zentri sche Einspannung der Werkzeuge zu pr fen Werkzeugaufnahme ID 1 4 18 0 HINWEIS In der...

Page 12: ...0 8 2 5 Ah AP 18 0 2 5 Ah AP 10 8 5 0 Ah und AP 18 0 5 0 Ah Hinweise f r eine lange Akku Lebensdauer VORSICHT Akkus niemals bei Temperaturen unter 0 C bzw ber 55 C laden Akkus nicht in Umgebung mit ho...

Page 13: ...adetemperatur 0 C 55 C erreicht hat beginnt der Ladevorgang Display blinkt schnell Hintergundbeleuchtung rot Akku aus dem Ladeger t entnehmen und wieder einsetzen Bei gleicher Anzeige ist der Akku def...

Page 14: ...Steinheim Murr 07 12 2015 FLEX Elektrowerkzeuge GmbH Bahnhofstrasse 15 D 71711 Steinheim Murr Entsorgungshinweise WARNUNG Ausgediente Ger te durch Entfernen des Netzkabels unbrauchbar machen Nur f r E...

Page 15: ...doors Do not expose the tool to rain Store power tools and batteries in dry rooms Disposal information see page 25 Important safety information WARNING Read all the safety instructions and general ins...

Page 16: ...damage to property Switch off the power tool immediately when the cutting accessory jams Be prepared for high reaction torques which cause kickback The cutting accessory jams when the power tool is ov...

Page 17: ...ction preselector switch 2 or torque setting turning dial 5 only when the tool is stopped Identify the power tool with stickers only Do not drill any holes into the housing Noise and vibration The noi...

Page 18: ...rpm 0 4940 0 21450 0 3200 Chuck mm 1 5 13 Tool holder 1 4 Machine screw diameter M6 M14 Max screw diameter 13 Max drill diameter in wood in steel in masonry mm mm mm 60 13 13 60 13 Weight according to...

Page 19: ...switch 4 Turning dial for operating mode 5 Turning dial for torque setting 6 Keyless chuck 7 Workplace lighting 8 Handle 9 Insertion slot for battery 10 Auxiliary handle 11 Tool holder hexagon socket...

Page 20: ...tool The loss of control may result in injuries Inserting replacing the battery Press the charged battery into the power tool until it clicks into place To remove press the release button 1 and pull o...

Page 21: ...ting mode PD 2G 18 0 only CAUTION Change the operating mode only when the power tool is stopped Move the operating mode turning dial to the required position Drilling Screwing Impact drilling Torque p...

Page 22: ...centre Tool holder ID 1 4 18 0 NOTE screwdriver bits and bit holders are securely held in the tool holder Pull the tool arrester forwards and press the tool in as far as it will go Release the tool a...

Page 23: ...fe CAUTION Never charge batteries at temperatures below 0 C or above 55 C Do not charge batteries in environments with high air humidity or ambient temperature Do not cover batteries and the charger d...

Page 24: ...played again with a different battery this indicates that there is a fault in the charger Have the charger checked at an authorised repair shop Maintenance and care Cleaning WARNING If metals are work...

Page 25: ...ropean Directive 2012 19 EC on Waste Electrical and Electronic Equipment and its incorporation into national law used power tools must be collected separately and recycled in an environmentally friend...

Page 26: ...423 254 12 2015 F r Druckfehler keine Gew hr Technische nderungen vorbehalten...

Reviews: