background image

PE 8-4 80

6

Wear personal protective equipment. 

Depending on the application, wear full 

face protection, eye protection or goggles. 

If appropriate, wear a dust mask, hearing 

protection, protective gloves and/or 

a special apron which protect you from 

small material particles. You should protect 

your eyes from foreign objects which are 

ejected for different applications. Dust and 

respirator masks must filter the dust which 

is generated by the power tool for the 

particular application. If you are exposed to 

loud noise for a prolonged period, you may 

suffer hearing loss.

Ensure that other persons are situated 

at a safe distance from the work area. 

Anyone who enters the work area must 

wear personal protective equipment. 

Fragments of the workpiece or broken 

insertion tools may fly off and cause injuries 

even outside the direct working area.

If the insertion tool is at risk of coming into 

contact with concealed power cables or the 

power cord itself, hold the power tool by the 

insulated grip surfaces only. Contact with a 

live cable may also cause metal parts of 

the appliance to become live and result in 

an electric shock.

Keep the power cord away from rotating 

insertion tools. If you lose control of the 

appliance, the power cord could be 

severed or become caught and your hand 

or arm may strike the rotating insertion tool.

Never put down the electric power tool until 

the insertion tool has come to a standstill. 

The rotating insertion tool may come into 

contact with the support surface, possibly 

resulting in you losing control of the electric 

power tool.

Never leave the electric power tool running 

while you are carrying it. Your clothing may 

become caught by accidental contact with 

the rotating insertion tool which may then 

drill into your body.

Regularly clean the ventilation slots on 

your electric power tool. The motor fan 

draws dust into the housing; a large build-

up of metal dust may cause electrical 

hazards.

Never use the electric power tool near 

combustible materials. Sparks may ignite 

these materials.

Never use insertion tools which require 

liquid coolants. The use of water or other 

liquid coolants may result in electric shock.

Do not allow any loose parts of the 

polishing hood, in particular fixing cords. 

Stow or shorten the fixing cords. Loose, 

entrained fixing cords may trap your fingers 

or become entangled in the workpiece.

Some dust created by power sanding, 

sawing, grinding, drilling and other 

construction activities contains chemicals 

known to the State of California to cause 

cancer, birth defects or other reproductive 

harm. Some examples of these chemicals 

are:

– Lead from lead-based paints. 

– Crystalline silica from bricks, cement, 

and other masonry products. 

– Arsenic and chromium from chemically-

treated lumber. 

Your risk from these exposures varies, 

depending upon how often you do this type 

of work. To reduce your exposure to these 

chemicals: 

– Work in a well-ventilated area.

– Work with approved safety equipment, 

such as dust masks that are specially 

designed to filter out microscopic 

particles.

– Avoid prolonged contact with dust from 

power sanding, sawing, grinding, 

drilling, and other construction activities. 

Wear protective clothing and wash 

exposed areas with soap and water. 

Allowing dust to get into your mouth or 

eyes or to lie on the skin may promote 

absorption of harmful chemicals.

Recoil and appropriate safety 

instructions

Recoil is the sudden reaction caused by 

a rotating insertion tool which sticks or is 

blocked. A rotating insertion tool which 

sticks or is blocked stops abruptly. As a 

result, an uncontrolled electric power tool is 

accelerated against the direction of rotation 

of the insertion tool at the blocking point.
A recoil occurs if the electric power tool is 

used incorrectly or improperly. A recoil can 

Summary of Contents for PE 8-4 80

Page 1: ...PE 8 4 80 ...

Page 2: ...Instruction manual 3 Notice d utilisation 12 Instrucciones de funcionamiento 22 ...

Page 3: ...dangerous situation Non observance of this warning may result in slight injury or damage to property NOTE Denotes application tips and important information Symbols on the power tool Before switching on the power tool read the operating manual Wear goggles Double insulation for safer operation see page 7 V volts alternating current Hz hertz A amperes n maximum speed no no load speed min revolution...

Page 4: ...le the tool is changed 3 Gear head With air outlet and direction of rotation arrow 4 Switch rocker For switching on and off With notched position for continuous operation 5 Power cord with plug 6 Dial for preselecting the speed 7 Rating plate 8 Side handle 9 Handle cover ...

Page 5: ...t observe the following instructions an electric shock fire and or serious injuries may occur This electric power tool is not suitable for grinding sanding for use with wire brushes or for cut off grinding If the electric power tool is not used as intended the user may be exposed to hazards and may be injured Never use accessories which the manufacturer did not intend or recommend especially for t...

Page 6: ... ventilation slots on your electric power tool The motor fan draws dust into the housing a large build up of metal dust may cause electrical hazards Never use the electric power tool near combustible materials Sparks may ignite these materials Never use insertion tools which require liquid coolants The use of water or other liquid coolants may result in electric shock Do not allow any loose parts ...

Page 7: ...Therefore either the symbol or the words Double insulation appear on the power tool or on the nameplate Although this system has no external grounding you must still follow the normal electrical safety precautions given in this Instruction Manual including not using the power tool in wet environments To keep the double insulation system effective follow these precautions Only FLEX AUTHORIZED SERVI...

Page 8: ... the accessories keep the hands warm organisation of work patterns CAUTION Wear ear protection at a sound pressure above 85 dB A Operating instructions WARNING Before carrying out any work on the polisher always pull out the mains plug Before switching on the power tool Unpack the polisher and check that there are no missing or damaged parts Attach handle cover Loosen screws or handle Push on hand...

Page 9: ... undamaged polishing tools only Carry out a test run to check that the tool is clamped in the centre Operating instructions NOTE When the power tool is switched off the tool continues running briefly If using a polishing paste use the respective tool for each paste In the case of sensitive surfaces e g car paint do not work aggressively but at low speeds and with low contact pressure Sponges can b...

Page 10: ...rmation WARNING Render redundant power tools unusable by removing the power cord NOTE Please ask your dealer about disposal options for redundant power tools Guarantee FLEX North America limited one year Warranty FLEX North America warrants its Professional Power Tools for a period of one year from the date of original purchase We will repair or replace at our option any part or parts of the produ...

Page 11: ...ations on how long an implied warranty lasts or the exclusion or limitation of incidental or consequential damages so the above limitation or exclusion may not apply to you This warranty gives you specific legal rights and you may also have other legal rights which vary from state to state ...

Page 12: ...euse Si vous ne respectez pas cette consigne vous risquez de vous blesser ou de causer des dégâts matériels REMARQUE Ce symbole vous donne des conseils d utilisation et des informations importantes Symboles apposés sur l appareil Avant la mise en service veuillez lire la notice d instructions Portez des lunettes de protection Double isolation pour un fonctionnement plus sûr voir page 16 V volts co...

Page 13: ...nt d outil 3 Boîte d engrenages Avec sortie d air et flèche directionnelle 4 Interrupteur à bascule Pour allumer et éteindre Avec position encrantée pour la marche permanente 5 Cordon d alimentation électrique terminé par une fiche mâle 6 Molette de préréglage de la vitesse 7 Plaque signalétique 8 Poignée latérale 9 Capot à poignée ...

Page 14: ...t et instructions ne sont pas correctement respectées cela engendre un risque d électrocution d incendie et ou de blessures graves Veuillez conserver toutes les consignes de sécurité et instruc tions dans un endroit sûr pour pouvoir les reconsulter ultérieurement Cet outil électroportatif est à utiliser comme polisseuse Veuillez respecter toutes les consignes de sécurité instructions illustrations...

Page 15: ...outil installé brisé peuvent être catapultés et provoquer des blessures aussi hors de la zone de travail immédiate Ne tenez l appareil que par ses poignées isolantes lors de travaux au cours desquels l outil installé risque de toucher des câbles électriques invisibles ou le cordon d alimentation de la ponceuse Le contact avec une ligne électrique peut mettre les pièces métalliques sous tension et ...

Page 16: ...roportatif non fermement tenue subit une accélération en sens opposé de celui de l outil installé Le recul brutal est engendré par une utilisation erronée ou inexperte de la ponceuse électroportative Il est possible de l empêcher en prenant les mesures de précaution ci après décrites Tenez fermement l outil électroportatif et placez votre corps et vos bras dans une position qui vous permettra d ab...

Page 17: ...EN 60745 Le niveau de bruit évalué en décibels A s élève typiquement à Niveau de pression acoustique 84 dB A Niveau de puissance sonore 97 dB A Marge d incertitude K 3 dB Valeur totale de vibration lors du ponçage de surfaces peintes Valeur émissive ah 4 7 m s2 Marge d incertitude K 1 5 m s2 PRUDENCE Les valeurs de mesure indiquées s appliquent aux appareils neufs Pendant la mise en œuvre quotidie...

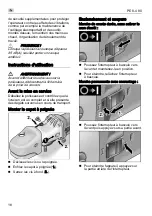
Page 18: ...de la prise de courant Avant la mise en service Déballez la polisseuse et contrôlez que la livraison est au complet et si elle présente des dégâts survenus en cours de transport Monter le capot à poignée Dévissez les vis ou la poignée Enfilez le capot à poignée 1 Serrez les vis à fond 2 Enclenchement et coupure Marche de courte durée sans activer le cran d arrêt Poussez l interrupteur à bascule ve...

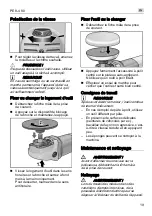
Page 19: ...nchez la fiche mâle de la prise de courant Appuyez fermement l accessoire à polir centré sur le plateau auto agrippant N utilisez qu un outil à polir intact Effectuez un essai de marche pour vérifier que l outil est serré bien centré Consignes de travail REMARQUE Après avoir éteint le moteur l outil continue de tourner brièvement En cas d emploi de pâte à polir utilisez un outil différent par pâte...

Page 20: ...telier de SAV agréé par le fabricant Pièces de rechange et accessoires Pour connaître les autres accessoires et notamment les outils et moyens auxiliaires de polissage reportez vous s v p aux catalogues du fabricant Vous trouverez des vues éclatées et des listes de pièces de rechange sur notre site Web www flex tools com Consignes pour la mise au rebut AVERTISSEMENT Lorsque les appareils ont fini ...

Page 21: ...LEX NORTH AMERICA SOUS CETTE GARANTIE OU TOUTE GARANTIE IMPLICITE DE PLUS EN AUCUN TEMPS FLEX NORTH AMERICA NE SERA TENU POUR RESPONSABLE POUR TOUTE PERTE OU DOMMAGE ACCESSOIRES OU CONSÉQUENTS QUELLE QU EN SOIT LEUR NATURE Certains états ne permettent pas des restric tions à la durée d une garantie implicite ou à l exclusion ou la restriction des dommages accessoires ou conséquents par consé quent...

Page 22: ... El incumplimiento implica el peligro de lesiones o daños materiales NOTA Indica consejos para el uso e informaciones importantes Símbolos en el aparato Leer las instrucciones antes de poner en funcionamiento el equipo Utilizar protección para la vista Double insulation consultar página 26 V Volts Corriente alterna Hz Hertz A Amperes n Velocidad de giro maximo no Velocidad sin carga min Revolucion...

Page 23: ...a para el aire y flecha indicadora del sentido de giro 4 Conmutador balancín Para el encendido y apagado Con una posición de traba para el funcionamiento continuo 5 Cable de conexión a al red con el enchufe correspondiente 6 Rueda de ajuste para la preselección de la velocidad de giro 7 Chapa de características 8 Manija lateral 9 Cubierta con manija ...

Page 24: ... cumpli miento de las indicaciones de seguridad pueden ser causa de descargas eléctricas incendios y o lesiones de gravedad Conserve todas las advertencias e instruc ciones de seguridad para el futuro Esta herramienta eléctrica debe utilizarse como pulidora Tener en cuenta todas las advertencias de seguridad instrucciones representaciones y datos que se entregan conjuntamente con este equipo En ca...

Page 25: ...do Pueden volar trozos de la pieza en proceso o de la herramienta destrozada produciendo lesiones en zonas aún externas a la zona de trabajo Sujetar el equipo de las superficies aisladas correspondientes cuando la herramienta de aplicación puede incidir en conductores eléctricos ocultos o cables pertenecientes a la red eléctrica El contacto con conductores bajo tensión puede aplicar esta tensión t...

Page 26: ...ación descontrolada del equipo eléctrico en el punto de bloqueo en sentido de giro opuesto a aquél de la herramienta Un contragolpe es la consecuencia de un uso incorrecto o deficiente de la herra mienta eléctrica Puede evitárselo mediante medidas preventivas según se describe a continuación Sujetar firmemente la herramienta eléctrica y ubicar el cuerpo y los brazos en una posición que permita con...

Page 27: ...tal de las vibraciones durante el pulido de superficies lacadas Valor de emisión ah 4 7 m s2 Incertidumbre K 1 5 m s2 CUIDADO Los valores indicados son válidos para equipos nuevos Los valores de ruido y de vibración se modifican durante el uso diario NOTA El nivel de las oscilaciones indicado en estas instrucciones fue medido según un procedimiento de medición conforme a EN 60745 y puede utilizars...

Page 28: ...cendido a pagado Marcha de tiempo reducido sin trabado Desplazar el conmutador balancín hacia delante y sujetarlo en esta posición Para el paro soltar el conmutador balancín Funcionamiento continuo con traba Desplazar el conmutador balancín hacia delante y trabarlo presionando su parte anterior Para el apagado presionar la parte posterior del conmutador balancín a fin de destrabarlo Preselección d...

Page 29: ...mbio de la herramienta Desconectar el enchufe de red Sujetar mediante presión el agente pulidor en forma centrada sobre el plato abrojo Utilizar exclusivamente herra mientas de pulido libres de daños Efectuar una marcha de prueba a fin de cerciorarse de la marcha céntrica de la herramienta Indicaciones para el trabajo NOTA Después de apagado la herramienta presenta una breve marcha inercial En cas...

Page 30: ...os expira la garantía del fabricante A través de las ranuras de ventilación posteriores puede observarse el chispeo de las escobillas durante el funcionamiento En caso que se observe una formación intensa de chispas en las escobillas desconectar inmediatamente la pulidora Entregar la pulidora a un taller de servicio a clientes autorizado por el fabricante Engranaje NOTA No aflojar los tornillos en...

Page 31: ...e los Centros de Servicio de FLEX o las Estaciones de Servicio Autorizado por FLEX CUALQUIER GARANTÍA IMPLICITA INCLUSO LAS GARANTÍAS DE COMER CIALIZACIÓN Y APTITUD PARA PROPÓ SITOS ESPECIALES O PARTICULARES DURARÁN POR SÓLO UN 1 AÑO A PARTIR DE LA FECHA DE COMPRA Para obtener información de la garantía de desempeño haga el favor de escribir a Flex North America Inc Warehouse Distribution Center 2...

Page 32: ... 7144 828 0 Fax 49 0 7144 25899 info flex tools com www flex tools com Flex North America Inc Warehouse Distribution Center 2720 E Phillips Road Greer SC 29650 877 331 6103 Customer Service 888 331 6104 Fax Flex North America Inc US Corporate Office 13057 West Center Street Suite 6 Omaha NE 68118 402 933 7759 Office 402 933 7729 Fax www flexnorthamerica com ...

Reviews: