10
MHCP Primary Cleaner
Section 4 – Installation Instructions
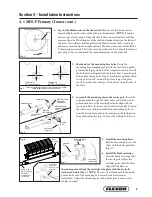
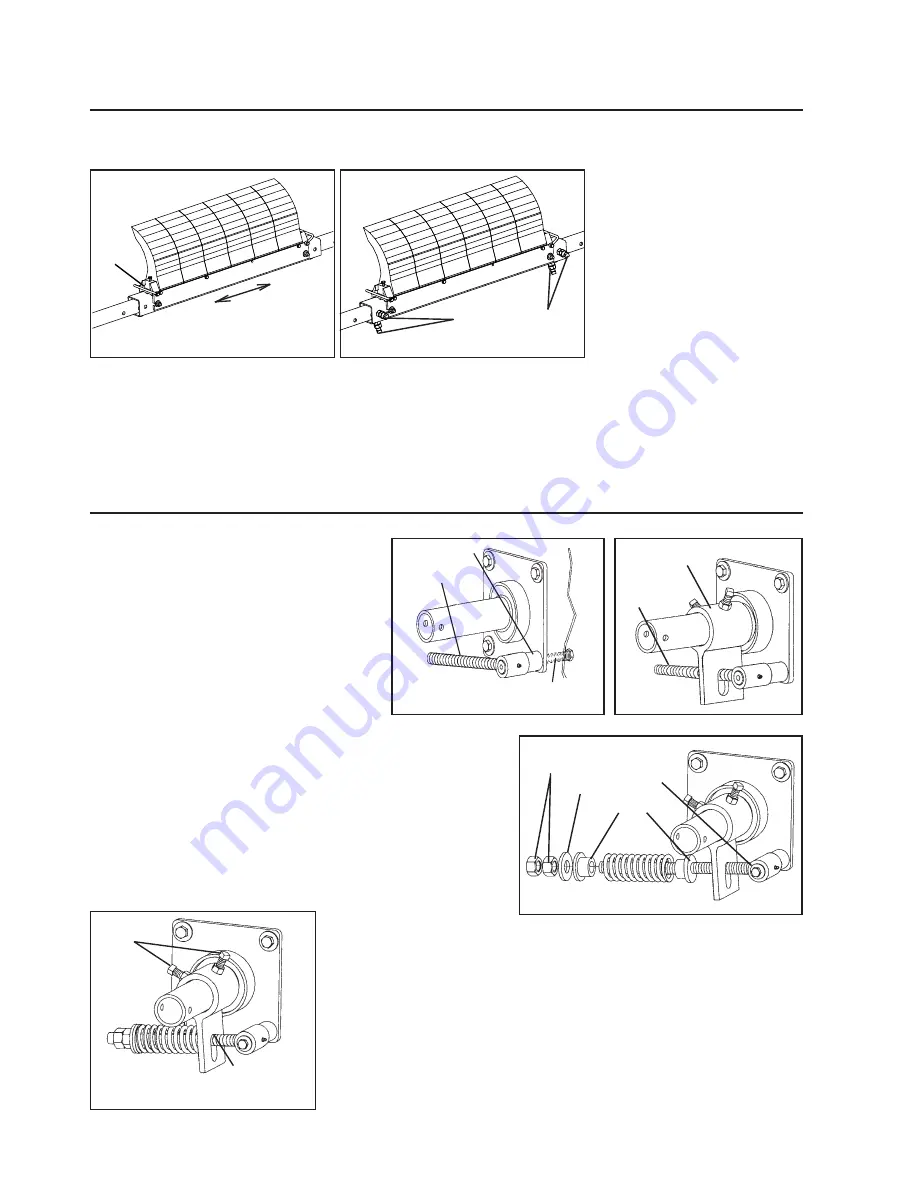
7. Centre the blades on the belt.
Slide the pole until the blades
are centreed or cover the belt’s
material path (Fig. 7). NOTE:
Standard blade coverage is
belt width minus 150mm. If
less blade coverage is required,
single blades can be removed
from the blade cartridge.
The blades do not have to be
centred in the cartridge. They
should be centred on the belt’s
material path.
8. Lock the extender poles in the centre pole. Tighten the two locking bolts and jam nuts on each end of the centre
pole (Fig. 8).
Install the tensioning system. For the PST Spring Tensioner go to step 9S. For the AWT Air/Water or PAT
Tensioner proceed to step 9A.
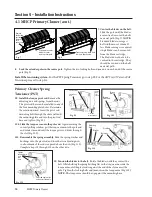
9S. Install the torque pivot rod. Remove the
adjusting nuts and springs from the rods.
The pivot rod base can be installed in any of
the four mounting plate holes. Determine
the rotation desired. Insert the pivot rod
mounting bolt through the chute wall and
the mounting plate and into the pivot rod
base and tighten (Fig. 9S).
10S. Slide the torque arm onto the pole end. Again ensuring the
correct pulling rotation, put the torque arm onto the pole end
and rotate it around until the torque pivot rod slides through
the slot (Fig. 10S).
11S. Reassemble the spring assembly. Slide the spring, washer and
bushings onto the pivot rod and turn the two adjusting nuts
so about 6mm of the rod is exposed above the nuts (Fig. 11S).
Complete steps 9S through 11S on the other side.
12S. Tension the blades to the belt. Rotate the blades until they contact the
belt. While holding the spring bushing flat on the torque arm, rotate the
torque arm until the pivot rod is against the end of the slot nearest the
pole. Tighten the locking bolts and jam nuts on the torque arm (Fig. 12S).
NOTE: The torque arm should be up against the mounting base.
Primary Cleaner Spring
Tensioner (PST)
4.1 MHCP Primary Cleaner (cont.)
Fig. 7
Fig. 8
Slide pole to center
blades or cover
belt’s material path
Remove
blade stop
to slide
blade(s)
off if
necessary
Tighten locking bolts and
jam nuts (both ends)
Slide pole to center
blades or cover
belt’s material path
Remove blade
stop to slide
blade(s) off if
necessary
Tighten locking bolts and
jam nuts (both ends)
Pivot Rod
Bushings
Adjusting
Nuts
Washer
Torque
Arm
Torque
Pivot Rod
Pivot Rod Base
Torque Pivot
Rod
Chute
Wall
(cut
away)
Pivot Rod
Mounting Bolt
Pivot rod against slot
end nearest the pole
Tighten
locking bolts
and
jam
nuts
Fig. 9S
Slide pole to center
blades or cover
belt’s material path
Remove blade
stop to slide
blade(s) off if
necessary
Tighten locking bolts and
jam nuts (both ends)
Pivot Rod
Bushings
Adjusting
Nuts
Washer
Torque
Arm
Torque
Pivot Rod
Pivot Rod Base
Torque Pivot
Rod
Chute
Wall
(cut
away)
Pivot Rod
Mounting Bolt
Pivot rod against slot
end nearest the pole
Tighten
locking bolts
and
jam
nuts
Fig. 10S
Slide pole to center
blades or cover
belt’s material path
Remove blade
stop to slide
blade(s) off if
necessary
Tighten locking bolts and
jam nuts (both ends)
Pivot Rod
Bushings
Adjusting
Nuts
Washer
Torque
Arm
Torque
Pivot Rod
Pivot Rod Base
Torque Pivot
Rod
Chute
Wall
(cut
away)
Pivot Rod
Mounting Bolt
Pivot rod against slot
end nearest the pole
Tighten
locking bolts
and
jam
nuts
Fig. 11S
Slide pole to center
blades or cover
belt’s material path
Remove blade
stop to slide
blade(s) off if
necessary
Tighten locking bolts and
jam nuts (both ends)
Pivot Rod
Bushings
Adjusting
Nuts
Washer
Torque
Arm
Torque
Pivot Rod
Pivot Rod Base
Torque Pivot
Rod
Chute
Wall
(cut
away)
Pivot Rod
Mounting Bolt
Pivot rod against slot
end nearest the pole
Tighten
locking bolts
and
jam
nuts
Fig. 12S


