


15
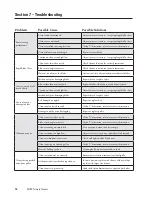
6.4 Blade Replacement Instructions (cont.)
Section 6 – Maintenance
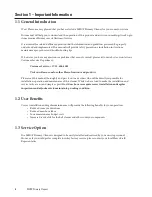
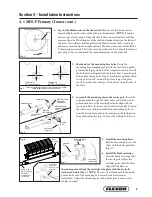
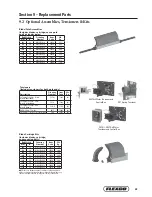
4. Install the new cartridge. Slide the new cartridge onto the pole.
Align holes on pole and cartridge then install bolts, washers and
nuts to lock in cartridge (Fig. 4).
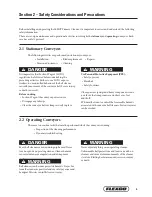
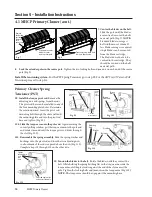
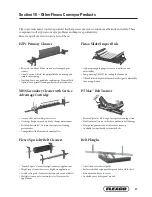
5. Reset the correct blade tension. Refer to the chart for the spring
length/kPa required for the belt width. For PST lightly pull the
pivot arm toward the end of the torque arm slot nearest the pole
and turn the adjusting nuts until the required spring length is
achieved (Fig. 5). Tighten jam nut. NOTE: The chart is also on the
cleaner’s pivot shaft bracket for future reference for retensioning
maintenance.
Test run the cleaner. Run the conveyor for at least 15 minutes and inspect the cleaning performance. Check the spring
length for proper tensioning. Make adjustments as necessary.
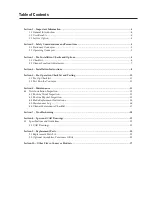
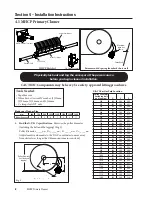
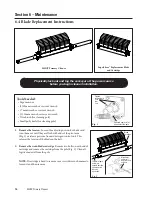
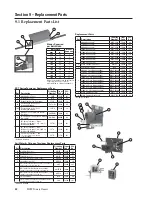
3. Change blades on cartridge. Be sure to install all new blades to
ensure even cleaning. To remove blades, unlock blade stop, remove
handle and loosen cartridge expansion bolts. Clean cartridge
before installing new blades. Install new blades then tighten
cartridge expansion bolts and reinstall blade stop handle (Fig. 3).
Cartridge
Expansion Bolts
Handle
Blade
Stop
Fig. 3
Blade
Cartridge
6" of pole end
must extend
outside the
mounting base
on each side
Align holes
and install
bolts, washers
and nuts
Fig. 4
Locking Bolts
And Jam Nuts
Collapse
Air Bags
Connect lines
from air bags
Connect line
from site supply
Air/Water Control Box
Connect lines
from air bags
Connect line
from site
supply
Nitrogen Regulator
of Washer
orque Arm
Measure
from top
of washer
to top of
torque arm.
Fig. 5
6" del eje
y se debe
extender fuera
de la base de
montaje de
cada lado
150mm of pole
end must
extend outside
the mounting
base on
each side
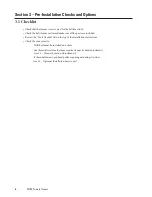
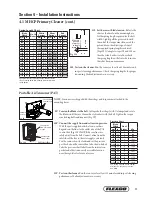
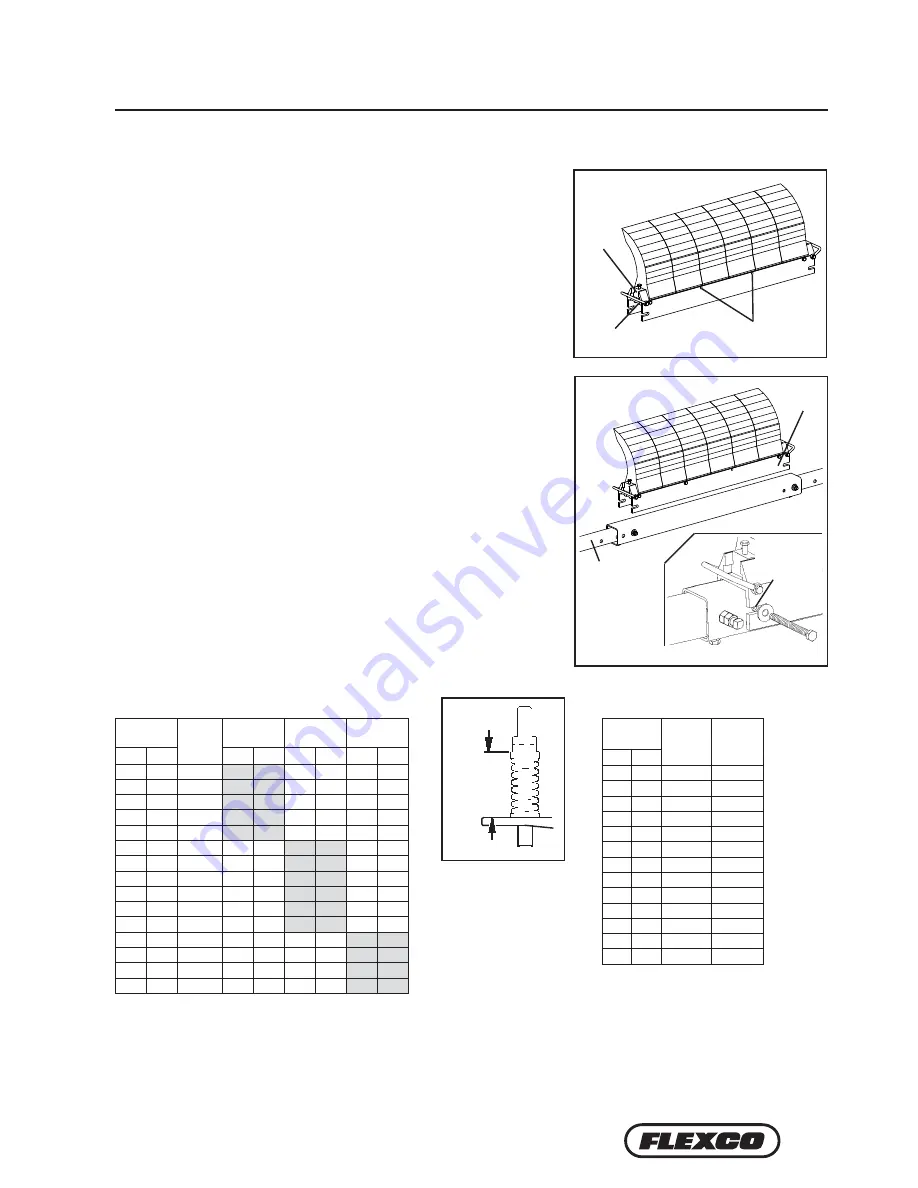
Spring Length Chart
Blade
Width
No. Of
Blades
White
Springs
Silver
Springs
Red
Springs
mm
in.
mm
in.
mm
in.
mm
in.
450
18"
3
146
5 3/4"
162
6 3/8"
165
6 1/2"
600
24"
4
137
5 3/8"
159
6 1/4"
162
6 3/8"
750
30"
5
130
5 1/8"
156
6 1/8"
162
6 3/8"
900
36"
6
121
4 3/4"
156
6 1/8"
159
6 1/4"
1050
42"
7
114
4 1/2"
152
6"
159
6 1/4"
1200
48"
8
N/A
N/A
149
5 7/8"
156
6 1/8"
1350
54"
9
N/A
N/A
146
5 3/4"
156
6 1/8"
1500
60"
10
N/A
N/A
146
5 3/4"
152
6"
1650
66"
11
N/A
N/A
144
5 5/8"
152
6"
1800
72"
12
N/A
N/A
140
5 1/2"
149
5 7/8"
1950
78"
13
N/A
N/A
130
5 1/8"
146
5 3/4"
2100
84"
14
N/A
N/A
N/A
N/A
146
5 3/4"
2250
90"
15
N/A
N/A
N/A
N/A
144
5 5/8"
2400
96"
16
N/A
N/A
N/A
N/A
140
5 1/2"
2550
102"
17
N/A
N/A
N/A
N/A
140
5 1/2"
Spring tension is based on the number of blades on the
cleaner, not the belt width. Shading indicates preferred
spring option.
Pressure Chart
Blade
Width
No. of
Blades
kPa
mm
in.
450
18"
3
55.2
600
24"
4
69.0
750
30"
5
89.6
900
36"
6
103.4
1050
42"
7
124.1
1200
48"
8
137.9
1350
54"
9
158.6
1500
60"
10
172.4
1650
66"
11
193.1
1800
72"
12
213.7
1950
78"
12
227.5
2100
84"
14
248.2
2250
90"
15
262.0
kPa setting is based on the number
of blades on the cleaner, not the
belt width.