


9
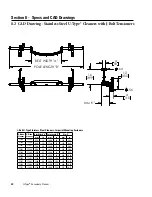
4U. Tighten torque arm set screws.
a. Spring tension nuts should be moved near the end of the threaded rod. Insert a screwdriver or small rod
through holes on end of cleaner pole. Pushing on screwdriver or rod, rotate cleaner blade into a position
with pole parallel to belt (Fig. 4Ua). Blade should not be touching belt at this time. The gap between the torque
arm and pivot block should be approximately 50mm (2").
b. Center the blade to the belt and make sure torque arm, stop collar, bearing and slide plate are tight together on
both sides. Then tighten stop collar set screw and lock nut with stop collar touching top of bearing mount stop
to hold blade parallel to belt, and remove screwdriver or rod.
c. Push torque arm down to contact the spring and tighten the torque arm set screws and lock nuts on both sides
of the cleaner (Fig. 4Ub).
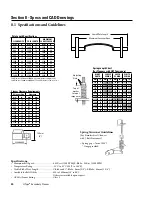
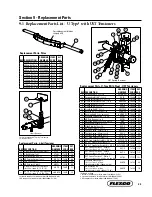
6U. Set the blade tension.
a. Set spring length to determined length (Fig. 6U).
Tighten spring tension nuts on threaded rod.
IMPORTANT: Always be sure there is uniform
contact between blade and belt.
b. If blade is not in full contact with belt at edges
and center, either raise or lower pole position of
cleaner and reapply tension.
c. Please note, when fully tensioned there should be
approximately 19mm to 38mm (3/4" to 1-1/2")
of space between the torque arm and pivot block
(Fig. 5U).
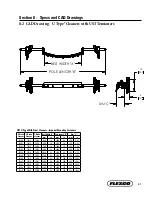
5U. Adjust the blade to the belt.
a. Loosen slide plate set screws and lock nuts. Adjust by
turning adjusting bolts either up or down (Fig. 5U).
b. Adjust blade either up or down until both blade ends and
the center make full contact with belt. If possible, adjust
both sides of the cleaner up to the belt at the same time
for even blade contact across belt (reduces chance of
overtensioning on one side).
IMPORTANT: In some cases, due to irregular belt wear
or cupping, it may be necessary to make final adjustments
independently on both sides.
c. Tighten lock nuts on adjusting bolts to secure blade in
correct position. Also tighten slide plate set screws and
lock nuts.
Adjusting
Bolt
Fig. 5U
Slide Plate Set Screw
and Lock Nut
Lock Nut
Fig. 4Ua
Fig. 4Ub
50mm (2”) gap
before tensioning
Spring tensioner
nuts at end of
threaded rod
Screwdriver
or small rod
Parallel
with belt
Stop collar
set screw
and lock nut
Stop collar
touching bearing
mount stop
No blade contact
with belt
Full blade
contact with belt
Tighten stop
collar set
screw and lock
nut to hold
blade parallel
to belt.
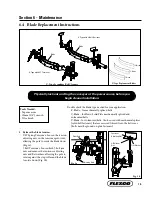
Section 4 - Installation Instructions
4.1 U-Type® Secondary Cleaner with UST Tensioner (cont.)
Push torque arm down
to contact spring; tighten
torque arm set screws
Top of
washer
to top of
torque arm
Adjusting
Nuts
Fig. 6U
19mm to 38mm
(3/4” to 1-1/2”)
gap
2
1
Torque arm
set screws
BELT
Spring Length Chart
(for Cleaners with UST Tensioners)
Blade
Width
Purple
Spring
Silver
Spring
White
Spring
mm
in.
mm
in.
mm
in.
mm
in.
450
18
154
6 1/8
160
6 3/8
162
6 3/8
600
24
148
5 7/8
148
6 1/4
160
6 1/4
750
30
140
5 1/2
156
6 1/8
158
6 1/4
900
36
136
5 3/8
152
6
156
6 1/8
1050
42
128
5
150
5 7/8
154
6 1/8
1200
48
N/A
N/A
146
5 3/4
152
6
1350
54
N/A
N/A
142
5 5/8
150
5 7/8
1500
60
N/A
N/A
140
5 1/2
150
5 7/8
1800
72
N/A
N/A
N/A
N/A
140
5 1/2
2100
84
N/A
N/A
N/A
N/A
136
5 3/8
2400
96
N/A
N/A
N/A
N/A
132
5 1/4