background image

16


U-Type

®

 Secondary Cleaner

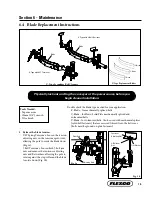
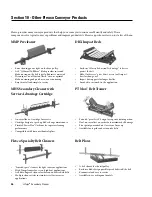
3.  Install the new blade.


 a. 

Center the blade in the holder (Fig. 3).


  b.  Tighten all plate retaining screws.

  c.  Tighten blade retaining screws 8 turns and tighten the blade  

  retaining screw locknuts (Fig 3).

5.  Inspect for full blade contact to the belt. Important - Always be 

sure there is uniform contact between the blade and the belt. If the 

blade is not in full contact with the belt at the edges and center, raise 

or lower the pole position of the cleaner and reapply the tension (See 

Installation Instructions). 

Section 6 -  Maintenance

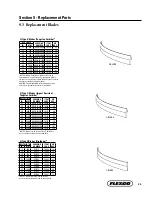
2.  Remove the worn blade. 

  a.  Loosen both locknuts on the blade retaining screws. Turn blade retaining screws out 8 turns (Fig. 2a).

  b.  Loosen or remove all plate retaining screws.

  c.  From one end, insert a screwdriver under the blade and lightly pry the blade up and out of the blade  


  holder (Fig. 2b). Once the blade breaks free, pull it out by hand.

  c.  Remove the blade from the holder and clean material buildup from holder with a wire brush (Fig. 2c).

Clean buildup 

from blade holder

Loosen both 

locknuts and blade 

retaining screws

Insert 

screwdriver, 

pry blade up

Fig. 2a

Fig. 2b

Fig. 2c

Tighten both blade 

retaining screws 

and locknuts

Plate 

retaining 

screws

Center new blade 

in blade holder

Fig. 3

Tensioner 

Adjusting Nut

J Bolt Jam Nut

Tension Spring

Clearance .030" 

between coils

Fig. 4b

Spring Tension 

Gauge

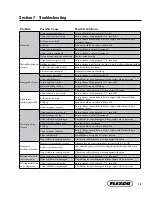
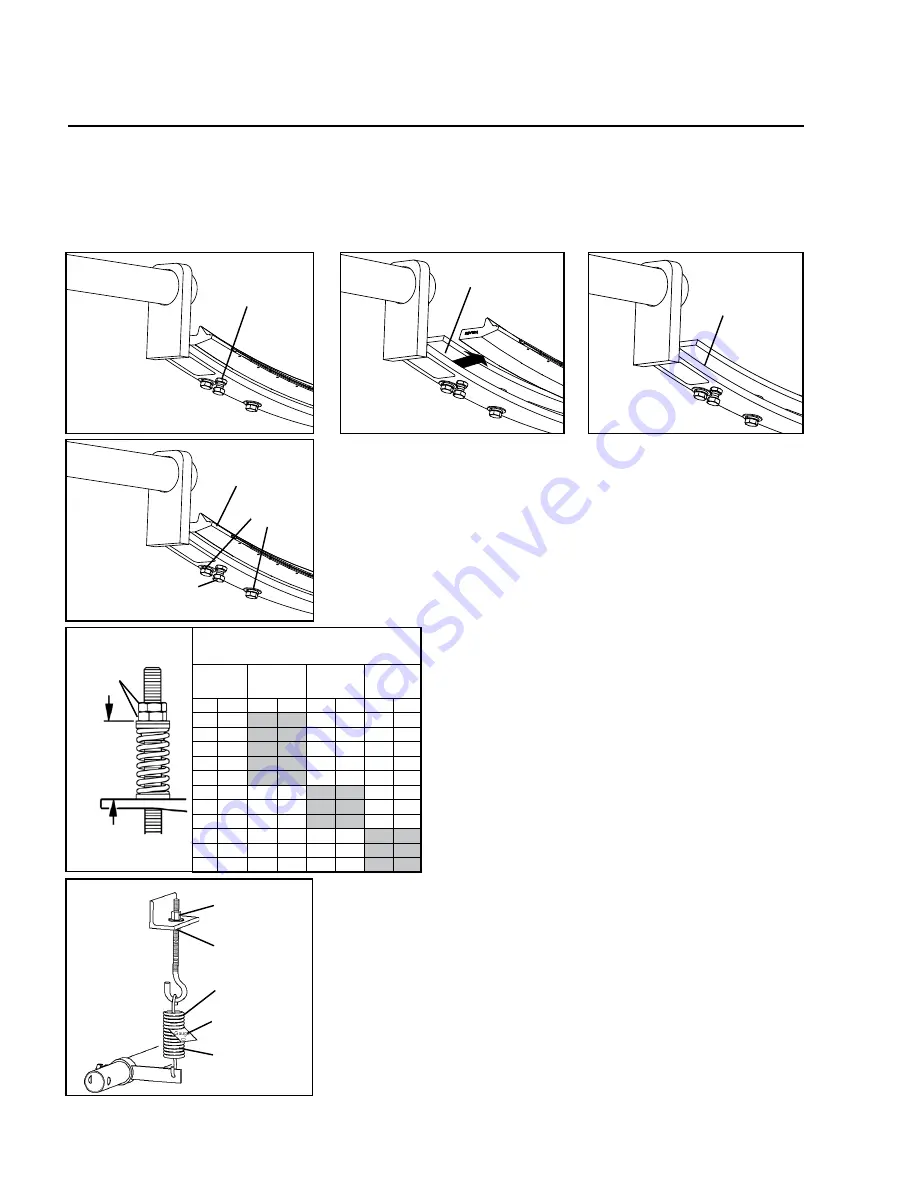
4.  Reset the blade tension. 

  UST Spring Tensioner: Refer to the chart for the spring 

length required for the belt width. Lightly pull the pivot 

arm toward the end of the torque arm slot nearest the 

pole and turn the adjusting nuts until the required 

spring length is achieved (Fig. 4a). NOTE: The chart 

is also on the cleaner’s pivot shaft bracket for future 

reference for retensioning maintenance. Reference 

Section 4 (Cleaner Installation Instructions) on page 6.

  J-Bolt Tensioner: Rotate the pole and insert the J bolts 

through the J bolt mount holes and install the flat 

washers and tensioner adjusting nuts. Turn the tensioner 

adjusting nuts until a .7mm (.030”) gap (use Spring 

Tension Gauge included with cleaner) appears between 

all coils of the tension spring (Fig. 4b). Lock both J bolt 

jam nuts.

Test run the cleaner. Run the conveyor for at least 15 minutes and 

inspect the cleaning performance. Check the spring length for proper 

tensioning. Make adjustments as necessary.

Top of 

washer 

to top of 

torque arm

Adjusting 

Nuts


Spring Length Chart 

 (for Cleaners with UST Tensioners)

Blade 

Width

Purple 

Spring

Silver 

Spring

White 

Spring

mm

in.

mm

in.

mm

in.

mm

in.

450

18

154

6 1/8

160

6 3/8

162

6 3/8

600

24

148

5 7/8

148

6 1/4

160

6 1/4

750

30

140

5 1/2

156

6 1/8

158

6 1/4

900

36

136

5 3/8

152

6

156

6 1/8

1050

42

128

5

150

5 7/8

154

6 1/8

1200

48

N/A

N/A

146

5 3/4

152

6

1350

54

N/A

N/A

142

5 5/8

150

5 7/8

1500

60

N/A

N/A

140

5 1/2

150

5 7/8

1800

72

N/A

N/A

N/A

N/A

140

5 1/2

2100

84

N/A

N/A

N/A

N/A

136

5 3/8

2400

96

N/A

N/A

N/A

N/A

132

5 1/4

Fig. 4a

Summary of Contents for U-Type Secondary Cleaner

Page 1: ...1 www flexco com www flexco com U Type Secondary Belt Cleaner Installation Operation and Maintenance Manual...

Page 2: ...l number information can be found on the Serial Number Label included in the Information Packet shipped in the cleaner carton This information will be helpful for any future inquiries or questions abo...

Page 3: ...2 Test Run the Conveyor 12 Section 6 Maintenance 13 6 1 New Installation Inspection 13 6 2 Routine Visual Inspection 13 6 3 Routine Physical Inspection 13 6 4 Blade Replacement Instructions 14 6 5 Ma...

Page 4: ...locations and products Please read this manual thoroughly and pass it on to any others who will be directly responsible for installation operation and maintenance of this cleaner While we have tried t...

Page 5: ...mp securely in place Use Personal Protective Equipment PPE Safety eyewear Hardhats Safety footwear Close quarters springs and heavy components create a worksite that compromises a worker s eyes feet a...

Page 6: ...le adjustable brackets that can be mounted on the conveyor structure so the U Typecleaner can be quickly and easily bolted into place Pole extenders are also available for wide non standard conveyor s...

Page 7: ...efficiently Pole location too high The intial cleaning will be concentrated to the outer edges of the belt failing to efficiently clean the center of the belt Tension too low Without the optimal tensi...

Page 8: ...Retaining Pin Spring Clip Bearing Mount Mounting Bracket Set Screw Lock Nut Mounting Bracket Set Screw Lock Nut Tensioner Adjusting Nut J Bolt Mount Blade Retaining Screw Lock Nut Mounting Bracket Com...

Page 9: ...200mm 6 8 Min 150 200mm 6 8 Min 100mm 4 Min 150 200mm 6 8 Min 6 150 mm Chute Mounting Access Hole Dimensions Belt Width H Dimension 450 1050mm 18 42 200mm 8 1200 2400mm 48 96 250mm 10 CLEARANCE Sectio...

Page 10: ...ise return side belt take out cupping or sagging on edges to find belt s true parallel path to the structure and mark reference point 1 on structure Measure down 75mm 3 from reference point 1 and mark...

Page 11: ...th blade ends and the center make full contact with belt If possible adjust both sides of the cleaner up to the belt at the same time for even blade contact across belt reduces chance of overtensionin...

Page 12: ...cupping or sagging on edges to find belt s true parallel path to the structure and mark reference point 1 on the structure on both sides of the conveyor Measure down 84mm 3 3 8 from reference point 1...

Page 13: ...d Lock Nut Screwdriver or Small Rod Blade No contact with belt Stop Collar Adjusting Bolt 5J Adjust blade to belt a Loosen bearing mount set screws and lock nuts Adjustments will be made by turning ad...

Page 14: ...lt at edges and center either raise or lower pole position of cleaner and reapply tension Fig 7J Stop Collar Clearance 6mm 1 4 for UV and UC 13mm 1 2 for UF Fig 9J Bearing Mount Stop Stop Collar Belt...

Page 15: ...check that all fasteners are tightened properly Add pole caps Apply all supplied labels to the cleaner Check the blade location on the belt Be sure that all installation materials and tools have been...

Page 16: ...ioners If belt looks clean or if there are areas that are dirty If blade is worn out and needs to be replaced If there is damage to the blade or other cleaner components If fugitive material is built...

Page 17: ...ced belts C Blade for Flexco Solid Plate mechanically spliced and vulcanized belts V Blade for vulcanized belts Can be used with mechanical splices solid bolt fasteners that are recessed skived into t...

Page 18: ...uge 4 Reset the blade tension UST Spring Tensioner Refer to the chart for the spring length required for the belt width Lightly pull the pivot arm toward the end of the torque arm slot nearest the pol...

Page 19: ...tivity Date Work done by Service Quote Activity Date Work done by Service Quote Activity Date Work done by Service Quote Activity Date Work done by Service Quote Activity Date Work done by Service Quo...

Page 20: ...ce from wear line LEFT MIDDLE RIGHT Blade condition Good Grooved Smiled Damaged Measurement of spring Required Currently Was Cleaner Adjusted Yes No Pole Condition Good Bent Worn Lagging Slide lag Cer...

Page 21: ...e cleaner can conform to belt or replace with alternate Flexco secondary cleaner Belt flap Introduce hold down roller to flatten belt Cleaner cannot conform Ensure cleaner can conform to belt or repla...

Page 22: ...R SPRING WHITE SPRING mm in mm in mm in mm in 450 18 154 6 1 8 160 6 3 8 162 6 3 8 600 24 148 5 7 8 148 6 1 4 160 6 1 4 750 30 140 5 1 2 156 6 1 8 158 6 1 4 900 36 136 5 3 8 152 6 156 6 1 8 1050 42 12...

Page 23: ...76715 76727 900 36 2050 82 203 8 00 76704 76716 76728 1050 42 2200 88 232 9 14 76705 76717 76729 1200 48 2350 94 266 10 48 76706 76718 76730 1350 54 2500 100 268 10 57 76707 76719 76731 1500 60 2650 1...

Page 24: ...mm in mm in mm in 77259 77395 450 18 1600 64 150 5 91 77260 77396 600 24 1750 70 174 6 85 77261 77397 750 30 1900 76 203 8 00 77262 77398 900 36 2050 82 203 8 00 77263 77399 1050 42 2200 88 232 9 14...

Page 25: ...nts for blade widths 1200 1500mm 48 60 HD components for blade widths 1800 2400mm 72 96 Replacement Parts U Type Mild Steel UST Tensioners REF DESCRIPTION ORDERING NUMBER ITEM CODE WT KGS 2 Torque Arm...

Page 26: ...37 1 82 0 1800mm 72 Pole USP72 1800 S S 77349 56 6 125 0 2100mm 84 Pole USP84 2100 S S 77351 62 5 138 0 2 J Bolt Kit incl locknut and washer STJK S S 77334 0 3 0 7 3 J Bolt Mount 1 ea STJM S S 77332 1...

Page 27: ...URCB54 1350 76754 6 8 60 1500 URCB60 1500 76755 7 6 72 1800 URCB72 1800 76756 9 2 84 2100 URCB84 2100 76757 10 7 96 2400 URCB96 2400 76758 13 6 U Type V Blades Tungsten Carbide BELT WIDTH ORDERING NUM...

Page 28: ...rtridge Flexco Specialty Belt Cleaners Extra cleaning power right on the head pulley A 10 250mm TuffShear blade provides increased blade tension on the belt to peel off abrasive materials The unique V...

Page 29: ...27...

Page 30: ...28 U Type Secondary Cleaner...

Page 31: ...29...

Page 32: ...mers worldwide through superior service and innovation 2 Woodlands Sector 1 01 21 Woodlands Spectrum I Singapore 738068 Tel 65 6484 1533 Fax 65 6484 1531 E mail asiasales flexco com Visit www flexco c...

Reviews: