background image

20

skytiger

TM

Care and Maintenance

SKYTIGER INSTRUCTIONS

CARE AND MAINTENANCE:

Taking good care of your Skytiger will prolong its life. If your Skytiger is used in wet conditions 
allow it to dry before re-packing and storing it. The kite may be hand washed in warm (not hot) 
soapy water. Do not use abrasive materials on it as this will damage the fabric. Small tears may 
be repaired with our clear self adhesive repair tape. For larger and more complicated repairs 
we recommend that you return your Skytiger to us through your dealer or direct. Make sure it is 
clean, free of sand and dry. We will charge if we have to clean your kite!

WARRANTY:

At Flexifoil International, we believe in designing and manufacturing our products to the highest 
possible standards. We pride ourselves on our outstanding quality control but if any of our 
products fail as a result of defective workmanship or faulty materials, we will replace it free of 
charge. No questions asked. This is in addition to your statutory rights.

Summary of Contents for SKYTIGER Series

Page 1: ......

Page 2: ...ch in strong winds Assisted launch Turning steering Stopping or reversing Landing After landing Packing away page 1 pages 2 3 page 4 page 5 pages 6 7 page 8 pages 9 11 page 12 page 12 page 13 page 14 page 15 page 16 page 16 17 page 17 page 18 pages 12 18 Connecting the flying lines to the kite Connecting the flying lines to the handles pages 9 10 page 11 Line length adjustment Handle tuning tips C...

Page 3: ... experience GENERAL Read all product instructions and safety guidelines before using Flexifoil products Use extreme caution when using kite traction equipment Improper use of this equipment can cause serious injury or death Kite traction kites are not parachutes or paragliders and must not be used as such Do not fly under the influence of alcohol or mind altering drugs LEARNING Always learn to fly...

Page 4: ...raction kite can pull you downwind for a considerable distance EQUIPMENT Always check your equipment for wear and tear before flying Do not fly with worn or damaged equipment or flying lines Repair or replace accordingly Always use the appropriate safety equipment helmet kneepads elbow pads protective eyewear gloves etc Never attach yourself permanently to the kite Kite lines and bridles under ten...

Page 5: ... Your Skytiger bag should contain the following items If your pack is not complete please contact your dealer immediately 1 x Instruction manual 1 x pair of 4 line Handles 1 x Product registration card 1 x Free repair voucher 1 x Folded Skytiger kite ...

Page 6: ...38 39 50 51 61 62 74 75 86 87 101 Calm Light Air Light Breeze Gentle Wind Fresh Wind Strong Wind Near Gale Gale Strong Gale Storm Calm smoke rises vertically Smoke drift indicates wind direction vanes do not move Wind felt on face leaves rustle vanes begin to move Leaves small twigs in motion light flags extended Leaves loose paper raised up flags flap small branches move Small trees begin to sway...

Page 7: ... 135 kg Brake Lines 200 lb 90 kg 200 lb 90 kg Main Lines 300 lb 135 kg 500 lb 225 kg Brake Lines 200 lb 90 kg 300 lb 135 kg SIZE RECREATIONAL USE HEAVY USE 40 KEY FOR LINE TABLE Recreational Use Sliding and skidding along under power light wind buggying and flying for fun approx Force 1 3 Heavy Use Getting air body surfing buggying snowboarding and other traction activities approx Force 3 6 Please...

Page 8: ...allow the kite to fly in clean air Open unrestricted areas like beaches usually have clean winds and shorter line lengths can be used We do not recommend using lines shorter than 25 metres The line length will influence the way the kite performs Longer lines will slow the kite down due to increased drag but can lead to greater power being generated by the kite bigger power band Shorter lines will ...

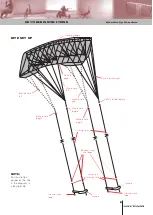
Page 9: ...g edge KITE SET UP Brake bridle right Main bridle right Flying lines Main bridle toggle Main bridle toggle Brake bridle toggle Brake bridle toggle Flying line attachment knots Sleeved flying line loops Ground stake loop Handle Ground stake loop Handle NOTE For illustration purposes the kite in the diagram is a Skytiger 26 ...

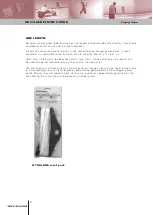
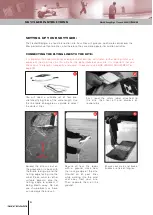
Page 10: ...USTMENT on page 19 You will need a suitable set of four pre stretched flying lines of the same length Use the line table on page 6 as a guide to select the correct lines First read the safety label attached to the kite then tear off and dispose of responsibly Spread the kite sail out on the ground on its back with the bridle facing up and the trailing edge facing into the wind Place sand or other ...

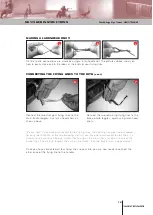
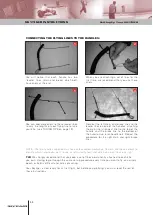
Page 11: ...han the brake lines in appearance Once you have connected all four flying lines to your kite you are now ready to connect the other ends of the flying line to the handles Connect the two strongest flying lines to the main bridle toggles Use larks head knots as shown above Connect the two remaining flying lines to the brake bridle toggles again using larks head knots MAKING A LARKS HEAD KNOT CONNEC...

Page 12: ...r Skytiger is now ready for its first flight but before you go flying you must read the rest of these instructions When you are attaching a set of lines for the first time we recommend that you use these knots You will notice that each handle has two leader lines main and brake which both have knots at the end 1 2 3 You can add more knots to these leader lines to vary the lengths of your flying li...

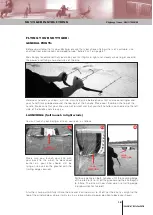
Page 13: ...e of the kite starts to lift off the ground and the kite begins to inflate The kite will now stand up on its trailing edge in preparation for take off A further sharp pull will fully inflate the kite and it will now start to lift off Let the kite fly straight to the top of the wind window where it will stay in a stable minimum power position above your head LAUNCHING Self launch in light winds You...

Page 14: ...kite near to the edge of the Wind Window when launching Set the kite on the ground so that the wind is blowing across the kite from wingtip to wingtip as shown Secure the kite with sand or similar along the trailing edge Pull back gently on the downwind handle and allow the kite to rise into the air and inflate The kite will then launch and fly to the edge of the wind window WIND DIRECTION Careful...

Page 15: ...ortant not to throw the kite into the air as this will prevent a smooth take off ASSISTED LAUNCH If you have someone to help you launch make sure that they understand what you want them to do before launching your kite Initial launches are best done at the edge of the wind window Steer the kite up the edge of the wind window to the top of the window above your head where it will stay in a stable m...

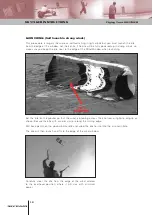
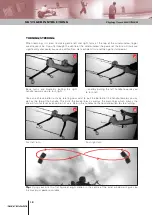
Page 16: ...the handles to the neutral position to stop turning Tip Flying your kite in a flat figure of eight motion in the centre of the wind window will give you the maximum power available TURNING STEERING When learning it is best to make gentle left and right turns at the top of the wind window to get used to your kite If you fly through the centre of the wind window the power of the kite will increase s...

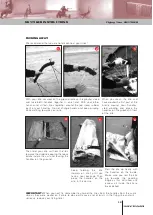
Page 17: ...here you want it in the wind window STOPPING OR REVERSING LANDING Landing is a variation on stopping or de powering the kite This can be done anywhere in the wind window as long as the leading edge of the kite is facing up towards the sky Apply full brake by rotating both your wrists to pull the brake lines only towards you The kite will descend and land on its trailing edge This manoeuvre takes p...

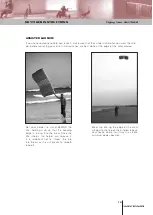
Page 18: ...way from you and the kite will rotate on its axis and point upwards You can now fly away or attempt to land again AFTER LANDING 1b 1a NEVER leave your kite unattended If you have finished flying pack it away for safety When the kite is on the ground keep the brake lines taut to stop the kite from taking off again Secure the handles to the ground by inserting a ground stake through the loops at the...

Page 19: ... handles on the ground in front of the kite Keep folding the kite inwards on itself until you have a neat package Then place the handles on the kite in the centre IMPORTANT When you next fly remember to unwind the lines from the handles from the same side as they were wound on Failure to do so will cause a lot of twists in the flying line and will seriously reduce your flying time 1 2 3 5 Roll the...

Page 20: ...u fly it It will take some experience to become skilled at tuning your kite but once you have mastered it it s easy to do The ideal flying set up is Main lines taut in flight controlling the kite Brake lines tight enough to pull in the trailing edge flaps but not so tight that the sail deforms Your handles are supplied with one knot tied in each leader line main1 brake1 You can tie further knots i...

Page 21: ...lf adhesive repair tape For larger and more complicated repairs we recommend that you return your Skytiger to us through your dealer or direct Make sure it is clean free of sand and dry We will charge if we have to clean your kite WARRANTY At Flexifoil International we believe in designing and manufacturing our products to the highest possible standards We pride ourselves on our outstanding qualit...

Page 22: ...21 skytiger TM SKYTIGER INSTRUCTIONS ...

Page 23: ...22 skytiger TM SKYTIGER INSTRUCTIONS ...
Page 24: ...egal Drive Soham Cambridgeshire CB7 5BE U K Tel 44 0 1353 723131 Fax 44 0 1353 722311 Email info flexifoil co uk Web www flexifoil com Copyright Flexifoil International Ltd 2001 Colours and specifications subject to change without notice ...

Reviews: