background image


EN 

6. While holding the spring compression, with the other hand, tighten the associated trigger screw.


Tighten to secure the cable. Do not over-tighten as this may cause the cable to be completely


crushed, preventing it from passing through the housing. 
7. Check that the spring is still slightly compressed, then reinstall the cable head into the trigger.


Refasten the cylinder with the M5 nut. 
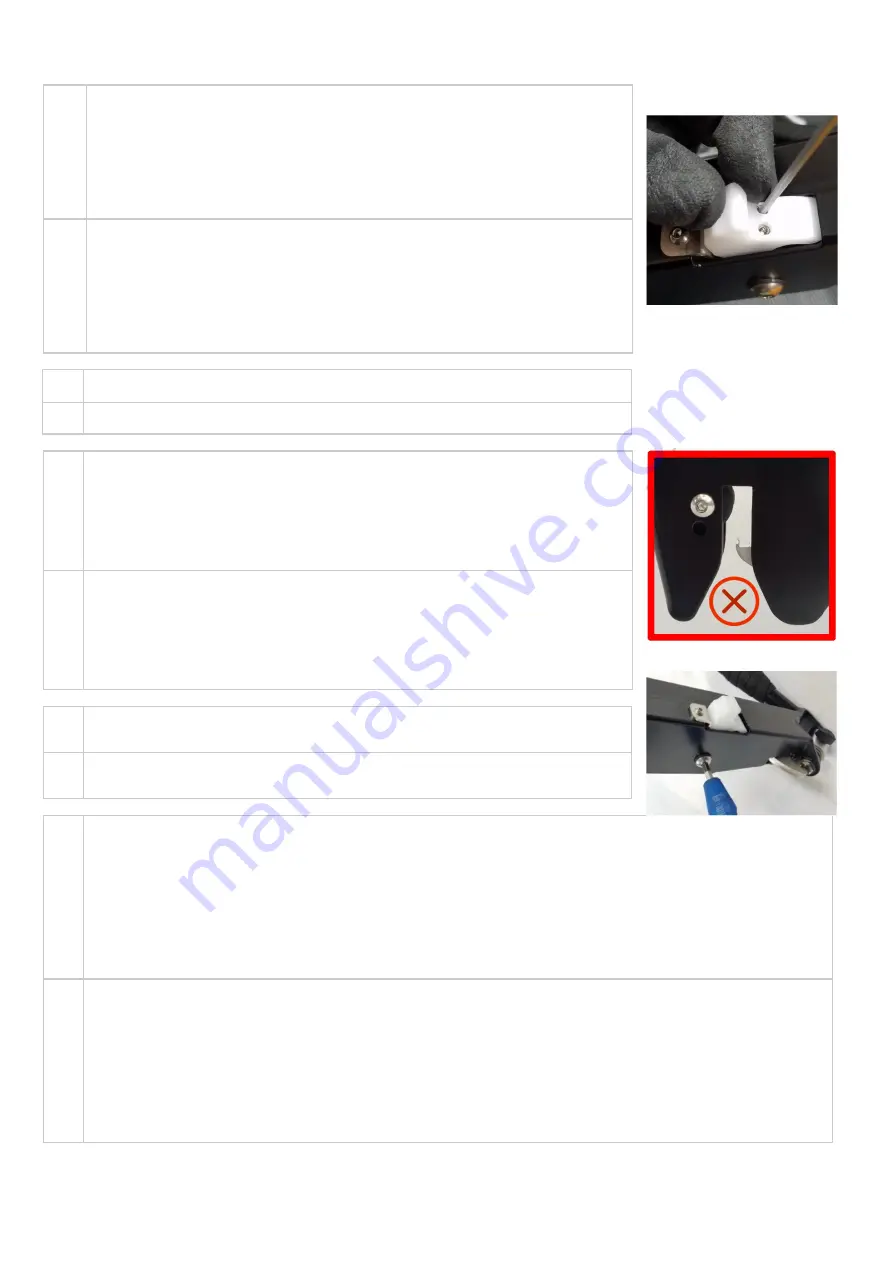
8. To correctly adjust the trigger: hold the white trigger in the initial position, loosen the same trigger


screw as before. The strike must then be correctly repositioned parallel to its housing. Then tighten


the trigger screw firmly. 

FR 

6. En tenant la compression du ressort, avec l’autre main, resserrer la vis associée de la gâchette.


Serrer de manière à bloquer le câble. Ne pas trop forcer pour ne pas écraser complètement le


câble ce qui gênerait son passage dans la gaine. 
7. Vérifier que le ressort est toujours un peu compressé puis réinstaller la tête de câble dans la


gâche. Refixer le barillet avec l’écrou M5. 
8. Pour régler correctement la gâche : maintenir la gâchette blanche en position initiale, desserrer la


même vis de gâchette que précédemment. La gâche doit alors se repositionner correctement,


parallèlement à son logement. Resserrer ensuite fermement la vis de la gâchette. 


EN 

9. Check that the trigger is positioned correctly at rest and when the trigger is pulled. 

FR 

9. Vérifier que la gâche se positionne bien au repos et lorsqu’on actionne la gâchette. 


EN 

 Problem lifting the front of the load

: the strike does not pull out enough. 

Check that nothing is blocking the rotation of the hook in the wheel block by turning the hook by


hand. 
If the hook is blocked, this may be due to the following reasons: 
- Objects jammed (packaging, plastic film, etc...) between the strike plate and the metal sheet. 
- of the screw around which the hook plate turns if it is too tight. 
- Cables or sheaths that are blocked or not securely fastened


FR


• 

Problème pour lever l’avant de la charge

 : la gâche ne sort pas assez. 

Vérifier que rien ne bloque la rotation de la gâche dans le bloc roue en faisant tourner la gâche à la


main. 
Si la gâche est bloquée ceci peut provenir : 
- d’objets coincés (emballages, films plastiques, etc…) entre la gâche et son logement 
- de la vis autour de laquelle tourne la gâche qui serait trop serrée 
- des câbles ou des gaines qui serait bloqués ou mal fixés


EN 

• 

If the white lever is difficult to operate 

Check that the screw which serves as the rotation axis of the lever is not too tight (Allen 5mm).


FR


• 

Si la manette blanche est difficile à actionner 

Vérifier que la vis qui sert d’axe de rotation de la manette ne soit pas trop serrée (Allen 5mm)


EN 

• 

If the cables and their casings are damaged or if the problem stays unresolved 

 
If the sheaths and cables are damaged or if the strike system does not work despite the previous adjustments, proceed to disassembly


and reassembly with spare parts. 
 
References: Left latch cable 1.25m and right latch cable 1.75m. MTB head brake cables sheath 10cm. 
1. Turn the trailer over 
2. Unscrew the M5 nut with an 8mm open-end wrench. 
3. Remove the wheel block cylinder 
4. Remove the cable head from the striker plate 

FR 

• 

Si les gaines et câbles sont abîmés ou si le problème est non résolu 

 
Si les gaines et câbles sont abîmés ou si le système de gâche ne fonctionne pas malgré les réglages précédents, passer au démontage


puis remontage. 
 
Références : Gaine de frein gauche 1,25m et droit 1,75m. Câbles frein tête VTT longueurs de gaine +10cm. 
1. Retourner la remorque 
2. Dévisser l’écrou M5 avec une clé plate 8mm 
3. Retirer le barillet du bloc roue 
4. Retirer la tête du câble de la gâche 

22 

Summary of Contents for BicyLift

Page 1: ...rope FEU01 Montage Gebrauch Wartung GEBRAUCHSANLEITUNG Anh nger BicyLift BTL04 Gabel f r Europalette FEU01 Montage gebruik onderhoud HANDLEIDING BicyLift BLT04 fietstrailer Europaletvork FEU01 MANUEL...

Page 2: ...nden in dieser Anleitung alle Informationen f r die Montage den Gebrauch und die Wartung NL Hartelijk dank voor uw aankoop van deze Bicylift trailer We hopen deze trailer ten volle zijn nut zal bewijz...

Page 3: ...schrijving Descripci n Chassis Chasis Fork Fourche Gabel Vork Horquilla Tools required for the assembly Outils requis pour le montage Erforderlichen Montagewerkzeug Gereedschap voor de montage Herrami...

Page 4: ...uw werkruimte te beschermen ES Disponga los elementos en su posici n de montaje Utilice la caja desplegada para proteger su espacio de trabajo Assembly Montage Montaje Frame and wheel unit Cadre et b...

Page 5: ...je lengte van de klemmen af met een tang of een beitel ES Utilizando las abrazaderas suministradas fije las vainas a los 4 soportes del bastidor del remolque asegur ndose de que la barra de tracci n e...

Page 6: ...inserted by one of its two long sides a minimum clearance of one meter must be present on one of the two sides while 20 cm is enough on the other side The ground in the lifting and depositing area mu...

Page 7: ...jusqu ce qu elle soit en but e sur la palette DE Schieben Sie die Gabel mit den Blattfedern nach unten ganz unter die Palette NL Schuif de vork onder de pallet met de bladveren naar beneden totdat ze...

Page 8: ...auteur par rapport aux accroches de la fourche DE Heben Sie den Anh nger vorne so an dass die Haken gegen ber denen der Gabel die richtige H he haben NL Til de voorkant van de trailer omhoog zodat de...

Page 9: ...e front of the trailer again Also check the balance of the load If necessary remove it and re centre the fork FR Retirer progressivement votre poids de l avant de la remorque pour vous assurer que les...

Page 10: ...iet genoeg druk hebt uitgeoefend op de voorkant van de trailer ES Presionar en el pestillo para liberar los cierres Si nota resistencia no fuerce el pestillo es que no ha presionado lo suficiente haci...

Page 11: ...que Changing the position of the drawbar Pour changer de position le timon So ndern Sie die Position der Deichsel De positie van de boom wijzigen Para cambiar de posici n el tim n EN 1 With your left...

Page 12: ...avec une surface de roulage relativement plane pr sentant des d clivit s longitudinale et lat rale inf rieures 10 des conditions m t orologiques adapt es au regard par exemple de la prise au vent de l...

Page 13: ...del remolque calzada condici n de circulaci n volumen respeto de los otros usuarios y estabilidad de la carga y del remolque tener en cuenta las dimensiones del conjunto enganchado con una anchura y u...

Page 14: ...regelm ig wenigsten alle 20 Betriebsstunden oder w chentlich nach der ersten Tour beziehen Sie sich auf die folgende Checkliste Z gern Sie nicht beim Auftreten von Ger uschen oder Unregelm igkeiten be...

Page 15: ...product advice FlexiModal technical team Ce document est destination des utilisateurs de la remorque pour v lo BicyLift La remorque tant un syst me purement m canique sa maintenance et ses r paration...

Page 16: ...the mudguards that the wheel does not rub Check with a 4mm Allen key that the 4 M5x14 screws of each mudguard are tightened properly to avoid unwanted vibrations FR V rifier l tat g n ral des garde b...

Page 17: ...walls and tread This could prevent a puncture during a tour Tires are 20x2 30 inch mounted with 20 inch Schrader valve tubes contact us for spare parts Repairs Dismounting the wheel puncture tire chan...

Page 18: ...rque porte une charge poser la charge au sol 2 Retourner la remorque EN 3 Loosen and remove the screw on the axle of the punctured wheel Allen 6mm 4 Remove the black axle from the wheel FR 3 Desserrer...

Page 19: ...7 Reinstall the repaired wheel or spare wheel It must be completely deflated to pass without removing the brake caliper The black axle is inserted from the outside of the trailer Make sure that the sq...

Page 20: ...late de 13mm Pour cela retourner la remorque et resserrer en faisant tourner la cl plate plut t que la cl Allen pour viter d ab mer la t te de vis Latch system G che EN Checkpoints Check the general c...

Page 21: ...f the cylinder adjustment is not sufficient the strike cable must be retightened 1 Place the trailer in a stable upright position 2 Detach the cylinder with the striker not positioned correctly To do...

Page 22: ...cts jammed packaging plastic film etc between the strike plate and the metal sheet of the screw around which the hook plate turns if it is too tight Cables or sheaths that are blocked or not securely...

Page 23: ...2 5mm Allen key 9 Remove the trigger and its cables sheaths from the drawbar FR 7 D visser la vis M8 qui sert d axe de rotation pour la g chette blanche avec un cl Allen 5mm 8 D visser la vis M4 avec...

Page 24: ...a manette de frein la vis de commande de frein de l attelage doit pouvoir venir en contact de la manette de frein EN If the lever goes further than the hitch brake control screw the brakes must be re...

Page 25: ...s plaquettes ne sont plus parall les au disque de frein Il est possible de r aligner l trier en d vissant les 2 vis M6 de support avec un cl Allen 5mm EN If the brake lever does not return properly Ch...

Page 26: ...Une d formation est observ e lorsque l angulation v lo remorque est trop importante V rifier que toutes les vis soient bien serr es Maximum angles Angulations maximale EN Settings repairs Disassembly...

Page 27: ...cadre de la remorque avec une cl Allen 4mm 2 Extraire le timon EN 3 Press the tiller position lever and pull the indexer out of the drawbar FR 3 Appuyer sur la manette de position du timon et extrair...

Page 28: ...Need advice or spare parts contact us Besoin de conseils ou de pi ces de rechange contactez nous contact fleximodal fr 33 0 222 930 940 28...

Page 29: ...m Control in case of problems lifting the load Good hooks positioning Monthly Braking system Brake control power and parallelism Monthly Conditions of the brake pads Monthly Hitching system Checking i...

Page 30: ...nsion des rayons Mensuel G ches Contr le en cas de probl me pour lever la charge Bon positionnement des g ches Mensuel Freinage Contr le du freinage puissance et parallelisme Mensuel Etat des plaquett...

Reviews: