FlexRadio Systems
9/7/2006
5
1.
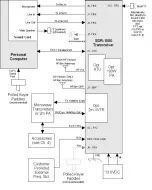
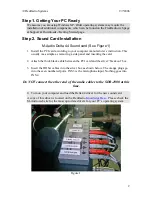
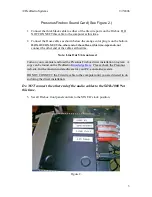
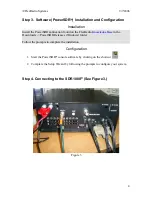
RX I/Q AUDIO: Connect the cable from the sound card LINE IN port into the
TO LINE IN jack on the back of the SDR1000
using the 1/8 TRS connector.
2.
TX I/Q AUDIO: Connect the cable from the sound card LINE OUT port into the
TO LINE OUT jack on the back of the SDR1000
using the 1/8 TRS
connector.
3.
RADIO CONTROL: Connect the beige colored parallel cable between the
computer and the SDR-1000 -OR- Connect the custom USB cable between the
computer and SDR-1000 . Load the USB driver found on the FlexRadio
Knowledge Base in the Downloads->PowerSDR Drivers and Utilities
3.
ANTENNA: Connect an HF antenna to the BNC jack closest to the DC power
jacks. The other connector is used for 6 meters or QRP operation if you have the
one watt radio.
4.
CW KEY: Plug your key into the jack labeled CW key.
5.
SPEAKER: Do not connect a speaker to the speaker jack on the back of the SDR
when using either the Delta 44 or Presonus sound cards but instead connect your
computer powered speakers to the end of the Hosa cable with the female 1/8
plug.
6.
MICROPHONE: BEST: connect the microphone directly to the sound card. On
the Delta 44 it s the INS 3 jack. On the Firebox, it s the MIC 1 position on the
front of the box. Either of these direct inputs can be wired for either balanced or
unbalanced operation.
If an XLR connector is used with the Firebox, the input will provide a low
impedance balanced input.
If a TRS ¼ jack is used with either the D44 or the Firebox, it will result in a high
impedance balanced input. Using a ¼ TS jack will result in a high impedance
unbalanced input
8-PIN MIC CONNECTOR:. Refer to the Operators manual for the pin
configuration. (The pin-out is the same as that used on Yaesu radios.) When the 8-
pin connector is used, the black 1/8 phone plug to ¼ phone plug cable included
with your Hosa cable set must be connected from the MIC out jack on the rear of the
SDR1000 to the either the INS3 on the D44 breakout box or the MIC 1 jack on the
Firebox.
7.
POWER CORD. Connect the dual banana plug to the red and black cable (both
included). Insert the plug into the SDR-1000 and attach to a 25A 13.8V power
supply.
Summary of Contents for SDR-1000
Page 1: ......
Page 2: ... 0 11 2 3 4 ...
Page 3: ... 0 1 1 2 13 4 5 2 63 7 2 73 8 5 9 ...
Page 7: ... 1 1 1 4 4 5 8 4 I 3 4 5 A 4 3 8 8 5 6 4 7 I 6 1 5 7 6 1 7 1 4 3 ...
Page 8: ... 1 1 ...
Page 14: ... 1 1 1 11 1 5 K 93 4 4 4 5 8 1 3 4 1 4 1 1 3 4 4 5 4 4 3 ...
Page 24: ... 1 1 9 9 9 9 2 ...
Page 25: ... 1 1 99 99 99 99 6 2 ...
Page 26: ... 1 1 9 9 9 9 B 2 ...
Page 27: ... 1 1 9 9 9 9 5 K 3 Q 8 4 4 8 3 5 9 1 1 4 1 4 1 45 4 9 1 3 K 3 3 Q 4 K 3 Q H A A 4 5 8 4 3 ...
Page 28: ......
Page 29: ......
Page 30: ......
Page 31: ......

