17
1300 353 986
flextool.com.au
OPERATION
STARTING THE FLEXTOOL MINI DUMPER
The following steps outline the procedure for starting the
electric Mini Dumper.
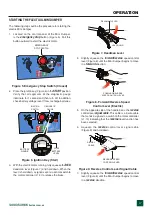
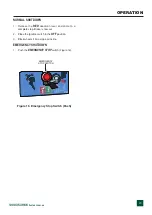
1. Located on the control panel of the Mini Dumper,
is the
emergency stop
button (Figure 5). Pull this
button outward to start the electric motor.
Figure 5. Emergency Stop Switch (Closed)
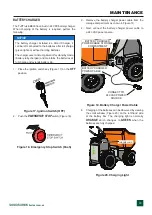
2. Place the ignition key (Figure 6) in the
START
position.
Verify that all segments of the diagnostic gauge
illuminate for 1 second and then turn off. In addition,
check battery voltage level. If low, recharge batteries.
Figure 6. Ignition Key (Start)
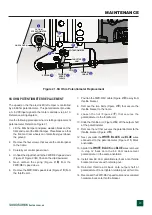
3. With the electric motor running, fully squeeze the
RED
deadman lever (Figure 7) and hold down. When the
lever is held down, a signal is sent via a microswitch to
the motor controller (J1-3) to release the brake.
2
230v / 110v
50Hz / 60Hz
1
EMERGENCY
STOP SWITCH
2
230v / 110v
50Hz / 60Hz
1
IGNITION
SWITCH
BATTERY
GAUGE
LOW
BATTERY
LEVEL
DIAGNOSTIC
GAUGE
Figure 7. Deadman Lever
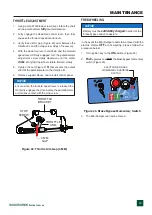
4. Slightly squeeze the
forward/reverse
speed control
lever (Figure 8) until the Mini Dumper begins to move
in a
forward
direction.
Figure 8. Forward/Reverse Speed
Control Lever (Electric)
5. On the opposite side of the handle bar is the
reverse
control lever
signal cable
. This cable is a 2-wire cable
that sends a signal via a switch to the motor controller
(J1-10) indicating that the
reverse
travel function has
been selected.
6. Squeeze the
reverse
control lever signal cable
(Figure 9) and hold down.
Figure 9. Reverse Control Lever Signal Cable
7. Slightly squeeze the
forward/reverse
speed control
lever (Figure 8) until the Mini Dumper begins to move
in a
reverse
direction.
“DEADMAN” LEVER
HOLD DOWN
FORWARD/REVERSE
SPEED CONTROL LEVER
REVERSE SPEED
CONTROL LEVER
SIGNAL
CABLE


