10
Maintenance Parts
Compressor 1-Year and Extended Parts
Warranty Op on Maintenance Schedule
Compressor 1-Year, Extended Parts and Life me
Pump Warranty Op on Maintenance Schedule
Daily
Weekly
Monthly
Every 6 Months
or 1000 Hours
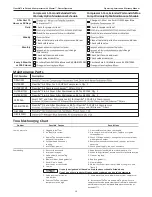
Troubleshoo ng Chart
Problem
Possible Causes
Resolu ons
Low air pressure
Overhea ng
1. Clogged inlet lter
2. Air leak(s) in system
3. Applica on exceeds rated air
output of compressor
4. Cylinder head valves not
sealing
5. Insu cient power
1. Duty cycle exceeded
2. Improper rota on
3. Head valve(s) not sea ng
properly
4. Blown cylinder head gasket(s)
5. Restric on in head,
intercooler or check valve
6. Low oil
1. Disassemble valve, clean thoroughly
2. Use soapy water to locate leaks, replace or ghten
threaded parts
3. Check CFM requirements, change tool or use compressor
with higher air output
4. Remove valves from cylinder head, repair or replace as
necessary
5. Check power supply, rewire as necessary
1. Keep duty cycle at 60/40 to maintain pump life
2. When facing ywheel, ensure counter clockwiserota on
3. Clean or replace
4. Replace gasket(s)
5. Clear blockage
6. Add oil. Ensure oil level is at middle of site glass. See
gure 8.
7. Dir
�
n intercooler ns or
cylinder
fi
ns
8. Poor ven a on / ambient
temperature too high
7. Use low pressure air to blow dirt away from compressor
8. Increase ven la on around opera ng area. Ensure
compressor has adequate clear space from walls and other
possible obstruc ons. Ambien
�
emperature should not
exceed 11 F.
Check for proper oil level
Change oil - Must use Smart Oil Whisper Blue
Compressor Oil
ter
Clean all external parts of compressor and driver
Check safety valve
change
if necessary
Check belt tension and wear
Check valve assemblies
Purchase Flexzilla Oil Maintenance Kit #MAINKIT008A
Check for proper oil level
ter
Clean all external parts of compressor and driver
Check safety valve
change
if necessary
Check belt tension and wear
Check valve assemblies
Purchase Smart Oil Maintenance Kit #FKIT026A
Use only designated oil based on maintenance schedule listed above.
Use of any other product will cause product damage and void the warranty.
A er First 70
Hours or 30 Days
FILTERKIT012
FKIT026A
Smart Oil™ and Filter Maintenance Kit, for Flexzilla® 5-10 HP Air Compressors
Flexzilla™ Oil and Filter Maintenance Kit, for Flexzilla® 5-10 HP Air Compressors
, and (8) Silencer™ Filters
MAINKIT008A
OILFZ004
DRAIN013
FILTERKIT011
Flexzilla™ Pro Air Dryer Filter Maintenance Kit, for 30 CFM, Qty. 2
Flexzilla™ Pro Air Dryer Filter Maintenance Kit, for 58 CFM, Qty. 2
OILPIS102Q
FILTER057
Flexzilla™ Air Filter, for 5-10 HP Air Compressors, Qty. 1
FILTER107KIT
Flexzilla™ Air Compressor Silencer™ Filters, Qty. 8
Operat ing, Service and Warranty Manual
Flexzilla® Pro Piston Air Compressors with Silencer™, Electric Operated


