117-00008 Rev 3.0 Flightcell® DZMx Installation Manual
Page 16 of 75
Effective Date: 18 February 2022
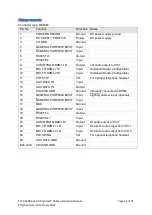
Pin No
Function
Direction
Notes
45
AUX DATA RX
Output
46
USB GND
Ground
47
GPIO3
Input
Reserved for Optional Capabilities
48
GPIO4
Input
Reserved for Optional Capabilities
49
I/O GND
Ground
50
GENERAL PURPOSE INPUT 2
Input
51
GENERAL PURPOSE INPUT 1
Input
52
GENERAL PURPOSE INPUT 5
Input
Optional: Lighting dimmer input
53
GENERAL PURPOSE INPUT 3
Input
54
GENERAL PURPOSE INPUT 4
Input
55
I/O GND
Ground
Installing a DZMx Remote Head
A Flightcell DZMx Remote Head is a remotely located control head for the DZMx, with
identical display and keypad. One or two Remote Heads may be installed to provide other
crew or mission specialists with full remote control of the DZMx.
Wiring the Remote Head
The Remote Head connects to the DZMx using the RS422/RS485 serial data connections.
The Remote Head also requires a 12-32VDC power supply. Two additional connections are
a ground connection to the chassis, and a lighting input for external lighting control.
Backlighting of the DZMx and Remote Heads can be configured individually, see page 32 for
details on adjusting the brightness and the installing the external lighting input.
A wiring diagram of the Remote Head is included in the wiring diagrams for the DZMx.
Configuring the DZMx for a Remote Head
Configure the DZMx to recognise the Remote Heads:
»
On the DZMx control head, go to
MENU > Hardware Config > Head B Enable
.
»
In DZMx Connect, go to
Settings > Hardware > Head
.
If a second Remote Head is installed, repeat these steps for
Head C
.
Configuring the Remote Heads
A head ID must be allocated to each Remote Head so that the DZMx can identify it. To
allocate an ID:
»
Press and hold the BACK key on the designated Remote Head for 2 seconds, then
release. Scroll down to
Advanced > Head ID
»
Use the RIGHT and LEFT arrow keys to select the correct head ID (either Head B or
Head C), then press END to save.


