17
ARMASIGHT by FLIR
SPARK
U S E R M A N U A L
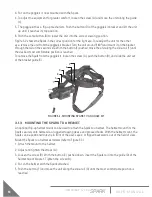
6. Adjust the mount for comfortable using. Loosen the screw (B) and move the unit along the guide (D)
for eye relief adjustment. Turn the lever (H) and move the unit along vertical slide-rail until the most
comfortable vertical position is reached.
7. The helmet mount has a flip-up mechanism. Push the button (E) of the mount bracket and lift the unit
up until it reaches its top position.
8. Push the same button (E) to lower the Spark into the proper viewing position.
The Spark can be mounted in position for the right or left eye. To readjust the Spark for other eye,
reverse its positioning and reinstall it on the helmet mount bracket. Use the second unit rail located on
the opposite side of the unit. Push the button (F) and move the unit along the slide-rail (G) until the most
comfortable position is reached.
To remove the Spark from the helmet mount, loosen the screw (B), push down on the button (C), and slide
the unit out of the guide (D). To remove the flip-up mechanism from the helmet mount, loosen the lever
(H), pull the knob out (I), and slide the flip-up mechanism out of the vertical rail.
3.1.4 MOUNTING THE SPARK TO A WEAPON WITH A QUICK-RELEASE WEAPON
MOUNT
NOTE:
The Spark is not a weapon sight. However, it can be used in conjunction with a collimator dot sight
or laser aiming device.
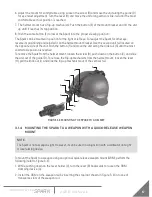
To mount the Spark to a weapon using an optional quick-release weapon mount (QRM), perform the
following (refer to Figure 3-4):
1. While pushing down on the lever holder (C), turn the lever (B) backwards to loosen the QRM
clamping device (A).
2. Install the QRM on the weapon rail by inserting the stop (not shown in Figure 3-4) into one of
transverse slots of the weapon rail.
C
D
E
G
B
A
F
H
I
FIGURE 3-3. MOUNTING THE SPARK TO A HELMET


