background image

427-0101-01-12 Revision 100

September 2020

This document does not contain any export-controlled information.

© 2020 FLIR Systems, Inc. All rights reserved worldwide. No parts of this manual, in whole or in part, may be 

copied, photocopied, translated, or transmitted to any electronic medium or machine readable form without the 

prior written permission of FLIR Systems, Inc.
Names and marks appearing on the products herein are either registered trademarks or trademarks of FLIR 

Systems, Inc. and/or its subsidiaries. All other trademarks, trade names, or company names referenced herein are 

used for identification only and are the property of their respective owners.
This product is protected by patents, design patents, patents pending, or design patents pending.
Photographs and images appearing in this manual may have been modified for illustrative purposes using 

commercial image editing software and may not always reflect an actual product configuration. 

The contents of this document are subject to change without notice. 

For additional information visit 

www.flir.com

 or write to FLIR Systems, Inc.

FLIR Systems, Inc.

6769 Hollister Avenue

Goleta, CA 93117
Support: 

https://www.flir.com/support/

.

Important Instructions and Notices to the User:

This device complies with part 15 of the FCC Rules and ISED’s license-exempt RSSs. Operation is subject to the 

following two conditions: (1) This device may not cause harmful interference, and (2) this device must accept any 

interference received, including interference that may cause undesired operation.
L'appareil est conforme à la section 15 des règles de la FCC et aux RSS exempts de licence de ISED. Le 

fonctionnement de l'appareil est soumis aux conditions suivantes: (1) Il ne doit pas causer d'interférences 

nuisibles, and (2) il peut accepter toute interférence, y compris celle susceptible de provoquer un fonctionnement 

indésirable de l'appareil.
This equipment complies with FCC radiation exposure limits and Canada radiation RF exposure limits set forth in 

CFR 47 Section 2.1091 and ISED RSS-102 set forth for an uncontrolled environment. This equipment should be 

installed and operated with a minimum distance of 20cm between the user and/or bystanders and this device. This 

device must not be co-located or operating in conjunction with any other antenna or transmitter, unless permitted 

under existing FCC certification condition.
Cet appareil est conforme aux limites d'exposition aux rayonnements de la FCC et aux limites d'exposition aux RF 

du Canada établies dans le CFR 47, section 2.1091 et ISED RSS-102 pour un environnement non contrôlé. Cet 

équipement doit être installé et utilisé avec une distance minimale de 20 cm entre l'utilisateur et / ou des tiers et cet 

appareil. Cet appareil ne doit pas être co-localisé ou fonctionner en conjonction avec une autre antenne ou un autre 

émetteur.
Modification of this device without the express authorization of FLIR Systems, Inc. may void the user’s authority 

under FCC rules to operate this device.

Note 1:

 This equipment has been tested and found to comply with the limits for a Class A digital device, pursuant to 

part 15 of the FCC Rules. These limits are designed to provide reasonable protection against harmful interference 

when the equipment is operated in a commercial environment. This equipment generates, uses, and can radiate 

radio frequency energy and, if not installed and used in accordance with the instruction manual, may cause harmful 

interference to radio communications. Operation of this equipment in a residential area is likely to cause harmful 

interference in which case the user will be required to correct the interference at the user’s own expense.

Note 2:

 If this equipment came with shielded cables, it was tested for compliance with the FCC limits for a Class A 

digital device using shielded cables and therefore shielded cables must be used with the device

Industry Canada Notice

This Class A digital apparatus complies with Canadian ICES-003.

Avis d’Industrie Canada

:

Cet appareil numérique de la classe A est conforme à la norme NMB-003 du Canada.

Proper Disposal of Electrical and Electronic Equipment (EEE)

The European Union (EU) has enacted Waste Electrical and Electronic Equipment Directive 2002/

96/EC (WEEE), which aims to prevent EEE waste from arising; to encourage reuse, recycling, and 

recovery of EEE waste; and to promote environmental responsibility.
In accordance with these regulations, all EEE products labeled with the “crossed out wheeled bin” 

either on the product itself or in the product literature must not be disposed of in regular rubbish bins, 

mixed with regular household or other commercial waste, or by other regular municipal waste 

collection means.  Instead, and in order to prevent possible harm to the environment or human 

health, all EEE products (including any cables that came with the product) should be responsibly 

discarded or recycled.

Summary of Contents for Elara R-290

Page 1: ...427 0101 01 12 Revision 100 September 2020 This document does not contain any export controlled information Installation and User Guide ElaraTM Radar R 290...

Page 2: ...existing FCC certification condition Cet appareil est conforme aux limites d exposition aux rayonnements de la FCC et aux limites d exposition aux RF du Canada tablies dans le CFR 47 section 2 1091 et...

Page 3: ...hod nearby please contact the local waste collection or recycling service the original place of purchase or product supplier or the responsible government authority in the area Business users should c...

Page 4: ...2 6 Installing the Radar Assembly 14 2 7 Uploading a Map Image and Configuring Georeference Settings 14 2 8 Aiming the Radar and Testing Target Detection 15 2 9 Defining Analytics Regions 15 2 10 Pair...

Page 5: ...rolled information Table of Contents 4 4 3 Transport Layer Security TLS and Secure HTTP HTTPS Communication 31 4 4 4 Other Cybersecurity Services 31 4 5 Map Page 32 4 6 Radar Fusion Page 34 4 7 Firmwa...

Page 6: ...FLIR Thermal Fence gives you instant automated threat detection and visual threat assessment capability around the clock in one easy to use package If help is needed during the installation process co...

Page 7: ...lowing items as required specific to the installation PoE power supply or PoE switch for radar power Cat5e or Cat6 Ethernet cable for IP communication and PoE for system power Ten conductor accessory...

Page 8: ...uracy meters 1 Azimuth Accuracy 0 6 Sensor Scan Rate Hz 10 Hz 5 Hz or 2 Hz user configurable Coverage Acres m2 FCC Human Detection 12 acres 48 500 m2 EU Human Detection 4 acres 16 000 m2 Object Data G...

Page 9: ...installation tools Blind mate Position lock Mechanical Weight Lbs 10 Height in 6 5 Width in 6 5 Depth in 7 75 Environmental Operating Temperature C 40 C to 70 C continuous operation Storage Temperatu...

Page 10: ...default Dynamic Host Configuration Protocol DHCP is enabled on the radar and a DHCP server on your network assigns the radar an IP address If there is no DHCP server on the network the radar s IP add...

Page 11: ...he Discover List Identify the radar by model name R 290 and name The default name is R 290 followed by the radar s serial number The DNA tool does not require a license to use and is a free download f...

Page 12: ...icated Step 3 Configure the radar s networking settings Right click the radar and select IP Setup or click the IP Setup icon in the navigation bar In the DNA IP Setup window you can clear Use DHCP and...

Page 13: ...isting of at least 12 characters and at least one uppercase letter one lowercase letter and one number Passwords can include the following special characters _ Log back in with the new password The ra...

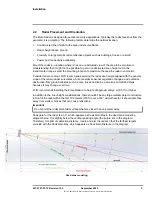
Page 14: ...at an angle aligned with the general slope of the terrain under surveillance Also consider seasonal vegetation changes and potential obstruction from ground vehicles such as cars trucks and trains as...

Page 15: ...gured the radar performing the fusion can determine whether it and a fused radar are tracking the same object see Uploading a Map Image and Configuring Georeference Settings You can mount the radar di...

Page 16: ...ould be installed with security measures regarding physical access by trusted and untrusted parties Network Security The radar transmits over IP to security personnel for video surveillance Proper net...

Page 17: ...802 3af 2003 standard PoE switch or a PoE injector The maximum Ethernet cable run is 100 meters including the PoE power supply Installations using PoE and IP video only require a single Ethernet cable...

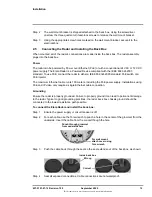
Page 18: ...wall mount bracket is not upright when you aim the radar make sure the THIS SIDE UP marking on the radar assembly faces up and the FLIR logo on the flat front panel is upright Connector Connection Et...

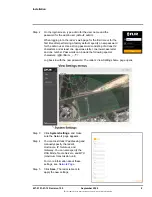
Page 19: ...eference Settings Upload a reference map image upon which the radar will overlay its display Uploading a map makes aiming the radar easier and also makes the radar display more useful to operators To...

Page 20: ...10 Pairing a PTZ Camera with the Radar Optional Users assigned the expert or admin role can pair the following FLIR Security PTZ cameras firmware v1 6 1 0 to work with the Elara Radar so that the cam...

Page 21: ...The camera reboots After the camera reboots log back in to the camera s web page 2 10 2 Enable and Configure an Automatic Radar Mode Step 1 In View Settings open the PTZ page Step 2 From the Radar Mod...

Page 22: ...fect the camera s zoom Enabled The distance from the object tracked by the radar determines the camera s zoom Step 8 To enable Only Alarm Tracks so that only alarms from the radar affect the camera cl...

Page 23: ...s the automatic mode and performs the manual action Exit and Come Back The camera exits the automatic mode performs the manual action and then returns to the automatic mode after the specified amount...

Page 24: ...you do not know the radar s IP address you can use the DNA tool to discover it The radar s web page login screen appears Step 2 Type a user name and the password and then click Log In When logging in...

Page 25: ...ons Live Radar You can Move the live radar display around by clicking on it and dragging it Zoom in and out using the mouse wheel when the mouse pointer is over the radar display Center the map and sh...

Page 26: ...lect Web Then select Edit Zoom Pan The video frame appears as an overlay in the live radar display Tip To change the size of the video frame Hover over the handle in the bottom right corner of the fra...

Page 27: ...n scan rate detection range fast moving object detection and tracking performance 2 Hz provides more detection range and better human detection 10 Hz provides less detection range but better fast movi...

Page 28: ...the radar display Step 5 To define another region repeat steps 1 5 Tips To make sure the radar detects objects and creates tracks before objects enter the alarm region define the detection region larg...

Page 29: ...ground altitude information You can also manually specify georeference information or if the map is properly calibrated right click on the map and then click Georeference sensor Latitude in degrees N...

Page 30: ...adar Fusion Page Firmware Info Page 4 1 Network Page When a user assigned the expert or admin role clicks System Settings the Network page appears The IP address mode can be set to DHCP default or Sta...

Page 31: ...ver 2 A secondary domain name server that backs up the primary DNS You can also specify the MTU Maximum transmission unit the largest amount of data that can be transferred in one physical frame on th...

Page 32: ...pears After setting the date and time the radar will require a reboot A confirmation prompt will appear 4 3 Users Page Admin level login privileges are required to add users and change or set all pass...

Page 33: ...and use all other View Settings and System Settings pages menus controls and settings admin including the default admin user Can access and use all of the radar s web pages including adding editing d...

Page 34: ...S you need to generate or upload a valid certificate You can Use the radar s web page to generate a self signed certificate Upload a self signed certificate Upload a certificate signed by a third part...

Page 35: ...elf signed or third party CA signed certificate Step 1 Select Upload Certificates Step 2 If you are uploading a self signed certificate under Public Key and then under Private Key a Click b Select the...

Page 36: ...an Anonymous Identity and a Password Changing these settings does not immediately take effect To apply a change to these settings click Save and then reboot the radar 4 4 3 Transport Layer Security TL...

Page 37: ...ng services are set to Allow which means they remain enabled and their default ports remain open To disable a service and its default port click Block Caution Changes to Services settings do not immed...

Page 38: ...site sides of the map image For example at top right and at lower left Step 3 Under Map Display click Find file and then click Upload If the map successfully uploads a confirmation message appears Cli...

Page 39: ...adar calibrates the map When a map is not calibrated a message appears onscreen To upload a Digital Elevation Model click Find file click Upload and then click Save If you have not yet configured the...

Page 40: ...rs to fuse with this radar You can also manually specify the IP address of another radar add it and select it to be fused to be fused with this radar To save any changes click Save 4 7 Firmware Info P...

Page 41: ...g the radar Factory Defaults Click Full Reset to return the radar its original factory configuration Click Partial Reset to maintain network and IP settings while returning all other settings to the f...

Page 42: ...le to View Radar Display Video Stream If the video stream from the radar does not appear it could be that the packets are blocked by the firewall or there could be a conflict with video codecs that ar...

Page 43: ...er 2020 FLIR Systems Inc 6769 Hollister Ave Goleta CA 93117 USA Corporate Headquarters FLIR Systems Inc 27700 SW Parkway Ave Wilsonville OR 97070 USA Support https www flir com support This document d...

Reviews: