427-0101-01-12 Revision 100
September 2020
9
This document does not contain any export-controlled information.
Installation
2.2
Radar Placement and Orientation
The Elara Radar is designed for outdoor security applications. Typically, the radar faces out from the
perimeter it is protecting. The following factors determine the optimal location:
•
Unobstructed line of sight to the area under surveillance
•
Radar height above ground
•
Proximity to large metallic radar-reflective objects such as buildings, trucks, or aircraft
•
Power and connectivity availability
Mount the radar in a location where it has an unobstructed view of the area to be monitored.
Understanding that it might not be possible to get an unobstructed line of sight out to the
instrumented range, select the mounting location to maximize the area the radar can monitor.
Consider terrain contour. FLIR recommends pointing the radar at an angle aligned with the general
slope of the terrain under surveillance. Also consider seasonal vegetation changes; and potential
obstruction from ground vehicles such as cars, trucks and trains, as well as aircraft and ships,
because it may change over time.
FLIR recommends installing the Elara Radar at a height of approximately 2 m (6.5 ft) or higher.
In addition to the line of sight considerations, there shouldn’t be any large metallic object or structure
in front of the radar within the first 100 meters (330 ft) over a 180° azimuth sector. It should also face
away from walls or fences that can cause reflections.
Important
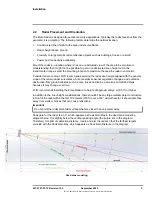
Peak gain for the radar is at -3°, which appears as Peak Gain Ray in the dead zone modeling
diagram below. It is slightly below the vertical pointing angle (the purple line in the diagram).
Therefore, for optimum detection distance, locate and aim the radar so that the farthest targets
coincide with the Peak Gain Ray, which appears as Peak Gain Distance in the diagram.
Do not point the radar at metallic surfaces that are closer than one meter away.
Dead zone modeling


