background image

427-0064-00-12 Version 100

August 2017

17

2

Basic Operation and Configuration

Camera Control and Status

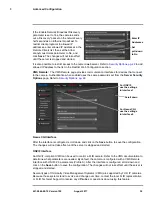
In the lower left of the screen are two indicator “lights”: Control and Status. 
Initially the Control light is off, as in the image above, indicating the user is not 
able to control the camera immediately. When multiple users are connected to 
a camera, only one user at a time can issue commands to the camera. If 
another user has control of the camera, the Control light is yellow.   

A user is able to request control of the camera by clicking on the yellow or black “light”, or simply by 
sending a command to the camera. The Status light may turn off temporarily while waiting for the 
response from the camera. After a short pause, the Control light should turn green. 

If a command is sent to the camera when the user does not have control, the command will not be 
executed, and it is necessary to send the command again once the light is green.

In addition, when the cursor is moved over the video, a snapshot button also appears in the 
upper right of the screen. After clicking the snapshot button, the video image is saved as a 
jpeg file and the browser will provide prompts depending on which browser is being used.

Web Control Panel

The control buttons on the right side of the page provide a way to control 
the camera in a limited number of ways. When the mouse cursor is 
positioned over a button, a tool tip is displayed. 

This same web interface is used with various FLIR cameras—some are 
fixed, such as the FB-Series O cameras, and some are pan/tilt cameras. 
The control panel may appear different for different FLIR cameras.

The following buttons appear for the FB-Series O cameras:

Toggle Polarity

This button changes the polarity of the assigned colors to the different temperatures in a 

scene. In the black and white palette for example, hot objects are displayed as white and cold objects 
as black, or vice versa. 

Toggle Palette

This button causes the camera to cycle through six different look up table (LUT) color 

palettes. Depending on the subjects viewed, one color palette may be preferable to the others. The 
Toggle Polarity button allows access to six more palettes (refer to 

Misc. (Lookup Table), pg. 30

). 

Perform IR NUC Calibration 

This button causes the camera to perform a Non-Uniformity Correction operation (refer to 

Image freezes momentarily, pg. 24

).

Summary of Contents for FB-Series O

Page 1: ...User and Installation Guide FB Series FB Series O...

Page 2: ...equency energy and if not installed and used in accordance with the instruction manual may cause harmful interference to radio communications Operation of this equipment in a residential area is likel...

Page 3: ...Testing 10 1 4 2 Analog Video Connections 10 1 4 3 Connecting Power 10 1 4 4 Alarm Connections Not supported 11 1 4 5 Ethernet 11 1 4 6 Camera Grounding 11 1 5 Mounting the Camera 11 1 6 Camera speci...

Page 4: ...Configuration 3 1 Setup Menu 27 3 1 1 Video Setup 28 3 1 2 Thermal Image Setup 29 3 2 Maintenance Menu 31 3 2 1 Sensor Menu 31 3 2 2 Files Menu 33 3 2 3 Product Info Menu 34 Image from a standard cam...

Page 5: ...system always follow the warnings and cautions in this manual when handling and operating the camera 1 1 Warnings and Cautions Warning Caution 1 2 References FLIR Doc 427 0030 00 28 Nexus IP Camera Co...

Page 6: ...Powered Device compliant with the IEEE 802 3af 2003 standard In installations using analog video and conventional power an RG59U coaxial cable and a power cable are installed It is recommended an Eth...

Page 7: ...n the unit s cables or power cords Ample Air Circulation Leave enough space around the unit to allow free air circulation Cabling Considerations Using a cable longer than the manufacturer s specificat...

Page 8: ...R representative or FLIR Technical Support for information For installations with multiple cameras the fields of view of cameras should overlap in order to remove all dead zones in which a camera cann...

Page 9: ...1 4 20 threaded fastener on the bottom of the camera If using the 1 4 20 fastener on the bottom of the camera the maximum depth of the fastener should not exceed 10 0 mm 0 4 in 1 4 Camera Connections...

Page 10: ...tions ensure the power supply or circuit breaker is switched off The camera itself does not have an on off switch Generally the FB Series O camera may be connected to a circuit breaker and the circuit...

Page 11: ...unting bracket 2 At the center of the template a cable entry hole 40 mm 1 57 in diameter will provide for hidden cables 3 Drill the cable entry hole for cables or use the slot for surface mounting the...

Page 12: ...Athermalized focus free General Weight 2 3 lb 1 kg with sun shield Dimensions L W H 11 1 x 3 8 x 3 7 285 mm x 96 mm x 94 mm with sun shield and fully extended mounting arm Input Voltage dc 12 Vdc 10 I...

Page 13: ...equipment in the network for example any PC or device that will connect to the camera any router or firewall that will carry the IP traffic and so on 2 1 IP Camera ONVIF Profile S Compliant When the...

Page 14: ...2 1 3 15 or later from the FLIR Firmware Software Downloads page at http www flir com security display id 73533 b Unzip the utility then double click to run the executable file DNA exe All the units...

Page 15: ...on the monitor If using a conventional power supply connect the camera to a network switch with an Ethernet cable and connect a PC or laptop to the switch also Use a web browser to access and test th...

Page 16: ...or slow communication links if there is a problem displaying the video image it may help to slow down the frame rate Help The Help menu displays software version information If it is necessary to cont...

Page 17: ...snapshot button the video image is saved as a jpeg file and the browser will provide prompts depending on which browser is being used Web Control Panel The control buttons on the right side of the pa...

Page 18: ...ormation is provided in Thermal Image Setup pg 29 When making configuration changes using the Setup page most of the changes take effect immediately and it is not necessary to start and stop the serve...

Page 19: ...be set to DHCP addressing if a DHCP server is used by the network To set the IP address using DNA refer to Set IP Address using the FLIR Discovery Network Assistant DNA pg 14 When the IP address is c...

Page 20: ...P server or can be entered manually If NTP mode is selected the NTP server information can be entered The Nexus server must be stopped before changes can be saved Set the date and time parameters then...

Page 21: ...ation that is active and running and another configuration that is saved and possibly different than the running configuration The message at the bottom of the page indicates the saved configuration i...

Page 22: ...ect the Save button to save the changes Note To maintain security of the system set new passwords for each of the three login accounts requires the admin login user The user account can only use the L...

Page 23: ...e The camera automatically optimizes the image to provide the best contrast in most conditions and in some cases other settings can be used to further improve the image The performance of the camera w...

Page 24: ...rature allowing the camera to correct for ambient temperature changes and provide the best possible image No video If the camera will not produce an image check the video connection at the camera and...

Page 25: ...am2 sensor1 Port 554 is the standard RTSP port as well as the default for the camera Typically if the default port has not been changed the port can be left out of the streaming command such as rtsp 1...

Page 26: ...ld keep in mind that the sky is quite cold and can strongly affect the overall image It may be possible to avoid a problem by slightly moving the camera up or down to include or exclude items with hot...

Page 27: ...r the settings are saved to a configuration file It is a good idea to make a backup of the existing configuration file prior to making changes and another backup once the changes are finalized If nece...

Page 28: ...to save the changes through power cycles The parameters in the Encoding section will have a significant impact on the quality and bandwidth requirements of the video stream Use the default values ini...

Page 29: ...lect either NTSC or PAL depending on the video viewing and recording devices connected to the camera Select Save 3 1 2 Thermal Image Setup In most installations it will not be necessary to change the...

Page 30: ...the page to keep the settings after a power cycle or select the Factory Defaults button to return the settings to default values Brightness ITT Mean determines the temperature that is at the middle o...

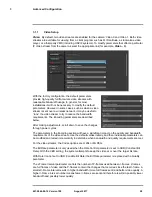
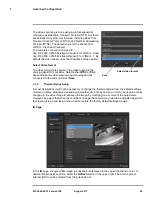
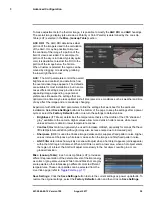
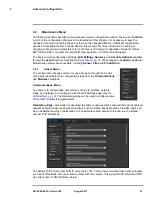
Page 31: ...menus are accessible including Sensor Files and Product Info 3 2 1 Sensor Menu The configuration changes commonly used are done through the Sensor menu Described below are configuration steps from the...

Page 32: ...to Security Options pg 22 Nexus CGI Interface After the interface is configured scroll down and click on the Save button to save the configuration The changes will not take effect until the server is...

Page 33: ...pload Download of configuration files to another computer for backup or to install a new configuration file to the camera Shown at the top of the screen is the configuration script file in a scrollabl...

Page 34: ...og page to set logging parameters Scroll down and select the Download button under Field Support Log to download a zip file to the computer for field service evaluation 3 2 3 Product Info Menu The Ide...

Page 35: ...Version 100 Date August 2017 FLIR Systems Inc 6769 Hollister Ave Goleta CA 93117 USA Corporate Headquarters FLIR Systems Inc 27700 SW Parkway Ave Wilsonville OR 97070 USA Support http www flir com se...

Reviews: