background image

9

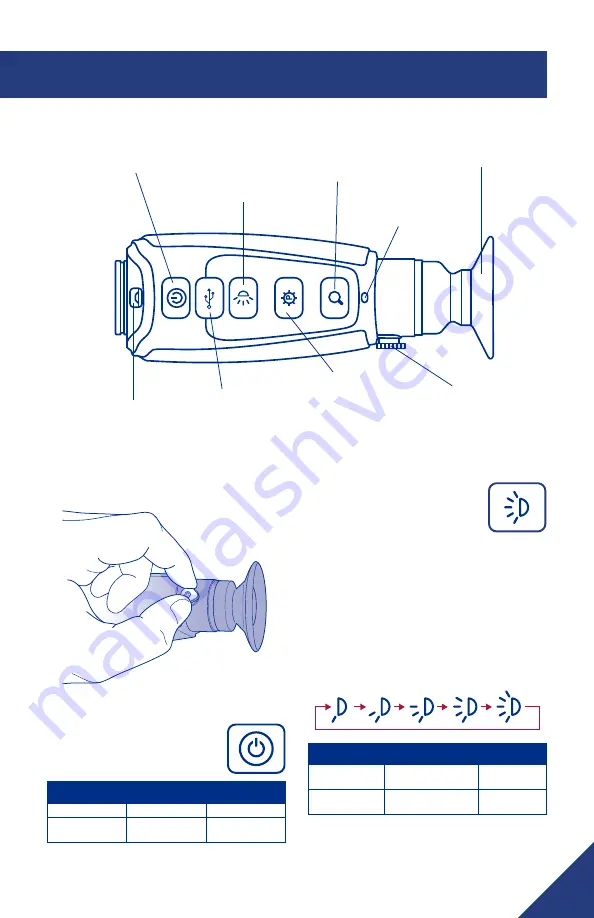
3.1 SYSTEM CONTROLS AND BUTTONS

3.1.3 DISPLAY BRIGHTNESS 

BUTTON

Use this button to cycle through the 

five levels of display brightness. 

Each press of the button advances 

to the next level of brightness. 
When the highest brightness level is reached, 

subsequent button presses advance to the 

next lower brightness levels. When the lowest 

brightness level is reached, subsequent button 

presses advance to the next higher brightness 

level. One of the following icons is displayed 

for approximately 3 seconds after the button is 

pressed indicating the current brightness level:

Dim

Bright

SYSTEM STATE

SHORT PRESS

LONG PRESS

System OFF

Flashes LED Task 

light

Turn on LED 

Task Light

System ON

Changes Current  

Display Brightness

N/A

3.1.1 DIOPTER ADJUSTMENT

While looking through the eyepiece, adjust the 

position of the diopter lever to optimize the 

sharpness of the image in the viewfinder.

3.1.2 POWER BUTTON

The Power Button performs the 

following functions:

SYSTEM STATE SHORT PRESS

LONG PRESS

System OFF

Turns Power ON

N/A

System ON

Access User 

Menu

Turns Power 

OFF

SECTION 3. OPERATING THE SYSTEM

Power

Task Light

Mini-USB/Charging/Analog  

video out 

(320 & 640 models only)

Display Brightness  

Task Light On/Off

Palette Selection

Zoom (320 & 640 models)

Charging

Indicator

Eyepiece

Adjustable Diopter

Summary of Contents for FLIRSCOUT III

Page 1: ...U S E R M A N U A L FLIR SCOUT III Thermal Monocular...

Page 2: ...change without notice Proper Disposal of Electrical and Electronic Equipment EEE The European Union EU has enacted Waste Electrical and Electronic Equipment Directive 2002 96 EC WEEE which aims to pre...

Page 3: ...eception which can be determined by turning the equipment off and on the user is encouraged to try to correct the interference by one or more of the following measures Reorient or relocate the receivi...

Page 4: ...FLIR SCOUT III U S E R M A N U A L CONTENT Page 1 Introduction 5 2 Getting Started 7 3 Operating the System 9 4 Symbology 13 5 Maintenance 14 6 Warranty 14 7 Specifications 15...

Page 5: ...ursion 1 3 FEATURES Rugged design Built to withstand the demands of outdoor use Microbolometer sensor for excellent image quality and clarity Palm Sized Portability and Light Weight Only 12 Ounces Emb...

Page 6: ...eat and are clearly seen by the FLIR SCOUT III in even the most adverse conditions FLIR SCOUT III ENABLES THE OUTDOOR ENTHUSIAST TO See animals and difficult terrain in reduced visibility or total dar...

Page 7: ...your product to determine the actual contents of your product package In addition to the product the following items are included in the product package FCC Declaration of Conformity CE Declaration o...

Page 8: ...es monocular is equipped with a sophisticated power system that uses a rechargeable internal Li Ion battery BATTERY STATUS INDICATOR While the monocular is ON a battery status indicator is always show...

Page 9: ...e current brightness level Dim Bright SYSTEM STATE SHORT PRESS LONG PRESS System OFF Flashes LED Task light Turn on LED Task Light System ON Changes Current Display Brightness N A 3 1 1 DIOPTER ADJUST...

Page 10: ...t BLACK HOT Hot objects appear black Scenes appear more lifelike than White Hot especially at night INSTALERT LEVEL 1 The hottest 5 of things in the image are colored and everything else is greyscale...

Page 11: ...Analog Video Adapter cable to record video or supply video to a remote monitor it may be useful to turn off the Auto Power Off feature of the monocular Set the video format using the SCOUT III LS X LS...

Page 12: ...TO FFC CALIBRATION By design the camera will periodically initiate a Flat Field Correction FFC cycle also known as a Non Uniformity Correction NUC A shutter activates inside the camera and provides a...

Page 13: ...ll of SCOUT III s functions See the reference points below to get a solid understanding of the onscreen functionality SECTION 4 SYMBOLOGY This symbol clearly identifies the current palette that the im...

Page 14: ...or display window 5 4 CAUTIONS Do not disassemble the monocular enclosure Disassembly can cause permanent damage The battery is not user replaceable Do not point the monocular at high intensity radiat...

Page 15: ...Fire Brightness Multiple Brightness Levels Task Light LED operational when imager power off SYSTEM SPECIFICATIONS Display 640 X 480 Video Output N A NTSC PAL composite video NTSC composite video POWER...

Page 16: ...xport flir com Technical Support Repairs Returns Refunds Warranty OTS Support flir com www flir com Equipment described herein is subject to US export regulations and may require a license prior to ex...

Reviews: