background image

RTSP address (fig. 4) using your video 

streaming-capable application.

OEMCameras.com

Phone: 1-888-919-2263 | Outside the U.S.: 

+1-845-343-4077 Address: P.O. Box 4242 Middletown, New 

York 10941 USA

FLIR

SCION


U S E R   M A N U A L

The MEDIA GALLERY allows the operator to 
play or delete selected image or video files 
stored in the camera.

4.6 DELETE MEDIA

FLIR0001

FLIR0002

FLIR0003

FLIR0004

FLIR0005

FLIR0006

FLIR0007

FLIR0008

FLIR0009

REC

xx 

h

 xx 

m

SSID #5

IP:  

192.168.10.10

Subnet Mask:  

255.255.255.0

RTSP IP:  

RTSP://192.168.10.10:5004/SCION

REC

xx 

h

 xx 

m

SSID #5

P a s s W o r d   

A

a

#

4.7 WIFI MENU

1. From the Settings Menu      , click on the WiFi 

network Icon        to select the WiFi menu.

2. All the WiFi networks in range will be shown.
3. Use the scroll buttons              to find the 

network you wish to connect to. 

4. Select the network with the OK button         .
5. Scion prompts you for a password (see Fig. 3).

Figure 3

Figure 1

Figure 2

Figure 4

6. Scroll up to select password characters, 

beginning with lowercase “a” and continuing 

with lowercase letters, single digit numbers, 

uppercase letters, and special characters.

7. Use the OK button         to select a character 

and the FLEX button to change to uppercase 

characters or numbers/special characters.

8. Hold down the FLEX button        to delete a 

given character (about 3 seconds).

9. Once your WiFi password is entered, hold 

the OK button about 3 seconds to log in. The 

screen reveals your IP address and Real Time 

Streaming Protocol number (RTSP IP) used for 

video streaming. 

To view an image

1.  Use the scroll buttons             to select an 

image, then press the OK button.

2. The image will be displayed.

To view a video

1.  Use the scroll buttons             to select the 

video, then press the OK button.

2. The video will be played and can be paused 

using the OK button.

To delete an image or video

1. Use the scroll buttons             to select the 

image or video, then hold the OK button       

for 3 seconds. 

2. The “Delete internal media” box will 

display, as in the figure below. Press the OK 

button          again to confirm the deletion. 

3.  The image or video will disappear from the list. 

10. To access the RTSP stream, navigate to the 

1. Use the scroll buttons             to select  

the Media Gallery        as in fig. 1 below.

REC

xx 

h

 xx 

m

WARNING

Delete internal media?

4.5 MEDIA GALLERY

Summary of Contents for SCION OTM130

Page 1: ...U S E R M A N U A L FLIR SCION Thermal Monocular TM Phone 1 888 919 2263 Outside the U S 1 845 343 4077 Fax 1 845 343 4299 Address P O Box 4242 Middletown New York 10941 USA...

Page 2: ...tronic Equipment EEE The European Union EU has enacted Waste Electrical and Electronic Equipment Directive 2002 96 EC WEEE which aims to prevent EEE waste from arising to encourage reuse recycling and...

Page 3: ...eption which can be determined by turning the equipment off and on the user is encouraged to try to correct the interference by one or more of the following measures Reorient or relocate the receiving...

Page 4: ...5 1 Introduction 6 2 Getting Started 8 3 Operating the System 9 4 Main Menu 10 5 View Modes 15 6 Maintenance Warranty 16 7 Specifications 17 OEMCameras com Phone 1 888 919 2263 Outside the U S 1 845...

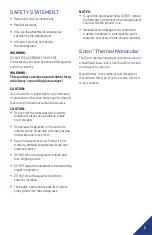
Page 5: ...ssure fresh water and a lens cloth Keep the equipment clean Protect it from moisture dramatic temperature drops and electrical shocks DO NOT force the equipment controls past their stopping points DO...

Page 6: ...the same features as Scion OTM s coupled with FLIR TruWITNESS compatibility That package can instantly stream encrypted thermal footage of any pursuit evidence recovery or search and rescue effort to...

Page 7: ...all generate or reflect heat and are clearly seen by the thermal camera in even the most adverse conditions Scion enables the user to See people or objects in difficult terrain reduced visibility or t...

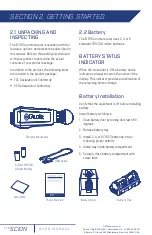
Page 8: ...is ON a battery status indicator is always shown in the corner of the display This indicator provides an estimation of the remaining battery charge Battery Installation Verify that the equipment is of...

Page 9: ...viewfinder SECTION 3 OPERATING THE SYSTEM 3 1 3 Using USB C Connector Remove the connector protective cap Connect USB C cable To view video using the USB C connect the cable to a USB input of a compu...

Page 10: ...t using progressive e zoom The actual e Zoom value will be displayed at the top of the scale Recording Video Long press the FLEX button to START STOP recording A REC icon will appear in the top right...

Page 11: ...TTE MENU The PALETTE menu allows you to select from a choice of temperature imaging modes The palettes act as color templates for visualization of temperature changes in the scene REC xx h xx m REC xx...

Page 12: ...een brightness level Press OK to select option use arrows to change value Press power button to exit selection 4 2 4 RAINBOW The Rainbow palette pinpoints small temperature changes and uses vibrant co...

Page 13: ...nt DDE a sharpness correction that digitally enhances the picture significantly improves edge sharpening further reducing image noise See presets table for adjustment range and default values Lower va...

Page 14: ...single digit numbers uppercase letters and special characters 7 Use the OK button to select a character and the FLEX button to change to uppercase characters or numbers special characters 8 Hold down...

Page 15: ...e 320 240 pixels 1 FULL mode Minimal overlay for best situational awareness 3 Lock Span mode Auto Gain Control AGC is locked at current level to view rich details even in low dynamic range scenes Shor...

Page 16: ...lens by scratching it Only wipe the lens clean when there is visible contamination on the surface 6 3 PREFERRED METHOD FOR CLEANING THE LENS Materials Optical grade cloth Pure water de ionized or othe...

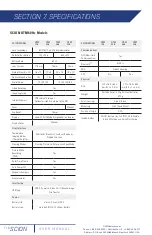
Page 17: ...rface Temperature Imaging Modes Thermal Palettes White Hot Black Hot Iron Bow Rainbow Graded Fire Lava Viewing Modes Scouting Picture in Picture Lock Span Mode Picture While Recording PWR Yes Date Tim...

Page 18: ...outing Picture in Picture Lock Span Mode Picture While Recording PWR Yes Date Time Stamp Yes Auto Power OFF Yes Magnetic Compass Yes Accelerometer Yes Interfacing USB Type USB C Power In Video Out Vid...

Page 19: ...Fire Lava Viewing Modes Scouting Picture in Picture Lock Span Mode Picture While Recording PWR Yes Date Time Stamp Yes Auto Power OFF Yes Magnetic Compass Yes Accelerometer Yes NFC Near Field Communic...

Page 20: ...port flir com www flir com NASDAQ FLIR Equipment described herein may require US Government authorization for export purposes Diversion contrary to US law is prohibited Imagery for illustration purpos...

Reviews: