background image

Working with Images and

Video

10

10.1

General SD Card Usage Information

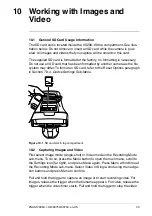
The SD card slot is located inside the VS290–00 top compartment. See illus-
tration below. Do not remove or insert an SD card while the camera is pow-
ered. All images and videos that you capture will be stored on this card.

The supplied SD card is formatted at the factory, no formatting is necessary.
Do not use an SD card that has been formatted by another camera as the file
system may differ. To format an SD card, refer to the Reset Options paragraph
in Section 7.9.4,

Device Settings Sub-Menu

.

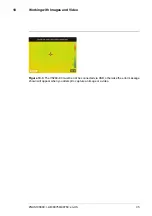
Figure 10.1

SD card slot in top compartment.

10.2

Capturing Images and Video

First select image mode (single-shot) or Video mode in the Recording Mode
sub-menu. To do so, press the Menu button to open the main menu, scroll to
the Settings icon (far right), and press Menu again. Press Menu a third time at
the Recording Mode sub-menu. Select Video or Single-shot using the naviga-
tion buttons and press Menu to confirm.

Pull and hold the trigger to capture an image or to start recording video. For
images, release the trigger when the filename appears. For video, release the
trigger when the video timer starts. Pull and hold the trigger to stop the video

#NAS100060; r. AB/80750/80750; en-US

33

Summary of Contents for VS290-00

Page 1: ...USER MANUAL Thermal Videoscope Kits Kit nos VS290 2x and VS290 3x...

Page 2: ......

Page 3: ...USER MANUAL Thermal Videoscope Kits NAS100060 r AB 80750 80750 en US iii...

Page 4: ......

Page 5: ...on 7 4 2 4 Worklight Button 7 4 2 5 Navigation Pad 7 4 3 Top Compartment 8 4 4 VSC IR21 Thermal Camera Probe 8 4 5 VSC IR32 Thermal MSX Camera Probe 9 4 6 VSC IR33 Thermal MSX Camera Probe 9 4 7 Displ...

Page 6: ...rea 30 9 Isothermal Alarms 32 9 1 Isotherms Overview 32 9 2 Isotherm Screen Shots 32 10 Working with Images and Video 33 10 1 General SD Card Usage Information 33 10 2 Capturing Images and Video 33 10...

Page 7: ...d are the property of their respective owners 1 2 Quality Assurance The Quality Management System under which these products are developed and manufactured has been certified in accordance with the IS...

Page 8: ...rument that improves productivity and reduces diagnos tic time for facility diagnostics utilities manufacturing public safety and in spection service industries Please update the VS290 00 Videoscope D...

Page 9: ...e points and are low profile 10 to 400 14 to 752 temperature range 57 x 44 field of view FOV Automatic hot cold spotting and Isotherm color alarms CAT IV 600 V safety rating VS290 32 and VS290 33 only...

Page 10: ...ot intended for use in high voltage 600 V AC environments Personal injury damage to the camera and damage to external equipment can result WARNING Do not operate the device if you do not have the corr...

Page 11: ...om that to which the receiver is connected Consult the dealer or an experienced Radio TV technician for help Unlicensed band This device complies with Part 15 of the FCC Rules Operation is subject to...

Page 12: ...4 Navigation pad Menu button centre and navigation buttons outer ring 5 Return button exit a menu 6 Power button long press 7 USB connector and memory card compartment 8 Collar screw locks probe to VS...

Page 13: ...to access the stored images and video Press the Return button to exit the gallery 4 2 4 Worklight Button Press the Worklight button to switch the probe tip light ON or OFF not avail able on VSC IR21 p...

Page 14: ...environments Always update the VS290 00 Videoscope Display s firmware as explained in Section 14 before connecting a new probe to ensure optimum performance CAUTION Ensure that the VS290 00 is powered...

Page 15: ...from the Videoscope display when removing it Figure 4 5 VSC IR32 camera probe 1 Thermal camera lens 2 Digital camera lens 3 LED worklight 4 Probe 4 6 VSC IR33 Thermal MSX Camera Probe The VSC IR33 is...

Page 16: ...4 Cross hairs Target a surface spot to measure its temperature See Sec tion 7 6 Measurements Menu for additional cross hairs functionality 5 Highest temperature sensed in the current camera image 6 R...

Page 17: ...camera images The horizon tal slider is obstructed in the image above Note that the VSC IR21 does not include MSX digital camera or worklight features 10 Temperature reading of targeted spot In Hot C...

Page 18: ...ators on the charger flash while a battery is charging and glow steadily when fully charged It may require up to 2 hours for a full charge if a battery is completely drained Once charged place a charg...

Page 19: ...optimum performance 1 Insert a fully charged battery into the VS290 00 handle 2 If the probe is purchased separately from the Videoscope Display please connect the probe to the Videoscope Display befo...

Page 20: ...gation buttons to se lect Thermal MSX Thermal or Digital camera press Menu to confirm Note that the VSC IR21 probe does not include MSX digital camera or worklight features 7 The cross hairs allow you...

Page 21: ...nu 7 2 Main Menu The main menu options are 1 Image Rotation 2 Image Mode 3 Color 4 Measurement 5 Temperature Scale and 6 Settings 7 3 Image Rotation Menu Figure 7 1 Accessing the Image Rotation mode P...

Page 22: ...features Thermal MSX Multi Spectral Dynamic Imaging is an enhancement that im proves image clarity by embossing visual scene details on the thermal image providing added context to accurately target...

Page 23: ...vigation arrows to scroll Press Menu when the desired color palette is selected Iron Rainbow Gray Above Alarm or Below Alarm In the Above Below Alarm modes known as Isotherms you select a high alarm s...

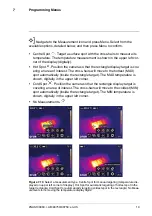
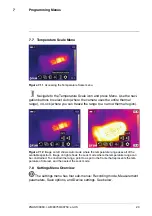
Page 24: ...Figure 7 7 Selecting a Color palette or an Isotherm Alarm Above and Below mode Figure 7 8 Isotherm Alarm examples 7 6 Measurements Menu Figure 7 9 Accessing the Measurements mode menu NAS100060 r AB 8...

Page 25: ...rget The MAX temperature is shown digitally in the upper left corner Cold Spot Position the camera so that the rectangle display target is covering an area of interest The cross hairs will move to the...

Page 26: ...egion Figure 7 12 Image on left shows Auto mode where the temperature range uses all of the available spectrum Image on right shows the Lock mode where the temperature range can be constrained To cons...

Page 27: ...Mode sub menu Select Video or Single shot using the navigation buttons and press Menu to confirm Pull and hold the trigger to start stop a video re cording or to capture a single image Figure 7 14 Se...

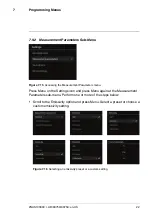
Page 28: ...u on the Settings icon and press Menu again at the Measurement Parameters sub menu Perform one or more of the steps below Scroll to the Emissivity option and press Menu Select a preset or choose a cus...

Page 29: ...eric temperature value Figure 7 18 Selecting the Atmospheric Temperature using the up down arrow buttons 7 9 3 Save Options Sub Menu Press Menu on the Settings icon and press Menu again at the Save Op...

Page 30: ...al image captured 7 9 4 Device Settings Sub Menu Figure 7 20 Accessing the Device Settings sub menu Press Menu on the Settings icon and press Menu again at the Device Settings sub menu to begin progra...

Page 31: ...et the Language Time Date and Units of measure Figure 7 21 Selecting the user interface Language Figure 7 22 Setting the Date Time and Format Figure 7 23 Selecting the Temperature Units NAS100060 r AB...

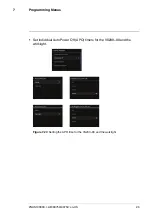
Page 32: ...Programming Menus 7 Set individual Auto Power Off APO timers for the VS290 00 and the worklight Figure 7 24 Setting the APO time for the VS290 00 and the worklight NAS100060 r AB 80750 80750 en US 26...

Page 33: ...tness View System information including serial number and firmware version If you require technical assistance please note the serial number for the base unit and probe found in this menu first as you...

Page 34: ...card Note that the memory card cannot be formatted if a USB cable is connected to the unit Figure 7 27 Reset the unit to factory default conditions and or format SD memory card View regulatory data F...

Page 35: ...ay Configuration When you power up the VS290 00 the display will show the camera image for the currently selected Image Mode Thermal MSX Thermal or Digital camera The digits and icons that are display...

Page 36: ...t the VS290 00 is powered off before removing or attaching probes Do not at tempt to remove or attach a probe with the VS290 00 powered up Note that the release tab item no 10 in Figure 4 1 must be pu...

Page 37: ...t the VSC IR21 does not have an MSX or a digital camera mode 5 The cross hairs allow you to target and measure the temperature of a sur face area The measurement is shown digitally upper left The ther...

Page 38: ...ect the temperature set point The hot alarm color cold is red while the cold alarm color code is blue 9 2 Isotherm Screen Shots Figure 9 1 Above Alarm left shows a high temperature alarm setup The ala...

Page 39: ...in Section 7 9 4 Device Settings Sub Menu Figure 10 1 SD card slot in top compartment 10 2 Capturing Images and Video First select image mode single shot or Video mode in the Recording Mode sub menu T...

Page 40: ...deo only full screen mode image vid eo information and image video delete 10 4 Transferring Images and Video Transfer to a PC by first connecting the VS290 00 to a PC using the supplied USB cable the...

Page 41: ...th Images and Video 10 Figure 10 3 The VS290 00 must be not be connected via USB otherwise the error message shown will appear when you attempt to capture an image or a video NAS100060 r AB 80750 8075...

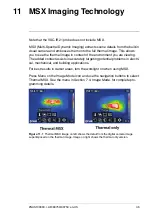
Page 42: ...in accurately targeting potential problems in electri cal mechanical and building applications For best results in darker areas turn the worklight on when using MSX Press Menu on the Image Mode icon a...

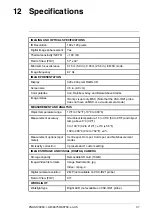
Page 43: ...camera mode MEASUREMENTAND ANALYSIS Object temperature range 14 to 752 10 to 400 Measurement accuracy At ambient temperature 15 to 35 59 to 95 and object temp above 0 32 0 to 100 32 to 212 3 5 5 100...

Page 44: ...e Display 640 g 1 4 lbs Dimensions VS290 21 kit with case L x W x H 54 x 35 x 17 cm 21 3 x 13 8 x 6 7 in VS290 32 kit with case L x W x H 120 x 48 x 20 cm 47 x 18 9 x 7 9 in VS290 33 kit with case L x...

Page 45: ...IP 54 probe and Vid eoscope Display Electrical Safety VS290 32 and VS290 33 are rated for use in CAT IV 600 V AC environments VS290 21 is not in tended for use in high voltage 600 V AC environments SU...

Page 46: ...CUSTOMER SUPPORT 13 Customer Support Telephone List https support flir com contact Repair Calibration and Technical Support https support flir com NAS100060 r AB 80750 80750 en US 40...

Page 47: ...timally with the Videoscope Display As new probes are introduced into the product family your Videoscope Display firm ware may need an update to accommodate them The firmware files and instructions fo...

Page 48: ...ays of purchase Otherwise the standard one year warranty will be in effect from date of purchase The 2 10 warranty covers parts and labour for the camera for 2 years and coverage of the detector for 1...

Page 49: ......
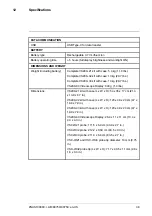
Page 50: ...support flir com Copyright 2021 FLIR Systems Inc All rights reserved worldwide Disclaimer Specifications subject to change without further notice Models and accessories subject to regional market con...

Reviews: