background image


GB 


GB 


21 


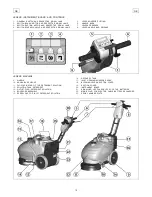
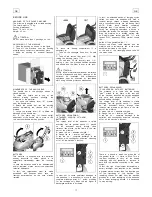
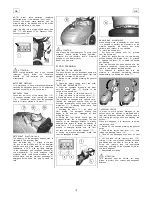
FRONT SQUEEGEE RUBBER REPLACEMENT 
Check  the  wear  of  the  squeegee  rubber  and 
eventually replace it. 
For the replacement it is necessary to: 
1. Lower  the  squeegee  rotating  to  the  lower 
part  the  handle  lever  (5)  placed  in  the 
centre of the handle bar. 
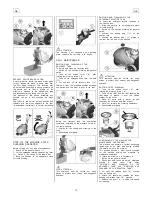
2. Tip  over  the  machine  backwards  (see 
under “POSITIONING OF THE MACHINE FOR 
MAINTENANCE  AND  PARKING")  paying 
attention to remember to switch off the general 
switch  and  to  empty  the  tanks  before  tipping 
over the machine. 


3. With  the  machine  in  this  position  proceed 
to disassemble the squeegee and then the rear 
squeegee 

rubber 

(see 

under 

“REAR 

SQUEEGEE RUBBER REPLACEMENT”). 
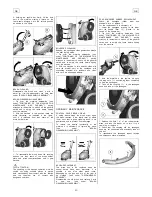
4. Take off the wing nuts (6) placed in the 
upper  part  of  the  squeegee  body  separating 
then  the  two  metal  parts  that  form  it  to take 
off the front rubber. 
5. Clean with a water jet all the components. 
To  reassemble  the  squeegee  repeat  reverse 
the operations above-mentioned. 


TROUBLESHOOTING GUIDE 

 
THE SUCTION MOTOR DOES NOT WORK 
1. Check the charge level of the batteries that 
is visible activating first the geneal switch (1) 
(see under “BATTERIES RECHARGING”). 
2. Verify that the suction motor switch (3) is 
activated checking that its signal lamp is on. 

3. Check the level in the recovery  tank (see 
under 

“OVERFLOW 

DEVICE”) 

and 

if 

necessary, empty the tank. 
If  the  problem  persists,  please  contact  the 
authorized technical assistance. 


THE BRUSH MOTOR DOES NOT WORK 
1. Check the charge level of the batteries that 
is visible activating first the geneal switch (1) 
(see under “BATTERIES RECHARGING”). 
2. Verify  that  the  bursh  motor  switch  (2)  is 
activated checking that its signal lamp is on. 
3. Activate the levers presence (5). 
4. Check  that  the  safety  device  of  the  brush 
lifting or the brush wear did not intervene. 
If  the  problem  persists,  please  contact  the 
authorized technical assistance. 


INSUFFICIENT WATER ON THE BRUSH 
1. Check  that  the  solenoid  valve  switch  (8) 
is activated verifying that the singal lamp is on. 
2. Check the level of the liquid in the solution 
tank  (see  under  “DETERGENT  SOLUTION 
TANK”). 
3. Check  that  the  adjuster  of  the  detergent 
solution  flow  (11)  placed  in  front  underneath 
the solution tank is sufficiently open. 
4. Activate the levers presence (5). 
If  the  problem  persists,  please  contact  the 
authorized technical assistance. 


THE MACHINE DOES NOT CLEAN PROPERLY 
1. The brush does not have the suitable bristle 
dimension:  use  only  original  brushes.  For 
advice,  contact  the  authorized  technical 
assistance. 
2. The  detergent  solution  is  insufficient:  open 
more the adjuster of the detergent solution flow 
(11). 
3. Check  that  the  liquid  detergent  is  in  the 
recommended percentage. 
Contact  the  authorized  technical  assistance  for 
advice. 
 
THE SQUEEGEE DOES NOT DRY 
PERFECTLY 
1. Check that the squeegee rubbers are clean. 
2. Check that the coupling of the suction hose 
is correctly inserted in the proper seat on the 
recovery tank. 
3. Intervene on the suction filter cleaning it. 
4. Replace the rubbers if worn. 
5. Check that the suction motor switch is on. 
6. Check the level in the recovery  tank (see 
under 

“OVERFLOW 

DEVICE”) 

and 

if 

necessary, empty the tank. 
 
EXCESSIVE FOAM PRODUCTION 
Check that low foam detergent has been used. 
Eventually  add  small  quantities  of  anti  foam 
liquid into the recovery tank. 
Please  be  aware  that  a  bigger  quantity  of 
foam  is  produced  when  the  floor  is  not  very 
dirty.  In  this  case  please  dilute  detergent 
solution. 
 

Summary of Contents for Onyx 35

Page 1: ...ice brush lifting 19 STOP OF THE MACHINE AFTER CLEANING OPERATION 19 DAILY MAINTENANCE 19 Emptying and cleaning of the recovery tank 19 Emptying and cleaning of the detergent solution tank 19 Suction filter cleaning 19 Positioning of the machine for maintenance and parking 19 Brush cleaning 20 Brush disassembly assembly 20 Squeegee cleaning 20 ORDINARY MAINTENANCE 20 Control device brush wear 20 B...

Page 2: ... PRESENCE 8 LEVER HANDLE BAR RELEASE LEGEND MACHINE 9 WHEELS 10 BRUSH BASE GROUP 11 FLOW ADJUSTER OF THE DETERGENT SOLUTION 12 SOLUTION TANK DETERGENT 13 OUTLET PLUG DETERGENT SOLUTION 14 SQUEEGEE ASSEMBLY 15 SCREW CAP FOR INLET DETERGENT SOLUTION 16 RECOVERY TANK 17 INLET OPENING SQUEEGEE HOSE 18 BLOCKING LEVERS SUCTION COVER 19 SUCTION COVER 20 INSTRUMENT BOARD 21 SIGNALLING LED CHARGE LEVEL OF ...

Page 3: ...apacity solution tank l 15 15 Capacity recovery tank l 16 16 Machine length min mm 745 745 Machine height mm 550 550 Machine width mm 415 415 Machine weight empty with batteries kg 65 70 Weight of the batteries kg 22 26 4 Recharging time max h 10 2 Battery compartment with support L x W x H mm 215 x 270 x 190 Battery coompartment without support L x W x H mm 215 x 257 x 205 Acoustic pressure level...

Page 4: ...having a higher gradient than the one stated on the number plate The machine has to carry out simultaneously the operations of washing and drying Different operations must be carried out in restricted areas prohibited to non authorized personnel Signal the areas of moist floors with suitable signs If the machine does not work properly check by conducting simple maintenance procedures Otherwise ask...

Page 5: ... of the machine A green led on batteries charged B orange led on level at half charge C red led on complete discharge of the batteries with consequent automatic switching off of all the machine s function In order not to cause permanent damages to the batteries it is essential to arrive to their complete discharge every 6 7 cycles providing for the recharge only when the red signal of discharged b...

Page 6: ...ve 4 The machine is equipped with solenoid valve therfore the detergent solution flow will be activated automatically acting upon the levers movement 7 Releasing these levers flow will stop automatically 7 Activating the levers 7 the brush will start rotating The detergent solution flow begins to run and the squeegee will start drying the floor 9 During the first meters check that the detergent so...

Page 7: ...cleaning of the tank 6 Reassemble everything ATTENTION This operation must be carried out using gloves to protect from contact with dangerous solutions EMPTYING AND CLEANING OF THE DETERGENT SOLUTION TANK To empty the detergent solution remained in the solution tank 1 Bring the machine to an appropriate place for tanks draining 2 Switch off the machine pressing the general switch 3 Unscrew the loa...

Page 8: ...ating eventual dirt residuals and clean with care the squeegee rubbers ORDINARY MAINTENANCE CONTROL DEVICE BRUSH WEAR A safety device stops the brush motor when the brush reaches a low bristle level of about 10mm such that a good cleaning result is not guaranteed and to prevent floor damages To restore the working functionality of the machine it is necessary to replace the brush see under BRUSH DI...

Page 9: ...at its signal lamp is on 3 Activate the levers presence 5 4 Check that the safety device of the brush lifting or the brush wear did not intervene If the problem persists please contact the authorized technical assistance INSUFFICIENT WATER ON THE BRUSH 1 Check that the solenoid valve switch 8 is activated verifying that the singal lamp is on 2 Check the level of the liquid in the solution tank see...

Page 10: ...ular floors with deep joints or relieves it is recommended to use softer bristles which penetrate more easily and deeper Please be aware that when brushes bristles are worn out and therefore too small they become rigid and unable to penetrate and clean deeper This may also happen with thicker bristles creating brush vibration PAD HOLDER Pad holder is recommended to clean smooth surfaces It has anc...

Reviews: