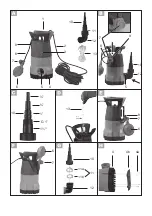
10
GB
If the water level is too low, the silt
in the shaft can quickly dry out and
impede the pump when warming
up.
Controls before operational
start-up
• Check that the float switch is
working (see chapter: “Opera-
tion“).
• Check that the pump is resting
on the pit base
• Check that the pressure line has
been attached properly
• Check the proper status of the
electrical plug socket and make
sure that the plug socket is suf-
ficiently fused (at least 6 A). In
-
sert the pump plug into the plug
socket and the pump is ready for
operation.
• Make sure that moisture or water
never come in contact with the
mains connection.There is a risk
of electrocution.
Operation
Mains connection
The submersible water pump acquired by
you is already provided with an grounded
plug.
The equipment is designed for con
-
nection to an earthed wall socket with a
residual current operated device (RCD
switch) at 230 V ~ 50 Hz.
Only start to operate the device
after all the above conditions have
been observed.
Switching on and off
1. Insert the plug in the socket. The pump
starts working immediately.
The pump immediately starts running
when the swimming switch is in the
correct position (see „Automatic opera-
tion“ and „Manual operation“).
2. To switch off, withdraw the plug from
the socket. The pump stops.
If the water level is too low, the
float switch will automatically
switch off the pump.
Supervise the appliance while it is
in operation in order to be immedi-
ately aware if the automatic cut-out
operates or the pump runs dry, to
limit any damage to a minimum.
Automatic mode
In automatic mode, the float switch (
6)
automatically switches the pump on or off.
In the case of stationary installation,
check regularly (no less then once
every three months) that the float
switch (
6) is working.
The On/Off switch point of the float switch
(
6) is infinitely variable:
Loosen the screw in the float switch
height adjustment (5) and move it
to the desired position.
Check the float switch (
6).
- It must be positioned so that it
can lift and lower freely. The
switching point heights “On” and
“Off” must be easy to reach.
Summary of Contents for 109771
Page 3: ...10 10 12 10 11 12 13 13 5 7 8 9 4a 4b 4 1 1 G 1 1 3 2 4 5 6 7 7 7 6 6 8 9 8 10 12 11 11a 11b ...
Page 42: ...42 ...
Page 88: ...88 ...
Page 89: ...89 ...


