1 2
G B
I E
CY
N I
Ensure that the saw chain does not
come into contact with the ground.
After completing the cut, wait for the
chainsaw to come to a standstill before
removing the chainsaw. Always switch
off the chainsaw motor before moving
from one tree to another.
• Dirt, stones, loose bark, nails, staples
and wire must be removed from the tree.
Service
•
Have your power tool serviced
by a qualified repair person us
-
ing only identical replacement
parts.
This will ensure that the safety
of the power tool is maintained.
• Follow the maintenance, control and ser-
vice instructions in this manual carefully.
Damaged safety equipment and parts
must be repaired or replaced profes-
sionally by our service centre, unless
otherwise indicated in the operating
instructions.
Chain saw safety warnings:
•
Keep all parts of the body
away from the saw chain when
the chain saw is operating. Be-
fore you start the chain saw,
make sure the saw chain is not
contacting anything.
A moment of
inattention white operating chain saws
may cause entanglement of your cloth-
ing or body with the saw chain.
•
Always hold the chain saw with
your right hand on the rear
handle and your left hand on
the front handle.
Holding the chain
-
tion increases the risk of personal in-
jury and should never be done.
•
Hold the power tool only on the
insulated handle surfaces, as the
saw chain may come into contact
with concealed power cables.
Contact between the saw chain and a
live cable may render metallic compo-
nents live and result in an electric shock
•
Wear safety glasses and ear
protection. Other protective
equipment for the head, hands,
legs and feet is compulsory.
Ad-
equate protective clothing will reduce
-
cidentaI contact with the saw chain.
•
Do not operate a chain saw in a
tree.
Operation of a chain saw white up
in a tree may result in personal in jury.
•
Always keep proper footing
and operate the chain saw only
when standing on fixed, secure
and level surface.
Slippery or un-
stable surfaces such as ladders may
cause a loss of balance or control of
the chain saw.
•
When cutting a branch that is
under tension be alert for spring
back.
When the tension in the wood
may strike the operator and/or throw
the chain saw out of control.
•
Use extreme caution when cut-
ting brush and saplings.
The slen-
der material may catch the saw chain
and be whipped toward you or pull
you off balance.
•
Carry the chain saw by the
front handle with the chain saw
switched off and away from
your body. When transporting
or storing the chain saw always
fit the guide bar cover.
Proper
handling of the chain saw will reduce
the Iikelihood of accidentaI contact
with the moving saw chain.
Summary of Contents for FKS 2200 G4
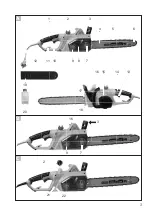
Page 3: ...3 C 1 2 3 5 6 17 A 14 13 15 16 7 9 7 9 11 12 19 B 2 4 10 8 3 16 20 21 22 18...
Page 4: ...4 R N S Q P O M L K 1 2 1 2 3...
Page 30: ...3 0 G R CY 16 180 ml A 1 2 3 4 5 6 O 17 16 15 13 14 18 9 7 8 10 12 19 20...
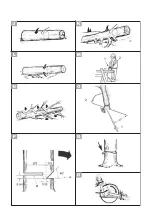
Page 32: ...3 2 G R CY 7 1 Lwa dB II...
Page 33: ...3 3 CY G R 460 mm...
Page 34: ...3 4 G R CY A...
Page 35: ...3 5 CY G R 30 mA H05RN F 75 2 5 mm2...
Page 36: ...3 6 G R CY N...
Page 37: ...3 7 CY G R...
Page 38: ...3 8 G R CY 1 E 1 B...
Page 39: ...3 9 CY G R 1 A A O B...
Page 40: ...4 0 G R CY FI 30 mA A 1 10 3 5 17 15 13...
Page 41: ...4 1 CY G R 11 18 1 2 7 8 3 5 4 5 4 45 5 24 5 4 5 23 23 5 6 5 9 7 8 25 8 7...
Page 42: ...4 2 G R CY 10 9 N 1 kg 2 10 min B 1 16 2 7 3 9 9 4 7 5...
Page 43: ...4 3 CY G R A 4 C 21 C 22 190 ml Parkside Grizzly 6 8 C 1 2 2...
Page 44: ...4 4 G R CY D 1 2 3 3 16 4 1 16 5 14 13 14 6 13 E 1 2 3 3 16 4 1 16 5 6 3 3 16 7...
Page 45: ...4 5 CY G R 26 F 1 2 3 7 9 8 4 4 5 4 45 5 24 5...
Page 46: ...4 6 G R CY 2 15 18 cm...
Page 47: ...4 7 CY G R 1 2 1 45 2 3 A 1 3 45 4 B 5 cm 1 10...
Page 48: ...4 8 G R CY 5 6 7...
Page 49: ...4 9 CY G R 1 2 3 2 1 3 3 1 3 4 1 2 3...
Page 50: ...5 0 G R CY A 8 A 4 26 10 24 A 5 A 5 A 4 A 4...
Page 51: ...5 1 CY G R 10 G 30 85 0 65 mm...
Page 52: ...5 2 G R CY H 1 2 3 4 0 mm 4 5 6 4 mm 7 8 0 65 mm 5 10 F 1 12 2 8 5 4 3 A 4...
Page 53: ...5 3 CY G R 4 26 5 4 5 8 F 4 10 1 A 12 2 8 5 4 3 5 8...
Page 55: ...5 5 CY G R A 13 ser vice ser vice ser vice A 5 A 5 A 5 service...
Page 56: ...5 6 G R CY 3 291822...
Page 89: ...2017 11 23_rev02_sh informativ informative Explosionszeichnung Exploded Drawing o 22 4 8 9...
Page 90: ...3 G F E D 14 13 24 9 23 3 3 16 16 1 16 24 9 23 F 4 5 25 8 24 7 4 5 0 45 I H 26...
Page 91: ......


