background image


nano4 – OPERATION INSTRUCTIONS 


Summary of Contents for AIRBOY nano4

Page 1: ...nano4 OPERATION INSTRUCTIONS ...

Page 2: ...nd spare parts 5 Operating instruction 8 Adjustments with control panel 10 Replacement of blade 102 Replacement of high temperature belt 12 Failures and solutions 14 Options and expandability 15 Maintanance and Cleaning 16 Warranty 17 Declaration of conformity 18 Notices 19 Support und Service 23 Document version 19 02 2021 ...

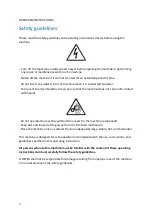
Page 3: ...does not come into contact with liquids Do not operate the machine without the covers for the machine components Keep hair and loose clothing away from the film feed mechanism Place the machine only on surfaces that are adequately large stable flat and horizontal This machine is designed for safe operation in compliance with the use instructions and guidelines specified in this operating instructi...

Page 4: ...ediate layer Air cushion wrapper Our standard version Polyethylene 20 μm Type 9 8 3 AirWave wrapper 320 x 420mm 4 chambers 20 µm 225 lfm 4 chambers for use as an intermediate layer wrapping and envelope All FLOETER air cushion films can be processed with the AirBoy nano 4 The setting recommendations page 6 refer to the formats listed here 9 7 1 and 9 8 3 and must be slightly adjusted for other for...

Page 5: ...UCTIONS 4 Machine Overview 1 Feeding roller 2 Tension column A and B 3 Control panel 4 Air nozzle 5 Protecting cover 6 Power switch 7 Power socket 8 Heating element 9 Teflon belt 10 Silicone wheels 11 Excentric shaft ...

Page 6: ...IONS 5 Technical data Input Voltage AC100 240 1 6A 50 60Hz Working power 50 150W Speed 4 levels V1 4m min V2 6m min V3 8m min V4 10m min Weight 2 6 kg Output Voltage DC 12V 8A Product dimensions LxBxH 430 x 190 x 195 mm ...

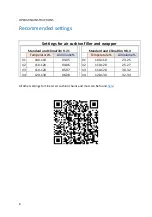
Page 7: ...d ClimaFilm 9 7 1 Temperature AirVolume V1 100 110 03 05 V2 110 120 04 06 V3 110 120 05 07 V4 120 130 06 08 Standard und ClimaFilm 9 8 3 Temperature AirVolume V1 100 110 23 25 V2 110 120 25 27 V3 110 120 30 32 V4 120 130 32 34 All other settings for Floeter air cushion chains and mats can be found here ...

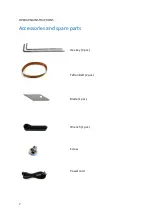
Page 8: ...OPERATING INSTRUCTIONS 7 Accessories and spare parts Hex key 2 pcs Teflon Belt 2 pcs Blade 1 pcs Wrench 1 pcs Screw Power cord ...

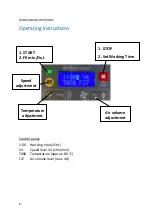
Page 9: ...tructions Control panel 1 00 Working time 1Std V4 Speed level V4 10m min T080 Temperature approx 80 C F27 Air volume level max 40 1 START 2 Film In Out 1 STOP 2 Set Working Time Temperature adjustment Air volume adjustment Speed adjustment ...

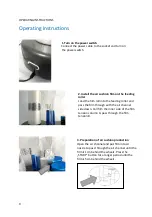
Page 10: ...l into the feeding roller and pass the film through with the air channel side down Pull film the inner side of the film tension column A pass through the film tension B 3 Preparation of air cushion production Open the air channel and put film into air nozzle to pass through the air channel until the film is 1cm behind the wheels Press the START button for a longer period until the film is 5cm behi...

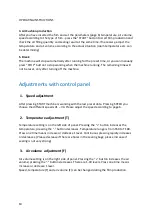
Page 11: ...l 1 Speed adjustment After pressing START machine is working with the last preset data Pressing SPEED you choose the different speeds V1 V4 Please adjust the speed according to page 6 2 Temperature adjustment T Temperature setting is on the left side of panel Pressing the button increases the temperature pressing the button decreases Temperature range is from T60 to T180 Press one time means incre...

Page 12: ...etting run time please estimate the rest length of film to avoid the idle times and cause the machine damaging 2 The working time only be set up in advance and cannot be changed while the machine in working mode But the air volume speed and temperature can be changed anytime 3 Users can adjust the parameter according to different required it will save the used parameter with each power off Example...

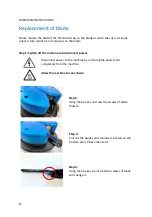
Page 13: ...Step 1 Switch off the machine and disconnect power Disconnect power to the machine by removing the power cord completely from the machine Allow the machine to cool down Step 2 Using the hex key unscrew the screws of blade bracket Step 3 Pull out the blade carrier blade is located on the bottom side Please take care Step 4 Using the hex key to unscrew the screws of blade and change it ...

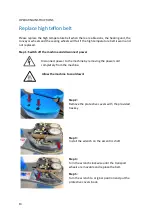
Page 14: ... 1 Switch off the machine and disconnect power Disconnect power to the machine by removing the power cord completely from the machine Allow the machine to cool down Step 2 Remove the protective covers with the provided hex key Step 3 Install the wrench on the excentric shaft Step 4 Turn the wrench clockwise until the transport wheels are movable and replace the belt Step 5 Turn the wrench to origi...

Page 15: ... increase temperature value 2 sealing is wide and thin temperature too high lower temperature value 3 under inflation air volume value too low increase air volume value 4 during operation the foil is jamming the heating area the body temperature of device increased Turn off the device let it cool down check replace blade ...

Page 16: ...r sales advisor for further information Mobile table solutions Bring your machine to the ideal working height compatible with Docking station Rolling basket light The rolling basket is mobile and always brings your air cushions to the ergonomically correct working height ...

Page 17: ...s of film or dust at the AirBoy nano4 Our recommendation After 30 roll changes or if required 1 Check Teflon belts and replace as the circumstances require 2 Check transport rolls regarding contamination and grip clean or replace if necessary 3 Check blade see the cutting of the film if necessary replace page 12 4 If necessary clear the machine of contamination and residue of film Consider also kn...

Page 18: ...y once the repair is finished If you need a replacement machine the warranty period will continue from the receipt date of the first machine The warranty will not be extended The scope of the warranty does not include the following Demage resulting from improper use of AirBoy nano4 This includes in particular damage caused by using unsuitable films or inserting foreign objects into the machine s t...

Page 19: ... AirBoy nano4 is compliant with the relevant harmonized standards listed according to EMC Regulations 2014 30 EU and LVD Regulations 2014 35 EU The compliance was verified by an independent specialized certifying company Technical documentation available on request ...

Page 20: ...OPERATING INSTRUCTIONS 19 Why do I like working with the AirBoy nano4 ...

Page 21: ...OPERATING INSTRUCTIONS 20 Why does my colleague like working with the AirBoy nano4 ...

Page 22: ...OPERATING INSTRUCTIONS 21 Pictures of our team with the AirBoy nano4 ...

Page 23: ... If you need support advice or do you have any questions We are here for you www floeter com en support FLÖTER Verpackungs Service GmbH Robert Bosch Straße 17 71701 Schwieberdingen Germany Tel 49 0 7150 92396 0 Info floeter com www floeter com EN ...

Page 24: ...OPERATING INSTRUCTIONS 23 ...

Reviews: