background image

26 - Flow Fitness PERFORM X2i - Gebruiksaanwijzing

5

Gebruik

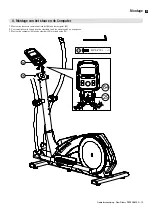
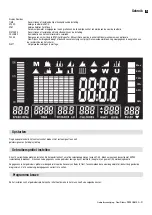
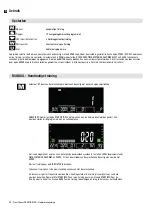
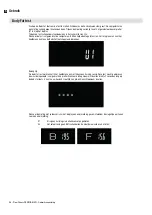
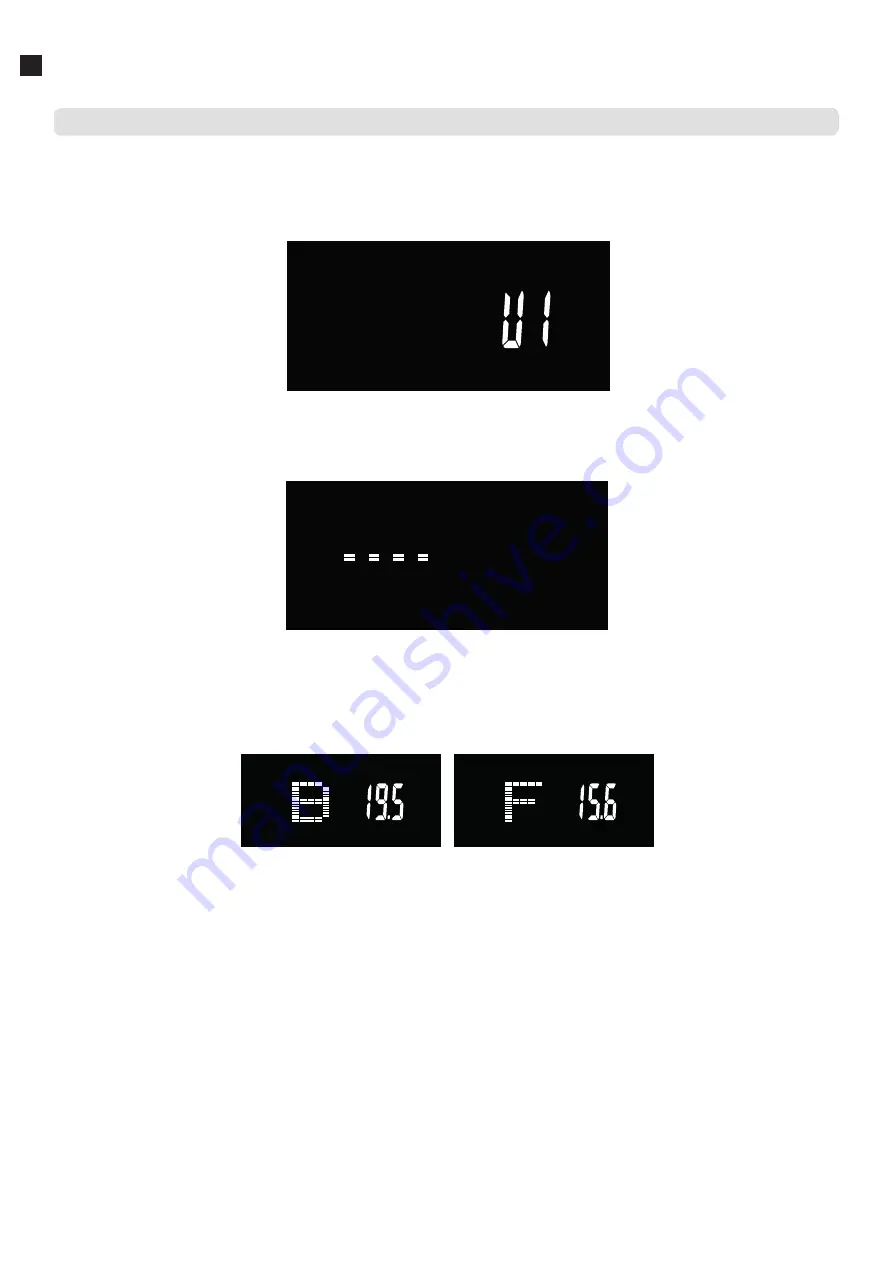
Druk op de Body Fat toets om de test te starten. Grijp daarna de handsensoren stevig vast. De computer zal nu 

een meting van ongeveer 8 seconden doen. Tijdens de meeting verschijnt eerst het geselecteerde user profiel 

(U1-U4) op het display.

Tijdens de test zullen onderstaande balken in het scherm te zien zijn. 

Wanneer de test is afgerond zal de computer uw BMI en Vetpercentage laten zien. Om terug te keren naar het 

hoofdmenu kunt een de Body Fat toets nogmaals indrukken. 
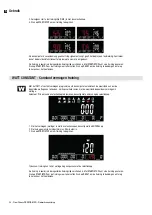
Belangrijk:

De body fat test werkt enkel in het hoofdmenu en niet tijdens een training sessie. Deze test maakt gebruik van 

de waarde ingevoerd in uw gebruikers profiel. Wanneer u dit opnieuw wilt invullen drukt u 2 seconden lang op 

de body fat toets. U kunt nu uw Geslacht, Leeftijd, Lengte en Gewicht opnieuw invullen.

Wanneer de meting niet succesvol is zal het display een error melding geven. Hieronder de mogelijke oorzaken 

voor een error melding:


E1 

Er is geen hartslag via de handsensoren gemeten


E4 

Het vetpercentage en BMI vallen buiten de meetbare waarde van 5 tot 50. 


Body Fat test


Summary of Contents for PERFORM X2i

Page 1: ...ENGLISH NEDERLANDS PERFORM X2i User Manual ...

Page 2: ...en gebruikt of gereproduceerd in welke vorm of op welke wijze dan ook zondervoorgaande schriftelijke toestemming van Flow Fitness B V All rights reserved Nothing in this instruction manual may be used or reproduced in any form or way without the express written permission of Flow Fitness B V NEDERLANDS 3 34 ENGLISH 35 80 ...

Page 3: ...ditie verbeteren 11 Trainingschema gewicht verliezen 11 4 Montage 12 1 Montage van de stabilisatoren 12 2 Montage van de pedalen 13 3 Montage van de stuurbuis 14 4 Montage van het stuur en de Computer 15 5 Montage van de vaste armen 16 5 Montage van de afdekkappen 17 5 Gebruik 18 Verplaatsen opbergen en in gebruik nemen 18 Onderhoud 19 Gebruik van de computer 20 Trainen met behulp van apps 28 6 Pr...

Page 4: ...voorwerpen in openingen van het apparaat Houd kinderen en huisdieren uit de buurt van het apparaat Personen met een handicap moeten medische goedkeuring hebben en begeleiding krijgen bij gebruik van dit product Plaats geen handen en voeten onder het product Houd nooit uw adem in tijdens het trainen Uw ademhaling moet op een normaal tempo zijn afhankelijk van de intensiviteit van uw training Begin ...

Page 5: ...1 X1 49 21L 21R 72L 72R 67 68 X1 X1 27 X1 100 102 X1 M8x1 25X20L 8pcs 9 KH 831R2 mm 63 ST4x15L 2pcs M8x1 25x100L 2PCS 17 M5 0 8x10L 2pcs 90 M8x1 25X20L 4pcs 9 D15 4xD8 2x2T 4PCS 7 D30xD8 5x2T 4PCS 3 D15 4xD8 2x2T 8PCS 7 M8x1 25x8T 2PCS 18 D22xD8 5x1 5T 4PCS 6 D22xD8 5x1 5T 8PCS 6 D15 4xD8 2x2T 2PCS 7 STEP1 STEP3 STEP5 STEP6 ...

Page 6: ...w Fitness PERFORM X2i Gebruiksaanwijzing 2 Introductie Belangrijke onderdelen Bewegende armen Computer Vaste armen met hartslag sensoren en quick keys Transportwielen Aansluiting voeding Verstelbare pedalen ...

Page 7: ...gramma s 1 Target Heart Rate programma 1 Constant WATT programma Recovery test Hartslag meting d m v een optionele bluetooth borstband USB oplader Bluetooth 4 0 Computer iConsole Kinomap Fitness Trainen met apps 69 Weerstandslevels 18 5 kg Roterende massa Ergometer Afmetingen Lengte 116 cm Hoogte 163 cm Breedte 63 cm Gewicht 56 kg Techniek Vestelbare pedalen Quick keys Ergonomie ...

Page 8: ...it zal het lichaam grotendeels kiezen voor een langdurige en energievoorraad te weten vet Aangezien dit in grote hoeveelheden in het lichaam is opgeslagen is dit langer vol te houden Hieronder is een schema weergegeven waarin u kunt aflezen wat voor u de beste hartslag is om mee te trainen In dit schema is per leeftijdscategorie een hartslaggebied aangegeven waarbinnen uw hartslag moet liggen tijd...

Page 9: ...als u kunt Buig naar links zodat uw rechterzijde wordt gestrekt Houd dit gedurende één seconde vast Ontspan en doe vervolgens dezelfde beweging met uw linker arm Herhaal dit drie tot vier keer Knee bend Plaats uw voeten op schouwder breedte en strek uw handen voor uw uit Buig nu langzaam door uw knieen niet meer als 10 centimeter Kom rustig omhoog en herhaal deze oefening een aantal keren Lower ba...

Page 10: ...ten Training 5 minuten Rust 1 minuut Training 3 minuten Rustig fietsen 1 minuut Cooling down 5 minuten Trainingschema week 5 en 6 Train op 60 van uw maximale hartslag Maximaal 5 keer per week Warming Up 5 10 minuten Training 6 minuten Rust 1 minuut Training 4 minuten Rustig fietsen 3 minuut Cooling down 5 minuten Na het volbrengen van het zes weken durende introductie trainingsschema kunt u een ke...

Page 11: ...n Training 10 minuten Rust 1 minuut Training 10 minuten Herhaal training 1 a 2 keer Rustig fietsen 1 minuut Cooling down 5 minuten Trainingschema gewicht verliezen Trainingschema week 7 en 8 Train op 60 van uw maximale hartslag Maximaal 6 keer per week Warming Up 5 10 minuten Training 7 minuten Rust 1 minuut Training 5 minuten Rustig fietsen 1 minuut Cooling down 5 minuten Trainingschema week 9 en...

Page 12: ...ut 9 de veerring 7 en platte ring 3 Draai de bouten stevig vast Door de stelpootjes aan weerszijden van de poten links of rechtsom te draaien kan de hoogte worden ingesteld Hiermee kan de crosstrainer waterpas worden gezet Montage 1 Montage van de stabilisatoren x4 x4 x4 M8x1 25x20L D15 4xD8 2x2T D30xD8 5x2 0T 9 7 3 19 2 7 9 3 1 Step 1 ...

Page 13: ...21L 21R op de linker en rechter pedaalstang met behulp van ringen 73 en de pedaal verstelknop 77 2 De pedalen 21L 21R kunnen in 3 verschillende posities bevestigd worden Zie onderstaand fig 2 Montage van de pedalen D40 M6 12 21R 11 73 77 21L 73 77 x4 D14xD6 5x0 8T 73 Step 2 77 x4 ...

Page 14: ...30 zoals afgebeeld in fig b 3 Monteer de stuurbuis 10 aan het hoofdframe 1 met behulp van sluitringen 6 veerringen 7 en inbusbouten 9 zoals afgebeeld in fig c 4 Monteer de bewegende armen 52L 52R aan de bevestigingsbuis draaibare arm 12 met behulp van sluitringen 6 veerringen 7 en inbusbouten 9 3 Montage van de stuurbuis Step 3 c 52L 6 7 9 12 10 49 9 7 6 52R 49 29 30 a b x8 x8 x8 M8x1 25x20L D15 4...

Page 15: ... bovenste communicatiekabel 29 aan de computer 64 2 Voer vervolgens alle kabels door de stuurbuis zoals in onderstaand fig aangegeven 3 Monteer de computer 64 aan de stuurbuis 10 met de bouten 76 4 Montage van het stuur en de Computer 76 64 64 29 M5 0 8 10L x4 76 Step 4 ...

Page 16: ...rbuis 10 met behulp van de veerringen 7 gebogen ring 6 inbusbouten 17 en borgmoeren 18 2 Verbind vervolgens alle communicatiekabels zoals aangegeven in fig b 5 Montage van de vaste armen 72L 17 6 72R 18 7 b 64 105 M8x1 25x100L 117 118 x2 x4 D15 4xD8 2x2T D22xD8 5x1 5T 17 7 6 M8 1 25 8T 18 x2 x2 Step 5 ...

Page 17: ... de computerafdekkap voor 68 met behulp van de schroeven 90 en 63 aan de stuurbuis 10 2 Monteer de bidonhouder 102 met M5x15 schroeven 101 3 Sluit de adapter 27 aan de achterzijde aan 5 Montage van de afdekkappen 67 63 90 68 10 90 100 101 102 x2 x2 ST4x15L M5x0 8x10L 63 90 M5x0 8x15L 101 x2 Step 6 27 ...

Page 18: ...n en kantel deze voorzichtig naar u toe De X2i staat nu op zijn transport wielen waarmee u het product gemakkelijk naar de gewenste plaats kunt verrijden Het kan mogelijk zijn dat u na het verplaatsen van de X2i het product opnieuw waterpas moet zetten Nadat het product op de gewenste plaats staat kunt u de voeding opnieuw aansluiten Verplaatsen opbergen en in gebruik nemen ...

Page 19: ... Gebruik hiervoor het bij het product aangeleverde gereedschap Veeg tevens na iedere training het eventuele zweet van alle onderdelen Hiermee voorkomt u dat het zweet kringen of zelfs corrosie veroorzaakt De metalen en kunststof onderdelen zijn met Flow Fitness Shine en Protect te reinigen Zorg er echter wel voor dat alle onderdelen goed droog zijn voordat deze weer worden gebruikt Onderhoud ...

Page 20: ...n huidige waarden en terugzetten van computer naar het trainings keuze menu RECOVERY Analyse van conditie aan de hand van hartslag herstel BODY FAT Analyse van vetpercentage Selectie knop Draaien om de waarden of het weerstandsniveau te veranderen Drukken om te bevestigen USB oplader aan de achterzijde Tablet houder voor smartphone of tablet ...

Page 21: ...n een grafiek aan de rechterzijde van het scherm WATT Het geleverde vermogen in wattage Plug de adapterkabel in het contact van het product Het systeem geeft een kort geluidssignaal en het display licht op U kunt 4 verschillende profielen instellen Na het opstarten kunt u met de selectieknop kiezen tussen U1 U4 Maak uw keuze en bevestig met ENTER selectieknop indrukken Er kunnen nu de gegevens van...

Page 22: ...Met START STOP kunt u de training pauzeren Druk op START STOP om de training weer te hervatten Druk op RESET om de training te beëindigen en terug te keren naar het hoofdmenu Manual handmatige training Program 12 voorgeprogrammeerde programma s HRC Heart Rate Control 4 Hartslaggestuurde training Watt constant Constant vermogen training User Gebruikersprogramma Gebruik de selectie toets om een keuz...

Page 23: ... Druk op RESET om de training te beëindigen en terug te keren naar het hoofdmenu PROGRAM Voorgeprogrammeerde training Kies in het hoofdmenu menu het icoon voor hartslag gestuurde training Hierbij kunt u trainen op een percentage van uw maximale hartslag of zelf een streef hartslag instellen De computer rekent automatisch uw maximale hartslag uit aan de hand van uw gebruikersprofiel De maximale har...

Page 24: ...tant vermogen programma past de computer automatisch de weerstand aan om de ingestelde wattage aan te houden Uw trapsnelheid samen met de weerstand bepaald uw vermogen in wattage Selecteer W door aan de selectieknop te draaien en bevestig met een druk op de selectieknop 1 Stel het vermogen wattage in met de selectieknop en bevestig met de ENTER knop 2 Stel nu de gewenste trainingstijd max 99 minut...

Page 25: ...der de weerstand met de selectieknop 2 Als u klaar bent druk dan de ENTER toets ca 4 seconden lang in om uit het bewerkingsmenu te gaan 3 Stel nu de gewenste trainingstijd max 99 minuten in 4 Druk op START STOP om uw training te beginnen Tijdens uw training kunt u de weerstand eventueel nog aanpassen met de selectieknop Tijdens uw training kunt u de weerstand van het huidige segment aanpassen met ...

Page 26: ... keren naar het hoofdmenu kunt een de Body Fat toets nogmaals indrukken Belangrijk De body fat test werkt enkel in het hoofdmenu en niet tijdens een training sessie Deze test maakt gebruik van de waarde ingevoerd in uw gebruikers profiel Wanneer u dit opnieuw wilt invullen drukt u 2 seconden lang op de body fat toets U kunt nu uw Geslacht Leeftijd Lengte en Gewicht opnieuw invullen Wanneer de meti...

Page 27: ... F2 goed F3 voldoende F4 matig F5 slecht F6 zeer slecht geen correcte meting Belangrijk 1 De RECOVERY conditiemeting start alleen op als er een hartslag gededecteerd wordt Voor een goede RECOVERY conditiemeting dient u de hartslag sensoren goed en zonder te bewegen vast te houden of een hartslagband te dragen 2 Uw conditie is gebaseerd op het herstel van de hartslag na een intensieve training Daar...

Page 28: ...uwer iPad air 1 of nieuwer iPad pro 1 of nieuwer iPad Mini of nieuwer iPhone 4s of nieuwer iPod touch 3gen of nieuwer Android tablet OS4 3 of hoger Android Phone OS4 3 of hoger Volg onderstaande stappen om uw mobiele apparaat aan de X2i te koppelen via een bluetooth verbinding 1 Ga de instellingen op uw iOS of Android apparaat en zet bluetooth aan 2 Volg de instructies van de ondersteunende apps V...

Page 29: ...m kinomap training Voor verdere ondersteuning volg deze link https www flowfitness com handleiding kinomap html iConsole Training Met de iConsole app kunt u de Perform X2i met uw smartphone of tablet bedienen Uw trainingen opslaan in een logboek of virtueel trainen deze app is geheel gratis Download de iConsole app door in de app of play store te zoeken naar iconsole of volg een van de onderstaand...

Page 30: ... 24 36L 57 110 26 33 43 34 25 36R 34 35 1 79 33 11 29 97 28 62 10 21R 14 66 21L 12 31 11 93 94 60 7 40 32 69 66 13 75 74 14 49 81 9 7 6 77 73 30 27 98 100 101 102 103 104 106 42 42 50 108 50 96 61 109 99 72L 9 7 3 19 78 103 2 105 65 22 4 5 15 8 119 115 116 107 80 117 118 120 121 122L 122R 56 47 16 41 46 86 89 71 70 95 84 59 58 83 44 51 37 88 87 91 48 45 44 44 82 ...

Page 31: ... 2 56 veer D2 6xD15x82L 1 57 gegolfde ring D27xD20 3x0 5T 1 58 sluitring D24xD16x1 5T 1 59 inbusbout M8x1 25x30L 1 60 sluitring D21xD8 5x1 5T 4 61 crank as 1 62 magneet 1 63 schroef ST4 2x1 4x15L 10 64 computer 1 65 hand pulse sensor 4 66 sluitring D22xD10x2T 4 67 computer afdekkap voor 1 68 computer afdekkap achter 1 69 pedaalstang as 2 70 bevestigingsplaat V snaar wieltje 1 71 sluitring D28xD8 5...

Page 32: ...olgd van de hartslagband Het is namelijk belangrijk dat de sensoren vochtig worden gemaakt voor beter contact met de huid Is de batterij vol en juist geplaatst Zit de band strak genoeg Ik krijg geen verbinding tussen mijn apparaat en Kinomap U dient eerst een uitrusting aan de maken in Kinomap Ga naar het menu en kies uitrusting vervolgens kunt u een apparaat toevoegen Als u een hometrainer heeft ...

Page 33: ...eigen inzicht verhelpen Indien het defect binnen het garantietermijn valt zal dit kosteloos gebeuren De garantie vervalt wanneer er gebreken zijn ontstaan aan het product door een onjuiste montage van het toestel dan wel wanneer er sprake is van het niet juist opvolgen van de instructies zoals beschreven in deze handleiding reparaties aan het product zijn verricht door anderen dan door Flow Fitnes...

Page 34: ...PERFORM X2i User Manual ENGLISH PERFORM X2i User Manual ...

Page 35: ...tion training schedule 42 Training schedule to improve stamina 43 Training schedule to lose weight 43 4 Assembly 44 1 Assembly of the stabilizers 44 2 Assembly of the pedals 45 3 Handlebar post assembly 46 4 Assembly of the computer 47 5 Assembly of the fixed arms 48 5 Assembly of the covers 49 5 Use 50 Storage moving and usage 50 Maintenance 51 Using the computer 52 Training with Apps 60 6 Produc...

Page 36: ...nd the product when you are training Don t stick any objects in any opening of the product Keep children and pets away from the product Handicapped persons should get consent from a medical expert and follow their directions for training with the product Do not place hands or feet under the product Never hold your breath during a training session Your breathing should be at a normal interval depen...

Page 37: ...1 49 21L 21R 72L 72R 67 68 X1 X1 27 X1 100 102 X1 M8x1 25X20L 8pcs 9 KH 831R2 mm 63 ST4x15L 2pcs M8x1 25x100L 2PCS 17 M5 0 8x10L 2pcs 90 M8x1 25X20L 4pcs 9 D15 4xD8 2x2T 4PCS 7 D30xD8 5x2T 4PCS 3 D15 4xD8 2x2T 8PCS 7 M8x1 25x8T 2PCS 18 D22xD8 5x1 5T 4PCS 6 D22xD8 5x1 5T 8PCS 6 D15 4xD8 2x2T 2PCS 7 STEP1 STEP3 STEP5 STEP6 ...

Page 38: ...38 Flow Fitness PERFORM X2i User Manual 2 Introduction Important parts Movable arms Computer Fixed arms with hand pulse sensors and quick keys Transporting wheels Adapter power plug Adjustable pedals ...

Page 39: ... 1 Target Heart Rate program 1 Consistant WATT Recovery test Heart rate registration with an optional bluetooth chest belt USB charger Bluetooth 4 0 iConsole iConsole Kinomap Training with apps 69 Resistance levels 18 5 kg Rotating mass Ergometer Size and weight Length 116 cm Heigth 163 cm Widht 63 cm Weight 56 kg Technical Adjustable pedals Quick keys Ergonomics ...

Page 40: ...of time When training at a low intensity the body will mostly choose to use a long lasting source of energy fat Since this is stored in large quantities in the body you can continue this kind of training for a longer time Below you will find a schedule allowing you to calculate the best heart rate for your training In this schedule each age category has a range that your heart rate should be in du...

Page 41: ... left so that the muscles in the right side of your torso are stretched Hold this position for one second Relax and make the same motion on the other side of your body Repeat this three or four times Knee bend Set your feet shoulder width apart and your stretched your hands out Lower yourself no more than 10cm by bending your knees Come back up again and repeat several times Lower back stretch Beg...

Page 42: ...5 10 minutes Train 5 minutes Rest 1 minute Train 3 minutes Slow pedaling 1 minute Cooling down 5 minutes Training schedule week 5 and 6 Train at 60 of your maximum heart rate with a maximum of 5 times a week Warming up 5 10 minutes Train 6 minutes Rest 1 minute Train 4 minutes Slow pedaling 3 minutes Cooling down 5 minutes After completing the introduction training schedule for six weeks you can c...

Page 43: ...utes Train 10 minutes Rest 1 minute Train 10 minutes Repeat training 2 or 3 times Slow pedaling 1 minute Cooling down 5 minutes Training schedule to lose weight Training schedule week 7 and 8 Train at 60 of your maximum heart rate with a maximum of 6 times a week Warming up 5 10 minutes Train 7 minutes Rest 1 minute Train 5 minutes Slow pedaling 1 minute Cooling down 5 minutes Training schedule we...

Page 44: ...izer 19 onto the main frame by fastening allen bolt 9 spring washer 7 and flat washer 6 By turning the wheel on both sides of the stabilizers the height can be adjusted to level the crosstrainer 1 Assembly of the stabilizers x4 x4 x4 M8x1 25x20L D15 4xD8 2x2T D30xD8 5x2 0T 9 7 3 19 2 7 9 3 1 Step 1 ...

Page 45: ...le the pedals 21L 21R onto the left and right pedal support 11 by fastening washers 73 and club knob 77 2 The pedals 21L 21R can be assembled in three different positions 2 Assembly of the pedals D40 M6 12 21R 11 73 77 21L 73 77 x4 D14xD6 5x0 8T 73 Step 2 77 x4 ...

Page 46: ...isplayed in figure b 3 Assemble the handlebar post 10 onto the main frame by fastening washers 6 spring washers 7 and Allen bolts 9 as displayed in figure c 4 Assemble the movable arms 52L 52R to the moveable supporting tube 12 by fastening washers 6 spring washers 7 and Allen bolts 9 3 Handlebar post assembly Step 3 c 52L 6 7 9 12 10 49 9 7 6 52R 49 29 30 a b x8 x8 x8 M8x1 25x20L D15 4xD8 2x2T D2...

Page 47: ... 29 to the computer 64 2 Feed the cables from the rear of the computer trough the handlebar post as display in the illustration below 3 Assemble the computer 64 to the handlebar post 10 by fastening the cross screws 76 4 Assembly of the computer 76 64 64 29 M5 0 8 10L x4 76 Step 4 ...

Page 48: ...handlebar post 10 by fastening the Allen bolt 17 curved washer 6 spring washer 7 and the self locking nut 18 2 Connect all communication cables as displayed in figure b 5 Assembly of the fixed arms 72L 17 6 72R 18 7 b 64 105 M8x1 25x100L 117 118 x2 x4 D15 4xD8 2x2T D22xD8 5x1 5T 17 7 6 M8 1 25 8T 18 x2 x2 Step 5 ...

Page 49: ... 63 and the round crosshead screw 90 2 Assemble the water bottle holder 102 to the handlebar post 10 by fastening the crosshead screw 101 Then place the water bottle 100 into the water bottle bracket 102 3 Connect the adapter 27 into the back of the crosstrainer 5 Assembly of the covers 67 63 90 68 10 90 100 101 102 x2 x2 ST4x15L M5x0 8x10L 63 90 M5x0 8x15L 101 x2 Step 6 27 ...

Page 50: ...ving hold the crosstrainer by the fixed arms and tilt the complete product onto the transporting wheels You can now ride the crosstrainer to the preferred location When placing the product into a new location it might be possible that product needs to be levelled again When the product is on the desired location reconnect the power adapter Storage moving and usage ...

Page 51: ...x weeks For fastening use the tool supplied with the product Clean metal and plastic parts with Flow Fitness Shine and Protect after every training session However make sure that all parts are completely dry before they are used again To prevent unnecessary wear this product can only be used inhouse and in a dry environment Maintenance ...

Page 52: ... values or reset the computer to the training selection menu RECOVERY Analyses stamina on the basis of the heart rate recovery BODY FAT Analysis of the body fat percentage Selection Knob Rotate to change value or the resistance level Press to enter USB charger at the rear of the console Tablet holder For smartphone or tablet ...

Page 53: ...n a chart on the right side of the screen WATT The current output in WATT Connect the adapter to the bike and outlet for powering up the screen as displayed below When powering up the computer will give a sound signal Your able to setup four different user profiles After powering up you can select between U1 U4 with the selection knob Confirm your selection by pressing the selection knob User spec...

Page 54: ...n you can pause the training session Press START STOP again to resume the training or RESET to go back to the main menu Manual Manual program Program 12 preprogrammed workouts HRC Heart Rate Control 4 Heart Rate Controlled program Watt constant User program User Constant WATT Rotate the selection knob to browse between workouts ENTER press the selection knob to select the workout After entering th...

Page 55: ...outs Select the heart icon for a heart rate controlled program in the main menu With the heart rate controlled training you are able to train at a percentage of your maximum heart rate or set a desired heart rate The computer will automatically calculate your maximum heart rate by using information from your user profile The maximum heart rate is a calculation of 220 minus your age The heart rate ...

Page 56: ...ter will automatically adjust the resistance to maintain the set output Your pedaling speed RPM and resistance level determine your output in WATT 1 Select the output Watt with the selection knob Press the selection knob to ENTER 2 Select the training duration TIME with the selection knob 3 Press START STOP to start the training session During a training session you are able to adjust the Watt lev...

Page 57: ...ection knob 2 When you have setup the segments press and hold the selection knob for 4 seconds 3 Select the training duration TIME with the selection knob 4 Press START STOP to start the training session During a training session you are able to adjust the resistance of the current segment by rotating the selection knob When the training is started all values will decrease and the training is fini...

Page 58: ...n menu and not during a training session This test will use the data stored in the user profile If you want to enter your user data again press and hold the Body Fat key for two seconds Now you are able to set your gender age length and weight again When a test is unsuccessful a error code will appear on the display Below the error codes that can appear during a body fat test E1 No heart rate has ...

Page 59: ...finished a code between F1 and F6 will appear on the screen The code responds to the fitness level displayed below F1 Excellend F2 Good F3 Average F4 Below average F5 Bad F6 Very bad no correct measurement Important 1 The RECOVERY stamina test will only start when a heart rate is detected For a correct measurement you need to hold the hand sensors firmly without moving 2 Your stamina is based upon...

Page 60: ... 1 or newer iPad Pro 1 or newer iPad Mini or newer iPhone 4s or newer iPod touch 3gen or newer Android tablet OS4 3 or higher Android Phone OS4 3 or higher Follow the steps below to connect your mobile device with the X2i using a bluetooth connection 1 Go to the settings on your mobile device and turn bluetooth on 2 Follow the instructions of the supported apps Connect the Perform X2i with your Sm...

Page 61: ...g for Kinomap Fitness or follow one of the links below Apple iOS App store https itunes apple com nl app kinomap id611177969 mt 8 Google Antroid Play Store https play google com store apps details id com kinomap training For further support please visit https www flowfitness com manual kinomap html iConsole Training The iC training app lets you control the X2i with your smartphone or tablet You ca...

Page 62: ...4 36L 57 110 26 33 43 34 25 36R 34 35 1 79 33 11 29 97 28 62 10 21R 14 66 21L 12 31 11 93 94 60 7 40 32 69 66 13 75 74 14 49 81 9 7 6 77 73 30 27 98 100 101 102 103 104 106 42 42 50 108 50 96 61 109 99 72L 9 7 3 19 78 103 2 105 65 22 4 5 15 8 119 115 116 107 80 117 118 120 121 122L 122R 56 47 16 41 46 86 89 71 70 95 84 59 58 83 44 51 37 88 87 91 48 45 44 44 82 ...

Page 63: ...oam 2 55 End cap 2 56 Spring D2 6 D15 82L 1 57 Waved washer D27 D20 3 0 5T 1 58 Flat washer D24 D16 1 5T 1 59 Allen bolt M8x1 25x30L 1 60 Flat washer D21 D8 5 1 5T 4 61 Crank axle 1 62 Round magnet 1 63 Screw ST4x1 41x15L 10 64 Computer 1 65 Handle pulse sensor 4 66 Flat washer D22 D10 2T 4 67 Front computer bracket 1 68 Rear computer bracket 1 69 Front pedal axle 2 70 Fixing plate for idle wheel ...

Page 64: ...ed for occasionally checking the heart rate during a training excises When there is no heart rate reception when using a bluetooth chest belt check the following Have you read the chest belt s manual It is important that the sensors are made moist for a better contact with the skin Is there a full and correctly placed battery Is the chest belt worn tight enough I cannot get a connection between my...

Page 65: ...RM X2i 65 7 Warranty The warranty is provided by the Flow Fitness distributor of your country and the reseller where you have purchased your product Please check https www flowfitness com en dealers for contact information Warranty ...

Page 66: ...66 Flow Fitness PERFORM X2i Notities Notes ...

Page 67: ...Flow Fitness PERFORM X2i 67 Notities Notes ...

Page 68: ...www flowfitness com ...

Reviews: