DURCO MARK 3 ISO FRAME MOUNTED ENGLISH 85392719 06-12
Page 31 of 52
flowserve.com
i)
Remove pump casing gasket [4590.1] and discard.
A replacement gasket will be required for assembly.
j)
Clean gasket mating surfaces.
6.8.2
Impeller removal
NEVER APPLY HEAT TO REMOVE THE
IMPELLER. TRAPPED OIL OR LUBRICANT MAY
CAUSE AN EXPLOSION.
Impeller removal with threaded on
6.8.2.1
impeller
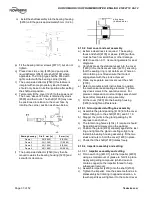
a) Ensure the pump bearing housing assembly is
firmly fixed to the work bench.
b) Fit a chain wrench or bolt a bar to the holes in the
coupling half, or fit a keyed shaft wrench directly
to the shaft. Make sure the wrench or bar can
not slip.
c) Turn the shaft [2100] counter-clockwise as viewed
from the drive end of the shaft with the wrench.
d) Give the shaft a quick turn clockwise to sharply
strike the wrench handle against the work bench
surface or a wooden block. A few sharp strikes
by the handle onto the bench/wooden block will
free the impeller from the shaft.
e) Alternatively, twist the impeller by firmly grabbing
hold of the impeller and twist it counter-clockwise.
To make the wrench handle impact on the work
bench. This method requires the use of metal
mesh reinforced gloves.
f) Remove and discard the impeller O-ring [4610.1].
Use a new O-ring for assembly.
Impeller removal with key drive impeller
6.8.2.2
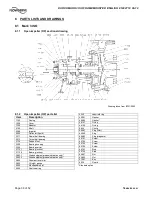
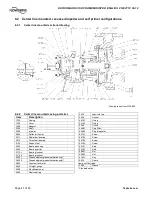
c) Remove impeller nut [2912.1/2912.2] complete with
O-ring [4610.5], which should be discarded. (A new
O-ring will be required for assembly.)
d) Pull impeller [2200] off shaft [2100].
e) Remove impeller key [6700.2].
f)
Remove impeller sealing gasket [4590.4] and
discard. (A new sealing gasket will be required for
assembly.)
6.8.3
Cover and seal
The seal manufacturer's instructions should be followed
for dismantling and assembly, but the following
guidance should assist with most seal types:
a) Remove shaft guard (if fitted).
b) Remove the seal gland nuts, if a separate seal
gland is fitted, and slide the seal gland away.
c) Remove the two cover nuts [6580].
d) Loosen the grub screws (used in most
mechanical seals).
e) Carefully pull off the cover and mechanical seal
rotating element(s).
f) Remove the seal cover.
g) Remove shaft sleeve (if fitted).
h) On non-cartridge seals the stationary seat
remains in the cover/mechanical seal gland with
its sealing member. Remove only if damaged or
worn out.
i)
On pumps fitted with gland packing, the packing
and lantern ring should be removed only if the
packing is to be replaced.
6.8.4
Bearing housing
a) Take grub screw(s) out of the pump half coupling
and pull off this coupling and remove the coupling
key.
b) Remove support foot [3134] (if necessary).
c) Remove the pump side liquid deflector [2540]
and/or labyrinth seal rotary half (depending on
option fitted).
d) Slacken the bearing carrier screws to initiate
bearing carrier release.
e) Remove bearing carrier [3240] and shaft [2100]
assembly from the bearing housing [3200] by pulling it
towards the coupling end.
f) Remove bearing circlip [6544] (or bearing lock
nut [3712.2] if paired angular contact bearings
are fitted).
Bearing carrier locking rings are left-
hand thread.
g) Remove drive side v-ring [4305] and/or labyrinth
seal rotary half (depending on option fitted).
h) Remove bearing carrier [3240].
i)
Remove pump side bearing [3011].
j)
Release the self-locking drive side bearing nut
[3712.1] and remove drive side bearing [3013].
k) When pressing bearings off the shaft, use force
on the inner race only.
6.9 Examination of parts
Used parts must be inspected before
assembly to ensure the pump will subsequently run
properly. In particular, fault diagnosis is essential to
enhance pump and plant reliability.
6.9.1
Casing, cover and impeller
Inspect for excessive wear, pitting, corrosion, erosion
or damage and any sealing surface irregularities.
Replace as necessary.
6.9.2
Shaft and sleeve (if fitted)
Replace if grooved or pitted. With the bearing
mounting diameters (or bearing outer) supported by
V-blocks, check that the shaft runouts are within
0.025 mm (0.001 in.) at the coupling end and
0.050 mm (0.002 in.) at the sleeve/impeller end.
Summary of Contents for Durco Mark 3
Page 49: ...DURCO MARK 3 ISO FRAME MOUNTED ENGLISH 85392719 06 12 Page 49 of 52 flowserve com Notes ...
Page 50: ...DURCO MARK 3 ISO FRAME MOUNTED ENGLISH 85392719 06 12 Page 50 of 52 flowserve com Notes ...
Page 51: ...DURCO MARK 3 ISO FRAME MOUNTED ENGLISH 85392719 06 12 Page 51 of 52 flowserve com Notes ...

