USER INSTRUCTIONS POLYCHEM GRP ENGLISH 71569132 12-04A
Page 46 of 52
flowserve.com
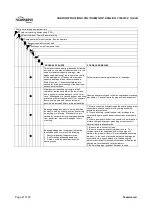
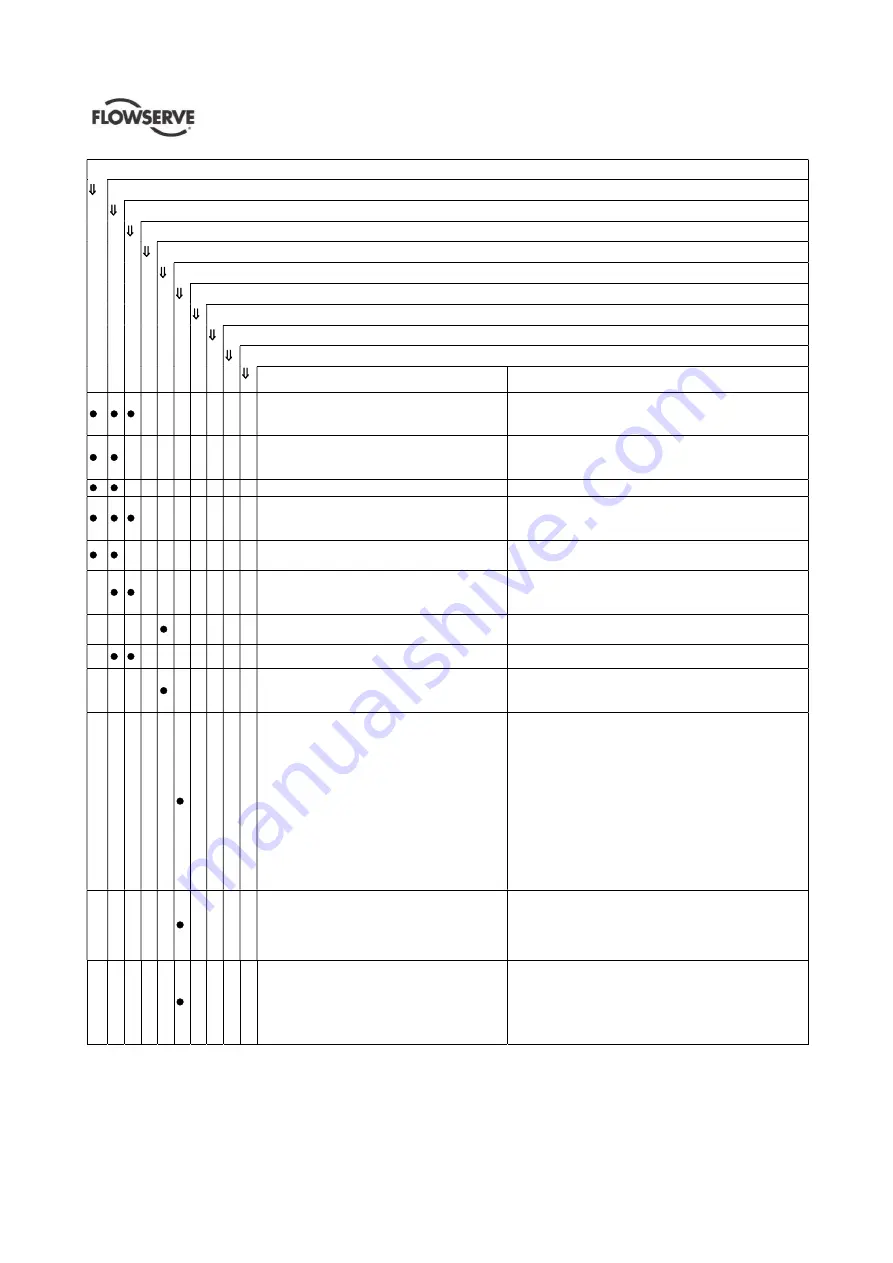
Pump not reaching design flow rate
Pump not reaching design head (TDH)
No discharge or flow with pump running
Pump operates for short period, then loses prime
Excessive noise from wet end
Excessive noise from power end
PROBABLE CAUSES
POSSIBLE REMEDIES
Direction of rotation wrong.
After confirming wrong rotation, reverse any two of three
leads on a three phase motor. The pump should be
disassembled and inspected before it is restarted.
Impeller too small.
Replace with proper diameter impeller. (NOTE:
Increasing impeller diameter may require use of a larger
motor.)
Impeller clearance too large.
Reset impeller clearance.
Plugged impeller, suction line or casing which
may be due to a product or large solids.
1. Reduce length of fiber when possible.
2. Reduce solids in the process fluid when possible.
3. Consider larger pump.
Wet end parts (casing cover, impeller) worn,
corroded or missing.
Replace part or parts.
Not properly primed.
Repeat priming operation, recheck instructions. If pump
has run dry, disassemble and inspect the pump before
operation.
Impeller rubbing.
1. Check and reset impeller clearance.
2. Check outboard bearing assembly for axial end play.
Damaged pump shaft, impeller.
Replace damaged parts.
Abnormal fluid rotation due to complex suction
piping.
Redesign suction piping, holding the number of elbows
and planes to a minimum to avoid adverse fluid rotation
as it approaches the impeller.
Bearing contamination appearing on the
raceways as scoring, pitting, scratching or
rusting caused by adverse environment and
entrance of abrasive contaminants from
atmosphere.
1. Work with clean tools in clean surroundings.
2. Remove all outside dirt from housing before exposing
bearings.
3. Handle with clean dry hands.
4. Treat a used bearing as carefully as a new one.
5. Use clean solvent and flushing oil.
6. Protect disassembled bearing from dirt and moisture.
7. Keep bearings wrapped in paper or clean cloth while
not in use.
8. Clean inside of housing before replacing bearings.
9. Check oil seals and replace as required.
10. Check all plugs and tapped openings to make sure
that they are tight.
Brinelling of bearing identified by indentation on
the ball races, usually caused by incorrectly
applied forces in assembling the bearing or by
shock loading such as hitting the bearing or
drive shaft with a hammer.
When mounting the bearing on the drive shaft use a
proper size ring and apply the pressure against the inner
ring only. Be sure when mounting a bearing to apply the
mounting pressure slowly and evenly.
False brinelling of bearing identified again by
either axial or circumferential indentations
usually caused by vibration of the balls between
the races in a stationary bearing.
1. Correct the source of vibration.
2. Where bearings are oil lubricated and employed in
units that may be out of service for extended periods, the
drive shaft should be turned over periodically to
relubricate all bearing surfaces at intervals of one to three
months.


