R and RX SLURRY Pump USER INSTRUCTIONS ENGLISH
71569242 03-11 (E)
Page 22 of 56
flowserve.com
®
Check that all belts making up one drive set have
matched code numbers. Loosen the adjustable base
and install the belts in their proper grooves. Adjust the
center distance between the sheaves to obtain proper
belt tension. Check the alignment of the pump and
driver sheaves with a taught string or straight edge. For
proper alignment and the sheave faces must be parallel
to each other and in line. Adjustments are made by
slackening the belts and moving the sheaves. Retighten
the drive or driver sheave then recheck. The procedure
may need to be repeated to get alignment as close as
possible..
When the sheaves are aligned that the shafts rotate
freely by hand and install safety guard.
4.6 Grouting
The purpose of grouting is to provide rigid support to the
pump and driver by increasing the structural rigidity of
the baseplate and making it an integral mass with the
foundation.
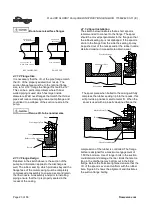
Clean the roughed foundation surface and build a
wooden form around the baseplate (see Fig. 1). For
initial grouting forms should be placed to isolate shims
and levelling nuts. The foundation surface should be
thoroughly saturated with water before grouting. A
typical mixture for grouting-in a pump base is composed
of one part pure Portland cement and two parts of clean
building sand with sufficient water to provide the proper
consistency. The grout should flow freely but not be so
wet as to cause the sand and cement to separate.
Thoroughly puddle the grout while pouring to eliminate
air pockets and low spots. Pour sufficient grouting to
ensure that the bottom surface of the baseplate is
completely submerged. Do not fill isolated areas
around the shims or levelling nuts. Once the grout has
set sufficiently, remove the wooden forms and finish off
the sides and top as desired. At the same time,
roughen the grout surface inside the baseplate. Cover
with wet burlap and allow the grout to cure for at least
40 hours.
After grouting has cured, shims and levelling nuts
should be removed or backed off. Tighten down
baseplate to the new grout to put bolts in tension and
ensure rigidity of structure. Install jam nuts and cut the
bolts to the desired length. Finish grouting isolated
areas. Fill the baseplate including pump and driver
support pedestals with concrete. Trowel and slope the
surface to give suitable drainage.
4.7 Piping
Protective covers are fitted to the pipe
connections to prevent foreign bodies entering during
transportation and installation. Ensure that these
covers are removed from the pump before
connecting any pipes.
4.7.1 Suction and discharge pipework
In order to minimize friction losses and hydraulic
noise in the pipework it is good practice to choose
pipework that is one or two sizes larger than the
pump suction and discharge. Typically main
pipework velocities should not exceed 2 m/s (6 ft/sec)
suction and 3 m/s (9 ft/sec) on the discharge.
Take into account the available NPSH which must be
higher than the required NPSH of the pump.
Never use the pump as a support for
piping.
Maximum forces and moments allowed on the pump
flanges vary with the pump size and type. To
minimize these forces and moments that may, if
excessive, cause misalignment, hot bearings, worn
couplings, vibration and the possible failure of the
pump casing, the following points should be strictly
followed:
Prevent excessive external pipe load
Never draw piping into place by applying force to
pump flange connections
Do not mount expansion joints so that their force,
due to internal pressure, acts on the pump flange
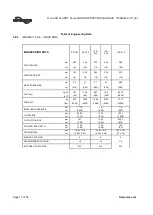
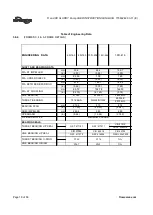
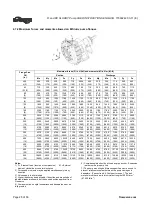
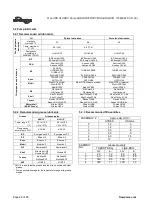
The table in 4.7.2 summarizes the maximum forces
and moments allowed on M pump casings. Refer to
Flowserve for other configurations.
Ensure piping and fittings are flushed
before use.
Ensure piping for hazardous liquids is arranged
to allow pump flushing before removal of the pump.
4.7.1.1 Flange Facing
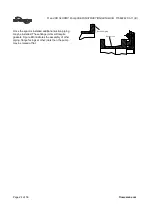
R Pumps are designed so that the connecting pipes
at the suction and discharge can be attached without
gaskets. To ensure correct sealing and rubber pinch,
standard flat face weld neck flanges must be used.
Any arrangements other than that shown will affect
pump internal clearances, cause leakage at the
flanges or result in serious damage to the rubber
parts.


