background image

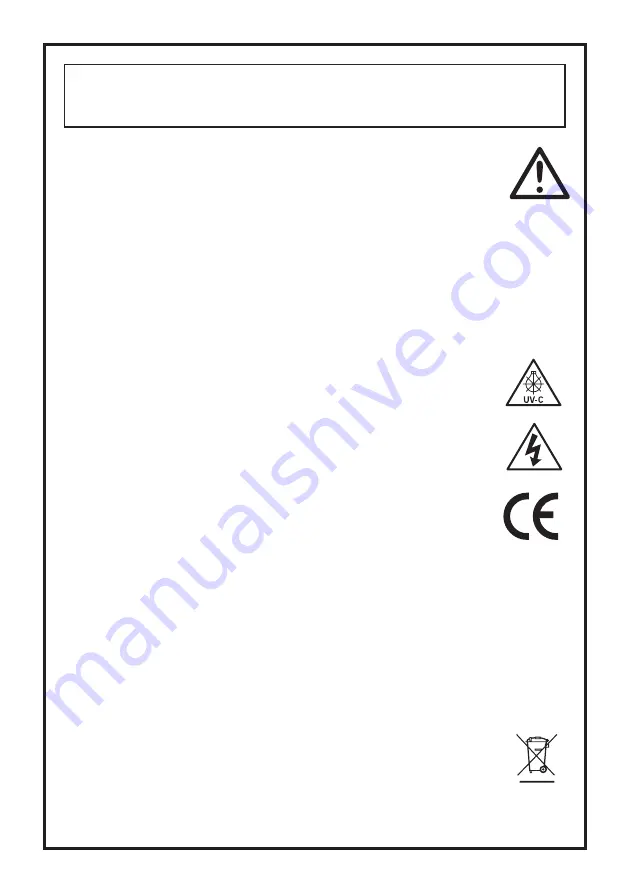
Disposal Of Your Old Product

Your product is designed and manufactured with high quality material and components, which 

can be recycled and reused. When this crossed-out wheeled bin symbol is attached to a 

product, it means the product is covered by the European Directive 2002/96/EC. Please contact 

your local authority about correct disposal for electrical and electronic equipment. Our WEE 

Registration Number is WEE/FE1471RR.

Please act according to your local rules and do not dispose of your old products with your normal household 

waste. The correct disposal of your old product will help prevent potential negative consequences for the 

environment and human health.

WARNING: PLEASE READ THE FOLLOWING  

SAFETY INFORMATION FIRST.

IMPORTANT SAFETY INFORMATION

-  This appliance is not intended for use by persons (including children) with reduced physical, 

sensory or mental capabilities, or lack of experience and knowledge, unless they have been given 
supervision or instruction concerning use of the appliance by a person responsible for their safety. 

- Children should be supervised to ensure that they don’t play with the appliance.

- Young children should always be supervised near water.
-  If the supply cord is damaged, it must be replaced by the manufacturer, its service agent or similarly qualified 

persons in order to avoid a hazard.

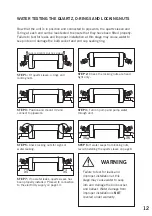
-  WARNING: Do not operate the UV-C emitter when it is removed from the appliance enclosure.
-  Unintended use of the appliance or damage to the housing may result in the escape of dangerous  

UV-C radiation. UV-C radiation may, even in little doses, cause harm to the eyes and skin.

- Appliances that are obviously damaged must not be operated.
- Read the maintenance instructions before opening the appliance.
- Never look directly at an illuminated UV bulb.
- Do not run this unit dry. Do not cover this unit. 
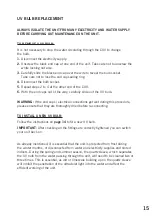
-  Please ensure that the unit is full of water before switching it on.
-  Always isolate the unit from mains electricity and turn off any water supply before carrying out  

any maintenance.

-  Always disconnect all pool appliances from the mains supply before putting your hands into the 

water.

-  Use in the area only if the installation complies with the relevant wiring regulations.
-    Power must be supplied through a Residual Current Device (RCD) with a residual operating 

current not exceeding 30mA.

- This unit must be earthed when earth wire is fitted.
- Never use a fuse larger than 3 amps on the power lead.
- The unit must not be submerged in water.
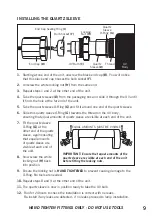
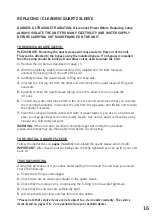
- If the quartz sleeve is cracked, replace it immediately.
-  The unit must be either fully frost protected or taken inside during winter months.

The energy consumption of the unit is lower than the wattage of the bulb due to the high efficiency of the ballast.

PRODUCT INFORMATION

-  

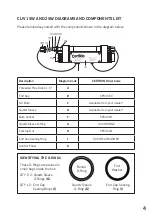
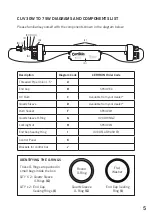
CUV15V3, CUV25V3, CUV30V3, CUV55V3, CUV75V3, CUV110N, CUV220N RATING:


UK / EU: 220-240V   50 / 60Hz.   USA: 120V   50 / 60HZ.

- All units are Class 1, IPX5. All components are CE compliant.

Summary of Contents for Certikin CUV110N

Page 1: ...ttempt to conduct any type of maintenance on the CUV Ensure the unit is installed in the recommended orientation Fit the quartz sleeves and O rings and switch on pump to check that unit is water tight before fitting the bulb bulb socket and end cap see pages 9 to 14 Ensure that the end cap is tight before running the unit After replacing bulbs or before tightening the end cap make sure that the O ...

Page 2: ... operate the UV C emitter when it is removed from the appliance enclosure Unintended use of the appliance or damage to the housing may result in the escape of dangerous UV C radiation UV C radiation may even in little doses cause harm to the eyes and skin Appliances that are obviously damaged must not be operated Read the maintenance instructions before opening the appliance Never look directly at...

Page 3: ...tions on how to install the bulb and quartz sleeve Quartz Sleeve O Rings and flat washer sealing rings are packed in separate small bags inside the box On the CUV s the stainless steel mounting brackets are pre fitted On the CUV110N the mounting brackets can be found in the cardboard end fitments please remove these and fit to the CUV110N Please take time to familiarise yourself with your UV and i...

Page 4: ...TY x 2 End Cap Sealing Rings I IDENTIFYING THE O RINGS Quartz Sleeve O Ring G End Cap Sealing Ring I Round O Ring Flat Washer Description Diagram Code CERTIKIN Order Code Threaded Pipe Union 1 5 A End Cap B SPCUVEC UV Bulb C Available from your dealer Quartz Sleeve D Available from your dealer Bulb Socket F SPCUVLH Quartz Sleeve O Ring G UVCORINGZ Locking Nut H SPCUVLN End Cap Sealing Ring I UVCOF...

Page 5: ...Cap Sealing Rings I IDENTIFYING THE O RINGS Quartz Sleeve O Ring G End Cap Sealing Ring I Round O Ring Flat Washer Description Diagram Code CERTIKIN Order Code Threaded Pipe Union 1 5 A End Cap B SPCUVEC UV Bulb C Available from your dealer Quartz Sleeve D Available from your dealer Bulb Socket F SPCUVLH Quartz Sleeve O Ring G UVCORINGZ Locking Nut H SPCUVLN End Cap Sealing Ring I UVCOFLATWASHER C...

Page 6: ... End Cap Sealing Rings I IDENTIFYING THE O RINGS Quartz Sleeve O Ring G End Cap Sealing Ring I Round O Ring Flat Washer Description Diagram Code CERTIKIN Order Code 2 Slip Fitting A End Cap B SPCUVEC UV Bulb C Available from your dealer Quartz Sleeve D Available from your dealer Bulb Socket F SPCUVLH Quartz Sleeve O Ring G UVCORINGZ Locking Nut H SPCUVLN End Cap Sealing Ring I UVCOFLATWASHER Contr...

Page 7: ...ling Rings I IDENTIFYING THE O RINGS Quartz Sleeve O Ring G End Cap Sealing Ring I Round O Ring Flat Washer Description Diagram Code CERTIKIN Order Code 2 Slip Fitting A End Cap B SPCUVEC UV Bulb C Available from your dealer Quartz Sleeve D Available from your dealer Bulb Socket F SPCUVLH Quartz Sleeve O Ring G UVCORINGZ Locking Nut H SPCUVLN End Cap Sealing Ring I UVCOFLATWASHER Control Panel K B...

Page 8: ...rformance we recommend that you pass the entire volume of your pool through the CUV unit at least once every 4 to 8 hours The slower the flow the higher the dosage of UV We do not recommend the use of pumps with operating pressures in excess of 2 5 bar 25 metres of head Model Pool size Max flow rate Bulb power Inlet Outlet CUV15V3 15m3 7 500 Litres hr 15W 1 X 15W T8 1 CUV25V3 25m3 10 000 Litres hr...

Page 9: ... again ensuring that equal amounts of quartz sleeve are visible at each end of the unit 8 Now screw the white locking nut H back into position 9 Ensure the locking nut is HAND TIGHTENED to prevent causing damage to the O Ring No tools are needed 10 Repeat steps 8 and 9 at the other end of the unit 11 The quartz sleeve is now in position ready to take the UV bulb 12 Run for 24hours to check the ins...

Page 10: ...secure the brackets to the unit Follow the steps below to undertake this Remove brackets from both cardboard packaging end fitments Double check the brackets are the correct way up to help with wall mounting Screws and nuts are pre installed in position where the brackets need to go At one end of the UV unscrew the nuts only but leave the screws and cable holder in place With the nuts off fit the ...

Page 11: ... the unit may be used as the inlet or outlet IMPORTANT Do not overtighten fittings IMPORTANT Valves positioned after the CUV must never be closed when the pump is in operation DO NOT dead head the unit All units are fully serviceable without removing the unit therefore they do not need a by pass to be installed 11 ...

Page 12: ...onnect to pipework STEP 4 Turn on pump and pump water through unit STEP 5 Check locking nuts for signs of water leaking STEP 7 If no water leaks quartz sleeve has been properly installed Proceed to connection to the electricity supply on page 13 STEP 6 If water seeps from locking nuts revisit installing the quartz sleeve on page 8 Failure to test for leaks and improper installation at this stage m...

Page 13: ...mains electric This unit must be connected to permanent wiring A switch with 3mm contact separation must be provided in the fixed wiring to provide disconnection from the electricity supply It is recommended that the UV unit is wired in conjunction with the pump so that when the pump is turned off so is the UV unit USA SPECIFIC GROUNDING INSTRUCTIONS This appliance must be grounded In the event of...

Page 14: ... the UV bulb pins You may need to hold the other end of the UV bulb to help you fit the socket 6 Ensure the UV bulb socket is firmly connected to the UV bulb 7 Repeat steps 3 to 6 at the other end of the unit 8 Now at one end of the unit slide the black end cap checking that the sealing ring in position over the bulb socket while carefully holding the cable to prevent the bulb connector disconnect...

Page 15: ...re re connecting TO INSTALL A NEW UV BULB Follow the instructions on page 14 to fit a new UV bulb IMPORTANT After checking all the fittings are correctly tightened you can switch your unit back on As already mentioned it is essential that the unit is protected from frost during the winter months or disconnected from water and electricity supplies and stored indoors During the spring and summer sea...

Page 16: ...onnect the unit from the pipework and tilt the unit to drain the chamber of water 7 Clean the sleeve and polish with a soft cloth or paper towel If you live in a hard water area you may get limescale on the quartz sleeve this can be easily removed by using vinegar or a cold water descaler WARNING If the end caps electrical connections get wet during this procedure please ensure that they are thoro...

Page 17: ...tion system sterilisers have thermal overload protection which automatically shuts down and then enables a fast re start when the problem has been cleared This may be as a result of water in the end caps Please see the troubleshooting section Thermal Overload Protection This will automatically switch off the unit should the temperature exceed the maximum operating temperature limits Automatic star...

Page 18: ...come dirty and requires cleaning Also make sure you have the right model for your pool size Ensure your pool filtration is removing waste and debris efficiently Dirt in pools will affect the efficiency of the CUV Check that your pool water volume is pumping through the CUV every 4 to 8 hours Check chemical levels and ensure they are within industry standards Only after you have carried out these c...

Page 19: ...urs a day For external applications if the unit is frost protected it may be left running throughout the winter Otherwise the unit should be removed drained and stored safely for the winter Can I bury the unit underground No The UV although weatherproof is not suitable for installing in any situation that may be subject to immersion in water Can it be used with ozone Yes The UV is safe to use with...

Page 20: ...sly set out above This guarantee does not cover the UV bulb or quartz sleeve This unit should only be installed by a qualified electrician The manufacturer or supplier shall not be responsible or held liable for any damages caused by defective components or materials of this product or for loss incurred by interruption of service or any consequential incidental damages and expenses arising from th...

Page 21: ......

Page 22: ...CERTIKIN INTERNATIONAL LTD Witan Park Avenue 2 Station Lane Industrial Estate Witney Oxfordshire United Kingdom OX28 4FJ Phone 44 0 1993 777200 Fax 44 0 1993 778869 www certikin co uk ...

Reviews: