background image

LACO USER MANUAL - GASCHECK G SERIES

16

© 2018 FLUIDX Equipment, Inc.

5.  MAINTENANCE

5.1 

CALIBRATION 

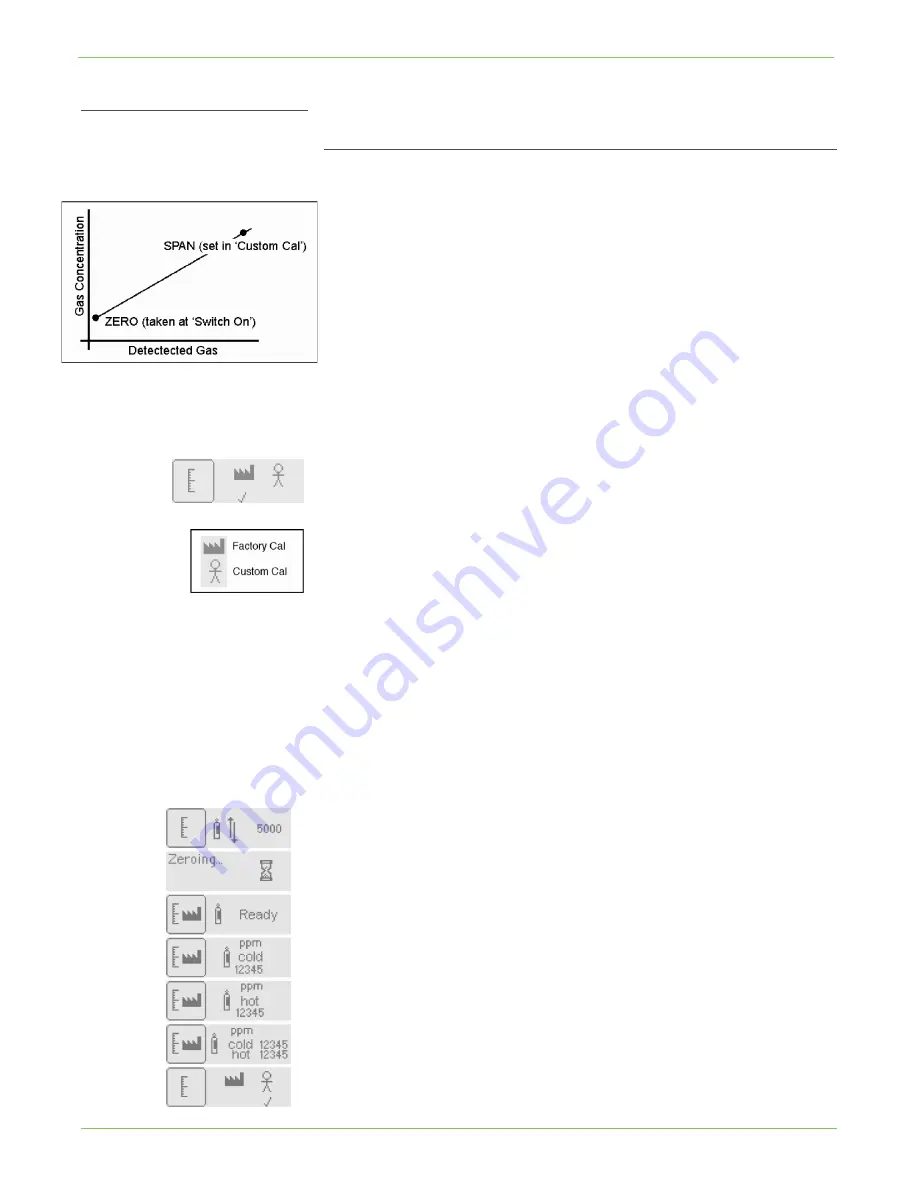
The GasCheck G Series has two selectable calibration settings: factory 
and custom. Factory calibration is carried out at Ion Science during the 
instrument’s manufacture. It can be selected and used but cannot be 
changed.

The GasCheck is calibrated against a 5000 ppm helium concentration and a 

0.0005cc/sec (5 E-4) helium leak rate.

Custom calibration gives the user the ability to calibrate the instrument. 
This setting may offer improved accuracy over the factory calibration if 
the barometric air pressure differs from that stated on the instrument’s 
calibration certificate.

5.1.1  SELECTING FACTORY OR CUSTOM CALIBRATION

To select either FACTORY CAL or CUSTOM CAL, select the calibration screen 

and move the up use the up and down keys to move the “tick” under the 
desired symbol, then press the ESC key to exit to the main menu.

Custom calibration can only be selected and used after the instrument has 
been calibrated by the user. To do this, move the “tick” under the CUSTOM 
CAL symbol and press the ENTER key.

The GasCheck requires either 5000 ppm helium concentration or a 
0.0005cc/sec (5 E-4 cc/sec) leak rate as a reference. The GasCheck 
automatically selects the type of calibration media based on which unit 
the instrument has already selected.

If the GasCheck is used to detect leaks measured using “ppm or mg/m3” 
units, then the instrument must be calibrated using a 5000 ppm helium 
concentration.

If the GasCheck G is used to detect leaks measured using “cc/sec” unites, 
the instrument must be calibrated using a 0.005 cc/sec (5 E-4) helium leak.

5.1.2  CALIBRATION PROCEDURE USING PPM UNITS

Please read this entire procedure before proceeding with this calibration 
routine.

1.  Fill an empty (uncontaminated) sample bag with 5000 ppm helium gas 

before starting the calibration procedure. Also remove the outer gray 
probe from the GasCheck.

2.  Select the CUSTOM CAL symbol from the instrument’s menu. An 

option appears allowing the adjustment of the “ppm” value to ensure 
the instrument matches the gas concentration being used. Use the up 
and down keys to adjust between 4900 and 5100 ppm.

Summary of Contents for GasCheck G Series

Page 1: ...USER MANUAL GASCHECK G SERIES ...

Page 2: ... 2018 FLUIDX Equipment Inc CONTACT US PHONE FAX Phone 801 486 1015 Fax 801 486 1032 ADDRESS FLUIDX Equipment Inc 139 W 2260 S Salt Lake City UT 84115 www fluidxinc com info fluidxinc com SMT 07 1015 rev B ...

Page 3: ...iii 2018 FLUIDX Equipment Inc CONTENTS 1 SCOPE 1 2 SAFETY 1 3 OVERVIEW 2 4 BASIC OPERATION 12 5 MAINTENANCE 16 ...

Page 4: ...k G Series instrument Portable Leak Detectors takes no responsibility for damage injury or death resulting from misuse misunderstanding or negligence while using this gas detector Please contact Portable Leak Detectors for clarification on any aspect of this manual that is not understood or for additional information 2 1 QUALITY ASSURANCE GasCheck G Series instruments are manufactured in complianc...

Page 5: ...its means of detecting gas which offers a robust sensor technology that requires practically no maintenance beyond annual servicing All GasCheck G Series models have an easy to use graphical interface with an intuitive keypad allowing simple function selection and adjustment It can be upgraded to add features without the need to be returned to the supplier and without having to modify the internal...

Page 6: ...rk and process equipment Medical Testing of membrane materials and sealing of glove boxes Pneumatic Valve seal testing 3 2 UNITS OF MEASUREMENT The GasCheck is calibrated against a 5 E 4 cc s helium leak to allow volumetric readings and also a 5000ppm helium to allow measurement of concentrations Table 3 Selectable Units of Measurement UNIT DESCRIPTION cc sec Cubic Centimeters per Second offers a ...

Page 7: ...k G range is NOT gas specific i e it cannot differentiate between gases 3 4 PACKING LIST Please remove all packing material and then check the content of the carry case against the list below before use Should the instrument or any accessory appear damaged or missing contact the instrument supplier for advise before use Table 4 Packing List ITEM QTY DESCRIPTION CHECK 1 1 GasCheck G instrument w sh...

Page 8: ...rrounding the object carries the access heat into the surrounding atmosphere This principal is also the same for objects that are cooler than the surrounding ambient air Dissipation of heat into an air atmosphere is known and is a predictable rate However if the ambient air is replaced with an alternative gas like helium the rate at which an object cools down changes If the object mentioned above ...

Page 9: ...through the cell a constant level of heat is transmitted to a Temperature Stable block through the air This rate of heat transmission is used to Zero the instrument When gases with different thermal qualities pass through the chamber the amount of heat being transmitted to the Temperature Stable block changes These changes are measured calculated and displayed on the GasCheck as leak rates or gas ...

Page 10: ...efore using the instrument the various settings should be adjusted to suit the application Pressing the ESC key while viewing this RUNNING SCREEN will access the instrument s MAIN MENU Repeated pressing of the ESC returns the user back to the RUNNING SCREEN Figure 1 Running Screen NOTE The amount of functionality varies between models See Table 1 GasCheck Specificationsto find which functions rela...

Page 11: ...ned the battery is exhausted BACKLIGHT INDICATOR The backlight symbol shows the status of the backlight even in bright daylight GAS MEASUREMENT The GasCheck G2 and G2 measure the leak rate of gas leakage in whichever units are selected SOUND INDICATOR The symbol shows if the sounder is on or off If the semicircle on the right of the symbol is present then the sound is switched on If not the sounde...

Page 12: ...N key to move the tick to the desired position and then press the ESC key to return to the MAIN MENU An audible beep can also be heard whenever the key pad is pressed This beep cannot be switched off G1 G2 G3 PEAK HOLD When selected this function holds the highest detected reading on the display until the ENTER key is pressed Select Peak ON or OFF using the UP or DOWN key and then press the ESC ke...

Page 13: ... detect helium leaks down to 0 0005 of a cubic centimeter per second PPM Parts per million This unit indicates a concentration but can t be used to quantify a volume of gas leakage MG M3 Milligrams per meter cubed Like ppm this unit is also a concentration so it can t be used to quantify a volume of gas leakage G YR Grams per year offers an alternative volumetric leak rate that directly measures t...

Page 14: ...the selection 3 A tick will appear 4 Press the ENTER or esc to exit to the MAIN MENU If the gas to be detected does not appear in the instrument s internal gas table then one of the five Gas Groups can be selected Gas Groups have a variation of sensitivities Group 1 is high sensitivity and Group 5 is low sensitivity Gas groups allow the instrument to calculate leak rates with reasonable accuracy T...

Page 15: ...E 5 0 000029 Argon Ar 3 5 E 5 0 000035 Oxygen 02 2 9 E 5 0 000029 Refrigerant R502 R502 3 0 E 5 0 000030 Refrigerant R404a R404a 3 2 E 5 0 000032 Refrigerant R407c R407c 3 3 E 5 0 000033 Refrigerant R410a R410a 3 2 E 5 0 000032 Refrigerant R507 R507 3 8 E 5 0 000038 4 BASIC OPERATION All GasCheck G Series models have the same keypads The following section explains the general functionality of each...

Page 16: ...re the instrument is on the X100 times one hundred range While on the main running screen use the UP and DOWN key to adjust between sensitivity ranges X100 is the most sensitive X1 is the least sensitive 2 Gas leaks tend to occur at pneumatic joints or welded seams To test for a leak hold the GasCheck at a 45 degree angle to the object being tested and drag the probe along the seam or joint at a r...

Page 17: ...ains 1 mm from the surface of the test area avoiding accidental dirt and moisture ingress Do not touch the probe especially the brass sensor housing Heat from fingers can result in significant changes in signal causing false readings Avoid placing the probe on wet or dirty surfaces Blockage of the probe will result in instrument failure Figure 2 Changing Probes Some applications may require a long...

Page 18: ...s will be replaced by 99999 on the display In this case use the UP or DOWN key to adjust the instrument sensitivity Figure 3 Detecting Leaks When detecting very small leaks probe movement at a rate of 10mm per second may be required The outer gray probe cover can be removed to allow better access to restricted areas If the outer probe is removed please note the following Avoid bending the inner pr...

Page 19: ...trument has been calibrated by the user To do this move the tick under the CUSTOM CAL symbol and press the ENTER key The GasCheck requires either 5000 ppm helium concentration or a 0 0005cc sec 5 E 4 cc sec leak rate as a reference The GasCheck automatically selects the type of calibration media based on which unit the instrument has already selected If the GasCheck is used to detect leaks measure...

Page 20: ...t errors in reading 5 1 3 CALIBRATION PROCEDURE USING CC SEC UNITS Please read this entire procedure before proceeding with this calibration routine 1 Check your LACO CalMaster Leak Standard to ensure the pressure reading matches the leak rate shown on the calibration stick The pressure gauge may be installed on your leak standard or for open style leak standards the pressure gauge is set on heliu...

Page 21: ...ewdriver Removing the battery cover will reveal a battery hold which requires 4 x AA size batteries Before removing old batteries or fitting new ones unclip the battery holder from the instrument by prying apart the PP3 type clip as shown in the illustration Once the battery holder is disconnected from the instrument the batteries can be removed or replaced Care must be taken when refitting the ba...

Reviews: