Summary of Contents for 15B MAX

Page 1: ... Digital Multimeters Calibration Manual August 2022 English 2022 Fluke Corporation All rights reserved Specifications are subject to change without notice All product names are trademarks of their respective companies ...

Page 2: ...nearest Fluke authorized service center to obtain return authorization information then send the product to that service center with a description of the difficulty postage and insurance prepaid FOB Destination Fluke assumes no risk for damage in transit Following warranty repair the product will be returned to Buyer transportation prepaid FOB Destination If Fluke determines that failure was cause...

Page 3: ...le of Contents Introduction 1 Contact Fluke 1 Safety Information 1 Specifications 1 Maintenance 1 General Maintenance 2 Test Fuses 2 Replace Batteries and Fuses 4 Performance Tests 4 Adjustment Procedures 7 ...

Page 4: ...ii 15B MAX 17B MAX Calibration Manual ...

Page 5: ...s available at www fluke com More specific safety information is listed in this manual where applicable A Warning identifies hazardous conditions and procedures that are dangerous to the user A Caution identifies conditions and procedures that can cause damage to the Product or the equipment under test Specifications Safety Specifications are in the Safety Specifications section of the Safety Info...

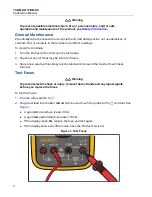
Page 6: ...Shake out any dirt that may be in the terminals 3 Soak a new swab with isopropyl alcohol and work it around the inside of each input terminal Test Fuses XW Warning To prevent electric shock or injury remove the test leads and any input signals before you replace the fuses To test the fuses 1 Turn the rotary switch to Q 2 Plug a test lead into the A or mA μA terminal and touch the probe to the W te...

Page 7: ... enclosure touching or handling any PCBs or components Minimize handling Handle static sensitive parts by non conductive edges Do not slide static sensitive components over any surface When removing plug in assemblies handle only by non conductive edges Never touch open edge connectors except at a static free work station Keep parts in the original containers until ready for use Use static shieldi...

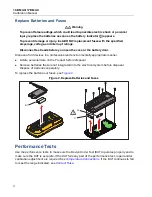
Page 8: ...ssional and environmentally appropriate manner Delete personal data on the Product before disposal Remove batteries that are not integrated into the electrical system before disposal Dispose of batteries separately To replace the batteries or fuses see Figure 2 Figure 2 Replace Batteries and Fuses Performance Tests Use the performance tests to make sure the Device Under Test DUT operates properly ...

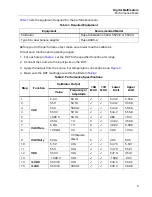
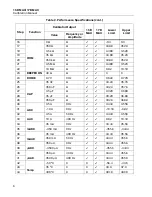
Page 9: ...quipment Equipment Recommended Model Calibrator Fluke Calibration 5502A 5502E or 5522A Type K to dual banana adapter Fluke 80AK A Table 2 Performance Specifications Step Function Calibrator Output 15B MAX 17B MAX Lower Limit Upper Limit Value Frequency or Amplitude 1 VAC 5 5 V 50 Hz 5 442 5 558 2 55 V 50 Hz 54 42 55 58 3 55 V 500 Hz 54 42 55 58 4 550 V 50 Hz 544 2 555 8 5 1000 V 50 Hz 986 1014 6 V...

Page 10: ... 34 24 35 76 26 350 nF Ω 342 4 357 6 27 3 5 μF Ω 3 320 3 680 28 35 μF Ω 33 20 36 80 29 350 μF Ω 332 0 368 0 30 ADC 3 5 A 0 Hz 3 444 3 556 31 10 A 0 Hz 10 18 9 82 32 AAC 3 5 A 50 Hz 3 444 3 556 33 10 A 400 Hz 9 82 10 18 34 mADC 35 mA 0 Hz 34 44 35 56 35 350 mA 0 Hz 355 6 344 4 36 mAAC 35 mA 400 Hz 34 44 35 56 37 350 mA 50 Hz 344 4 355 6 38 μADC 350 μA 0 Hz 344 4 355 6 39 3500 μA 0 Hz 3556 3444 40 μ...

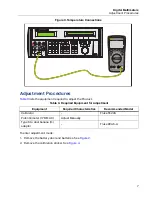
Page 11: ...2 Remove the calibration sticker See Figure 4 Table 3 Required Equipment for Adjustment Equipment Required Characteristics Recommended Model Calibrator Fluke 5522A Potentiometer 17B MAX Adjust Manually Type K to dual banana m adapter Fluke 80AK A POWER 0 1 2 3 4 5 6 7 8 9 ENTER M k m V Hz FIELD EDIT F OPR EARTH SCOPE EXGRD MENU PREV SHIFT RESET CE SETUP REF NEW TC MEAS F n p p W dBm sec C A MULT x...

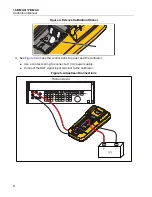
Page 12: ...ure 4 Remove Calibration Sticker 3 See Figure 5 to make the connections to power and the calibrator Use a contact spring to connect a 3 V dc power supply Connect the DUT signal input terminal to the calibrator Figure 5 Adjustment Connections ...

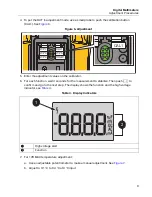
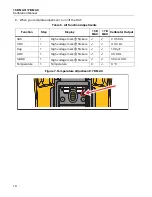
Page 13: ...function wait 4 seconds for the measurement to stabilize Then push H to confirm and go to the next step The display shows the function and the high voltage indicator see Table 4 7 For 17B MAX temperature adjustment a Use an adjustable potentiometer to make a manual adjustment See Figure 7 b Adjust to 0 1 ÁC to 0 3 ÁC at 0 ÁC input Table 4 Display Indicators A High voltage alert B Function CAL1 WP6...

Page 14: ... All Function Adjustments Function Step Display 15B MAX 17B MAX Calibrator Output VAC 1 High voltage mark Y flickers 3 V 50 Hz VDC 1 High voltage mark Y flickers 3 V 0 Hz Cap 1 High voltage mark Y flickers 100 μF ADC 1 High voltage mark Y flickers 3A 0 Hz mADC 1 High voltage mark Y flickers 30 mA 0 Hz Temperature 1 Temperature X 0 C ...

Reviews: