Maintenance
Calibration
4
4-35
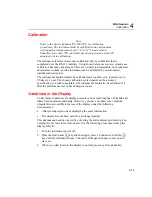
Calibration
Note
Refer to the Service Manual (PN 1883791) for calibration
procedures. The instrument must be stabilized in an environment
with an ambient temperature of 22
°
C to 24
°
C and a relative
humidity of less than 70%, and must have been powered at least 30
minutes prior to calibration.
The instrument features closed-case calibration, that is, calibration that is
completed over the RS-232 interface. Using known reference sources, closed-case
calibration has many advantages. There are no parts to disassemble, no mechanical
adjustments to make, and the instrument can be calibrated by an automated
instrumentation system.
The instrument should normally be calibrated on a regular cycle, typically every
90 days to 1 year. The chosen calibration cycle depends on the accuracy
specification you wish to maintain. The instrument should also be calibrated if it
fails the performance test or has undergone repair.
Variations in the Display
Under normal operation, the display presents various combinations of brightly and
dimly lit annunciators and digits. However, you may encounter other, random
irregularities across different areas of the display under the following
circumstances:
•
After prolonged periods of displaying the same information
•
The display has not been used for a prolonged period
This phenomenon can be cleared by activating the entire display and leaving it on
overnight (or at least for several hours). Use the following procedure to keep the
display fully lit:
1.
Turn the instrument power off.
2.
Press the front panel
D
key and then apply power. Continue to hold the
E
key until the instrument beeps. The entire front panel display comes on and
stays on.
3.
When you wish to return the display to normal, press any front panel key.
Summary of Contents for 2680A
Page 8: ......
Page 14: ...2680A 2686A Users Manual vi ...
Page 20: ...2680A 2686A Users Manual 1 2 ...
Page 98: ...2680A 2686A Users Manual 2 62 ...
Page 196: ......
Page 228: ...2680A 2686A Users Manual A 32 ...
Page 236: ...2680A 2686A Users Manual C 4 ...
Page 242: ...2680A 2686A Users Manual D 6 ...
Page 274: ...2680A 2686A Users Manual 6 ...


