Maintenance
Performance Tests
4
4-15
Table 4-3. Resistance Test
Step
Range
Input Resistance
Display Limits
1
2
3
4
5
6
7
8 (optional)
9 (optional)
200
Ω
200
Ω
2 k
Ω
20 k
Ω
200 k
Ω
M
Ω
M
Ω
M
Ω
M
Ω
short circuit
100.00
Ω
1.0000 k
Ω
10.000 k
Ω
100.00 k
Ω
1.0000 M
Ω
10.00 M
Ω
40.0 M
Ω
290 M
Ω
0.00 to 0.04
99.86 to 100.14
.9988 to 1.0012
9.988 to 10.012
99.88 to 100.12
.9978 to 1.0022
9.95 to 10.05
39.3 to 40.7
282 to 298
4-16. Continuity Test
Use the following procedure to verify proper operation of the continuity
function:
1.
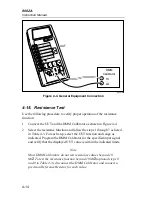
Connect the UUT and the DMM Calibrator as shown in Figure 4-4.
2.
Select the resistance function and the 2 k
Ω
range. Press the
button once. The
symbol should appear on the display.
3.
Apply a resistance of 100.0
Ω
. The long bar across the top of the display
should appear on the display immediately. A reading of .0997 to .1003
should appear shortly thereafter (negating any test lead resistance).
4.
Press the
button to enable the audible continuity (the 100.0
Ω
still applied). The
R
symbol should appear on the display with the
symbol. The tone should sound.
5.
Remove the connections to the input of the UUT. The tone should stop
and the bar should disappear from the display. The display should
indicate OL (overrange) along with the
and
R
symbols.
4-17. Current Test
Use the following precautions to verify proper operation of the dc and ac
current functions:
1.
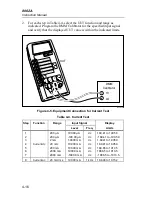
Connect the UUT and the DMM Calibrator as shown in Figure 4-5.
Summary of Contents for 8062A
Page 4: ......
Page 8: ...8062A Instruction Manual iv...
Page 10: ...8062A Instruction Manual vi...
Page 14: ...8062A Instruction Manual 1 2...
Page 24: ...8062A Instruction Manual 2 2...
Page 50: ...8062A Instruction Manual 2 28...
Page 52: ...8062A Instruction Manual 3 2...
Page 62: ...8062A Instruction Manual 3 12...
Page 64: ...8062A Instruction Manual 4 2...
Page 90: ...8062A Instruction Manual 4 28...
Page 92: ...8062A Instruction Manual 5 2...
Page 102: ...8062A Instruction Manual 5 12 8062A 4031 iv39c eps Figure 5 2 A1 Main PCB Assembly...
Page 106: ...8062A Instruction Manual 6 2...
Page 108: ...8062A Instruction Manual 6 4 dy55c eps Figure 6 1 Accessories...
Page 118: ...8062A Instruction Manual 7 2...
Page 122: ...8062A Instruction Manual 7 6...
Page 123: ...8062A Instruction Manual 7 7 8062A 1201 iu46c eps Figure 7 5 A1 Main PCB Schmatic Diagram...
Page 124: ...8062A Instruction Manual 7 8 8060A 1003 iu61f eps Figure 7 6 A3 RMS PCB Schmatic Diagram...

