background image

FlukeView Forms 
Users Manual 

14 

Click on the << button if you want to change the example 
input data to approximate the inputs you are expecting to 
measure. 

Changing the Logging Interval 

To change the logging interval, open the Logging 
Window, select the Setup tab and make changes in the 
Interval 
section. Changing the logging interval: 


Does not usually significantly change a graph of the 
data. A very small interval (10 seconds or less) rarely 
provides more significant data, especially if input 
event data is also being recorded. 


Does directly impact the number of records stored 
(smaller interval means more records are recorded). 


Does not change the number of times that FlukeView 
Forms
 requests readings from the meter. This is an 
internal value based on the type of meter and the 
PC’s CPU speed and current performance. 

Changing the Input Event Settings 

Changing the input event settings allows you to specify 
what changes in the input are significant enough to begin 
a new input event.  

To change event settings, open the Logging Window
select the Setup tab and make changes in the Events 
section. 

With Relative Threshold selected under Threshold 
method
, you specify a percentage change in the readings 
that begins a new event. Relative thresholds work well 
when signal noise (insignificant changes in the input 
signal) is proportional to the expected signal value.  

With Fixed Threshold selected under Threshold 
method
, you specify a fixed-value change in the readings 
(in the units of measure that the meter is using) that 
begins a new event. Fixed thresholds work well when you 
want to capture a significant unit change in the input you 
are measuring. 

Summary of Contents for FlukeView Forms

Page 1: ...FlukeView Forms Documenting Software Users Manual September 2000 Rev 5 8 07 2002 2003 2005 2007 Fluke Corporation All rights reserved All product names are trademarks of their respective companies...

Page 2: ......
Page 3: ...lation 3 System Requirements 3 Installing FlukeView Forms 3 Overview of FlukeView Forms 3 Starting FlukeView Forms 6 Selecting a Form Template 6 Getting Data from the Meter to the PC 6 How Your Meter...

Page 4: ...sting Form 17 Printing a Form 18 Saving a Form 18 Placing Existing Meter Data in a New Form Template 18 Display Selected Readings 19 Finding and Opening Saved Forms 19 Opening a Saved Form 19 Using th...

Page 5: ...ng Program Options 24 FlukeView Forms Meter Functions 24 Clearing Data from Meter Memory 25 Changing Meter Settings 25 Altering Form Templates 25 Altering an Existing Template 26 Creating a New Form T...

Page 6: ...ke warrants that the Product will perform in its intended environment substantially in accordance with the accompanying written materials for a period of 90 days from the date of license acceptance Fl...

Page 7: ...meter data in a format that meets your needs Contacting Fluke To order accessories receive assistance or locate the nearest Fluke distributor or Service Center call USA 1 888 99 FLUKE 1 888 993 5853 C...

Page 8: ...ents readings from supported digital meters through IR or standard serial communications Displays acquired results in graphs and tables Allows you to save and print results Allows you to retrieve and...

Page 9: ...g in with Administrator privileges Installing FlukeView Forms To install FlukeView Forms please see the printed FlukeView Forms Installation Guide For installation of the Fluke USB IR cable see the US...

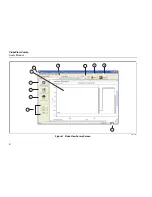
Page 10: ...FlukeView Forms Users Manual 4 3 2 1 8 9 7 4 11 5 6 10 zk01f eps Figure 1 FlukeView Forms Screen...

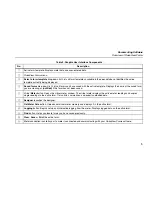
Page 11: ...untitled if the form has not been saved E Virtual Meter button Opens the virtual meter window The virtual meter displays the active meter readings and copies single readings to the active form It also...

Page 12: ...k Form dialog box appears Double click a form template name in the Select a form template list Note If you open a new blank form template FlukeView Forms asks if you want to save any changes you have...

Page 13: ...ing the Communications Port The communications port that FlukeView Forms uses is displayed at the bottom right of the FlukeView Forms screen To change the communications port 1 Open FlukeView Forms 2...

Page 14: ...ms two ways When you upload individually saved readings from meter memory When you perform a single reading copy to form Note Readings stored in meter memory are identified variously as saved readings...

Page 15: ...rm The Get Meter Data dialog box appears In some cases this step is unnecessary Instead you are prompted with the Get Meter Data dialog box automatically You can also press the Get Meter Data button t...

Page 16: ...ing The Logging Window appears You can also press the Logging button to access the Logging Window 6 Set up your logging session using the Setup tab of the Logging Window or make no changes to Setup an...

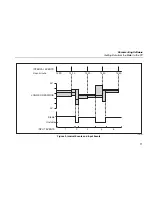
Page 17: ...are Getting Data from the Meter to the PC 11 INTERVAL EVENTS Hour minute 14 00 14 10 14 20 14 30 14 40 LOGGED READINGS INPUT EVENTS 1 2 3 4 5 5 V 0 V Stable Unstable zk02f eps Figure 2 Interval Events...

Page 18: ...the display of two readings at once and both are being displayed then both readings may be logged depending on the settings you have selected When you start logging the meter readings are monitored b...

Page 19: ...view either or both on the form If you decide to record only input events or only interval events you lose this flexibility but you reduce the number of readings you take and save disk space on your P...

Page 20: ...s an internal value based on the type of meter and the PC s CPU speed and current performance Changing the Input Event Settings Changing the input event settings allows you to specify what changes in...

Page 21: ...current event is yellow while older events are blue and eventually scroll off the left side of the chart The number of events logged and the current high low and average values for the event in progr...

Page 22: ...ars at the bottom of any display reading table on the form or in a testpoint reading form item Data from Multiple Meters on a Single Form You can display data from more than one meter on a single form...

Page 23: ...by the user If you place your cursor in a field and the symbol appears that is a user data field You can enter comments and additional data in these fields To retain user data when adding a new set o...

Page 24: ...ve button Save is disabled if there is no new data to save Saved forms are identified by the form template and the date and time they were first saved You can also enter a 30 character remark to help...

Page 25: ...iple logged readings into a single reading Note You cannot edit the actual meter data You can only delete entire readings or you can change the order of readings 1 From the menu select Tools then Sele...

Page 26: ...have saved previously by opening the saved form and changing user data You can then either perform a Save to overwrite the original form or Save As to create a new form with the edited material Deleti...

Page 27: ...can copy the data to the form or export the data to a csv file see file export for a more flexible export Additional buttons options are provided to support specific meter capabilities It shows meter...

Page 28: ...hat you see is what you get export For a more flexible export see the File Export Data menu Clearing Data from Meter Memory You can use FlukeView Forms to clear data from the meter s memory if the met...

Page 29: ...base 1 Open FlukeView Forms or FlukeView Forms Designer 2 On the File menu select Open Database 3 Browse to the drive and folder containing the database 4 Select the database you want to open and clic...

Page 30: ...select File then Open Database 3 Select the database to optimize and click OK 4 On the menu select Advanced then Database Maintenance 5 Select Optimize and follow on screen instructions Note FlukeVie...

Page 31: ...to change some meter settings including synchronizing the clock internal logging settings and other meter functions that are specific to the type of meter 1 Turn on the meter 2 From the Meter menu se...

Page 32: ...Item 7 Change fonts type colors and other form item characteristics by selecting the form item click on the form item in the template From the menu select Edit then Properties Make changes 8 Select m...

Page 33: ...h display meter data or user data Form items displaying meter data can only display either logged readings or display readings The following is a list of available form items These are found in templa...

Page 34: ...adings against their amplitude Typical readings tend to plot together in a cluster whereas exceptional events are plotted away from the typical ones This can be useful when there is a recurring event...

Page 35: ...rm item signifies Yes Clearing the check box signifies No Numeric Entry Provides a space to type numeric values on the form Selection Box Allows you to choose data from a list of predefined values tha...

Page 36: ...ew Forms uses 1 On the Tools menu select Options The Options dialog box appears 2 Click the Communications tab 3 In the Port drop down list select the communications port you would like to use The def...

Reviews: