5. MAINTENANCE, ADJUSTMENTS AND CALIBRATION
Page 163
© 2011 Fluke Calibration
The piston-cylinders are high precision metrological assemblies. The annular gap between the piston and
the cylinder is adjusted to be less than 1 micron, and in some cases, less than 0.5 micron. The gap
between the piston and cylinder is lubricated by the pressurized medium. If the space becomes
contaminated, PG9000 performance can be affected. Symptoms of contamination of the space (a dirty
piston-cylinder) include:
•
Decay in rotation rate is more rapid than normal:
Piston rotation slows down too quickly,
especially at low mass loads.
•
Difficulty rotating piston:
The motorized rotation system is unable to start piston rotation.
•
Poor sensitivity:
Very small mass changes do not have usual effect.
•
Noisy pressure:
The pressure defined when the piston is floating is not a stable as it usually is.
If any of these symptoms are present, they may be caused by a dirty piston-cylinder. The piston-cylinder
module should be disassembled and the piston-cylinder cleaned. The following section provides instructions
for disassembly and cleaning of gas operated, gas lubricated piston-cylinders (PC-7100/7600).
Note
Gas lubricated piston-cylinders (PC-7100/7600) are highly sensitive to
contamination. When using gas lubricated piston-cylinders, if symptoms of
contamination develop rapidly with operation after successfully cleaning, there is
almost certainly a source of contamination within the PG9000 system. This source
must be identified and eliminated to reduce the frequency of piston-cylinder
cleaning. Often, the source of contamination is the test gas supply itself (which
can contain humidity, lubricating oil, or particulates) or the return gas from
contaminated DUTs that are connected to the PG9000 system.
Caution
The PC-7100/7600 piston-cylinder module design affords maximum protection to
the piston-cylinder element assuring that it is protected during routine piston-
cylinder handling. Cleaning the piston-cylinder requires disassembly of the
module and exposure of the piston-cylinder to possible damage. These risks
include damage to the critical working surfaces for all piston-cylinder sizes and
chipping or breaking, especially for small diameter piston-cylinders. Only qualified
personnel should undertake piston-cylinder disassembly and reassembly. The
instructions and recommendations contained in this manual should be followed
carefully throughout the operation.
5.3.1
Disassembly and Reassembly: 10 and 20 kPa/kg
There are five sizes piston-cylinders within the PC-7100/7600 family – 10 / 20 / 50 / 100 / 200
kPa/kg. The disassembly process is nearly the same for all five models but with minor
differences between the low range and high range piston-cylinders.
The 10 and 20 kPa/kg piston-cylinders disassembly process is the same for both models.
The 50, 100, and 200 kPa/kg piston-cylinders share a common disassembly process.
Caution
•
Never
•
The piston assembly ( piston head + adjusting mass + piston cap
+ piston cap retaining screw) is part of the PG9000 calibrated mass load.
Its mass has been measured and is reported in the calibration report. Use
caution when handling these parts, to avoid changing their mass by
swapping parts, contaminating them or leaving parts out in reassembly.
Out of tolerance pressure definitions could result.
touch the highly polished (lapped) surfaces of the piston or cylinder
with your bare hands. Body oils and acids can permanently etch the
surfaces.
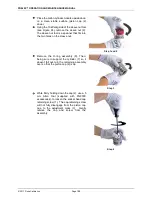
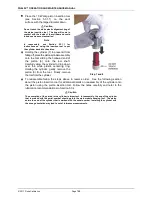
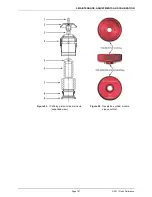
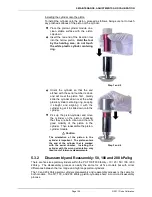
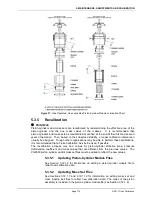
Numerical references in the procedure below refer to Figure 23. This procedure applies to
both the 10 kPa/kg and 20 kPa/kg piston-cylinder modules.
Summary of Contents for PG9000 Series
Page 10: ...PG9602 OPERATION AND MAINTENANCE MANUAL 2011 Fluke Calibration Page X Notes...
Page 128: ...PG9602 OPERATION AND MAINTENANCE MANUAL 2011 Fluke Calibration Page 118 Notes...
Page 164: ...PG9602 OPERATION AND MAINTENANCE MANUAL 2011 Fluke Calibration Page 154 Notes...
Page 188: ...PG9602 OPERATION AND MAINTENANCE MANUAL 2011 Fluke Calibration Page 178 Notes...
Page 192: ...PG9602 OPERATION AND MAINTENANCE MANUAL 2011 Fluke Calibration Page 182 Notes...


