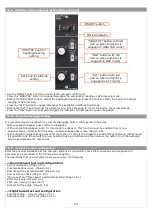
ENGAGE AUTOPILOT IN “HDG/TRK” MODE (HEADING OR TRACKING HOLD/CHANGE)
- Once in flight and with Eclipse already turned on, turn on the ACU control unit via the ON/OFF switch.
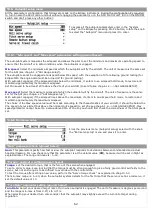
- Choose between heading or tracking (on the Eclipse, from the attitude indicator screen, press any button to show up
the menu bar and press P3 button to switch between heading or tracking).
- Trim the roll and pitch of the aircraft, if present.
- Press the “HDG/TRK” button on the ACU control unit (led will turn on) or press for 2 seconds the remote button (if
installed and enabled as explained in chap.10.6.5).
- Set the desired heading/tracking by rotating the “HDG/TRK” knob on the ACU.
- If you press the HDG/TRK knob during an autopilot-commanded turn, the autopilot will maintain the actual
heading/tracking (the heading/tracking bug is centered).
AUTOMATIC COURSE REVERSAL
The automatic course reversal mode may be used as an emergency aid to pilot who inadvertently enters IMC conditions
and need to execute an immediate course reversal.
- With autopilot engaged in “HDG/TRK” or “NAV” mode, press for 3 seconds the “HDG/TRK” button on the ACU to start
a counter clockwise course reversal, or press for 3 seconds the “NAV” button to start a clockwise course reversal.
During the maneuver the autopilot status indicator will show “AP:180”. After completing the maneuver the autopilot
return engaged in the HDG or TRK mode.
- You can cancel the course reversal function rotating the HDG/TRK knob or pressing the “HDG/TRK” button.
ENGAGE AUTOPILOT IN “NAV” MODE (FLIGHT PLANE OR GOTO NAVIGATION)
The “NAV” mode is based from data received from an external GPS, before using this function for the first time check
that the GPS input of the Eclipse is enabled: enter in system setup by pressing P1+P4 buttons, select the “Fuel
computer” menu and check that the “Ext. GPS for reserve indication” is set to “YES”.
- Once in flight and with Eclipse already turned on, turn on the ACU control unit via the ON/OFF switch.
- Set a flight plane or a GOTO in the external GPS.
- Press the “NAV” button on the ACU control unit (led will turn on). Now the autopilot willl follow the flight plane or
GOTO.
NOTE:
When the flight plane is completed or the GOTO has been reached you need to manually disengage the autopilot.
ENGAGE AUTOPILOT IN “ALT” MODE (ALTITUDE HOLD/CHANGE)
- Once in flight and with Eclipse already turned on, turn on the ACU control unit via the ON/OFF switch.
- Trim the aircraft for level flight.
- Press the “ALT” button on the ACU control unit (led will turn on) or press for 2 seconds the remote button (if
installed and enabled as explained in chap.10.6.4).
- Set the desired altitude by rotating the “ALT” knob on the ACU. The autopilot maintain a vertical speed as set in the
VS climb rate
and
VS descent rate
parameters (see chap.10.6.3).
- If you press the ALT knob during an autopilot-commanded altitude change the autopilot will maintain the actual
altitude (the altimeter bug is centered on the actual altitude).
AUTOPILOT DISENGAGE
- If engaged in “HDG/TRK” mode, press the “HDG/TRK” button on the ACU control unit (led will turn off) or press the
remote button (if installed).
- If engaged in “NAV” mode, press the “NAV” button on the ACU control unit (led will turn off) or press the remote
button (if installed).
- If engaged in “ALT” mode, press the “ALT” button on the ACU control unit (led will turn off) or press the
remote
button (if installed).
In case of emergency or malfunction turn off the autopilot via the ON/OFF switch on the ACU control unit or open the
circuit breaker which provides power to it.
69
Summary of Contents for Eclipse
Page 6: ...ECLIPSE PART I INSTALLATION 6 ...
Page 7: ...2 Dimensions 7 ...

