background image

Instruction Manual 

Redking Video Camera 
Stabilizer (FLCM-RK)


Summary of Contents for FLCM-RK

Page 1: ...Instruction Manual Redking Video Camera Stabilizer FLCM RK ...

Page 2: ... of purchase and work hard to resolve any problems in the unlikely event one should arise With our commitment to continuous improvement and your Feedback building on our reputation of providing affordable quality products is PRIORITY 1 Table of Contents Subject Page Foreword 3 Introduction 4 Safety Hints 5 Assembling 6 7 Warranty 15 ...

Page 3: ... customer service and office staff that take great pride in all that they do Our mantra of continuous improvement has been the guiding principle of how we conduct our business since day one Once you have the opportunity to experience your new Redking Video Camera Stabilizer we hope you will agree that we craft quality products at a competitive price Products designed to meet and exceed the standar...

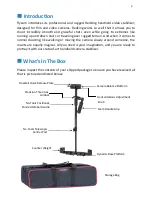
Page 4: ... slowly around someone the results are equally magical All you need is your imagination and you are ready to portray it with our state of art handheld camera stabilizer Camera Balance Platform Foam Handle Grip Dynamic Base Platform Dovetail Quick Release Plate Counter Weight No Tools Telescopic Central Post Precision Three Axis Gimbal No Tools Positional Knurled Gimbal Handle Horizontal Axis Adjus...

Page 5: ...R PROTECTIVE GEAR If you intend to shoot while moving fast or while traversing uneven terrain do not hesitate to wear protective gear as knee or elbow pads or a helmet DO NOT SHOOT IN UNSAFE CONDITIONS Avoid situations where one commonly falls like skis skates or running in muddy fields ADULT SUPERVISION IS RECOMMENDED Minors using this product should have adult supervision FOLLOWING THESE GUIDELI...

Page 6: ... should only be tightened by hand Do not over tighten it as it could cause thread stripping Loosen allen bolts at the bottom of Camera Plate align its holes with the top of Central Post re tighten them securing the plate to post Attach the quick release plate to the camera base Slide the release lever to insert the camera set up into quick release adapter Return the lever to its original locked po...

Page 7: ...l position to achieve optimum performance Secure the counter weight plate by using the black thumb nuts to prevent weight movement NOTE Remember to leave at least 1 of the telescoping post showing below the telescoping clamp The easiest way to correctly align the parts is loosen the screw on the top part of telescoping clamp using allen wrench until you can rotate the parts so they are correctly a...

Page 8: ...setup the horizontal balance of the system If the Stabilizer is horizontally balanced correctly then camera will remain level and central post will remain vertical during operation unless you intentionally position stabilizer otherwise or release any pan tilt or roll pressure on central post When testing for correct horizontal balance you need to make sure that you pick up your Stabilizer from a f...

Page 9: ...mera monitor position post length accessories etc there are many possibilities for statically balancing the Steadycam However for each arrangement there is only one combination that also balances the sled dynamically Dynamic balance can easily be achieved by trial and error method In all cases when a sled is in dynamic balance the camera s center of gravity will be towards rear of the center line ...

Page 10: ... seconds it is too bottom heavy You need to move the bottom mass closer to post If the drop time is more than 2 seconds it is top heavy A DROP TIME OF 2 2 5 SECONDS IS PREFERRED Note Recheck the balance by looking at sled If necessary use side screws and bottom plate screws to make required adjustments Holding Your FLYCAM stabilizer When handling your Redking Video Camera Stabilizer one hand holds...

Page 11: ...up on viewfinder For doing so will cause the unit to be restricted in its ability to stabilize and eliminate camera shake You can either use camera s built in LCD Monitor or attach an exter nal LCD Monitor Not Included directly to the base platform of stabilizer A 1 4 20 monitor mounting hole is located at both the front and back edges of Base Platform NOTE You can also attach an external LCD Moni...

Page 12: ...n so it won t accidentally rotate Re attach top plate to the FLYCAM Center it but don t worry about getting it absolutely perfect yet Remove most of the weights from Base Platform but leave one on each side Insert the center post as far as it will go and tighten so it won t slide out Hold the handle normally and turn the FLYCAM so that it is horizontal to the ground Let go of the stalk while keepi...

Page 13: ...s of metal construction and partially enclosed by the Bearing assembly If after a period of time your bearings don t turn smoothly lubricate with a minimum of light machine oil Light lubricating oil can also be used on the Yoke and Handle Bearings Be sure to keep oil away from your camera clean up any over spill Cleaning Do not use solvents or harsh cleaners of any kind on your Flycam Hand held st...

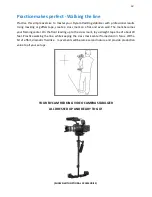
Page 14: ...ecomes your framing center On the floor leading up to the cross mark lay a straight tape line of about 20 feet Practice walking the line while keeping the cross mark center framed and in focus With a bit of effort dramatic fluid like movements will become second nature and provide production value to all your set ups YOUR FLYCAM REDKING VIDEO CAMERA STABILIZER ALL DRESSED UP AND READY TO GO SHOWN ...

Page 15: ...by anyone other than our company We are not liable for incidental or consequential damages resulting from the use of the unit or occurring due to any breach of this warranty Replacement parts of the product will be provided at nominal cost covering the cost price of the replacement parts only to the customers after the Warranty Period has expired We will cover the complete cost of sending replacem...

Reviews: