background image

A

B

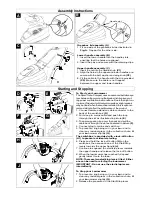
Handle slot

Grassbox lid assembly (A)

1. Fit one side of the grassbox lid as illustrated in

Fig. A

.  Repeat for the other side.

Lower handle assembly (B)

1. Insert the lower handle into the handle slots,

ensuring that the holes are aligned. 

2. Insert the pins and secure with the retaining clips.

Upper handle assembly (C)

1. Insert the nut into the handle knob.

( C 1 )

2 . Align the holes in the upper and lower handles and

secure with the bolt, washer and wing knob.

( C 2 )

3 .

Fit the cable to the handle with the clip provided.

(C3)  

Make sure the cable is not trapped

between the upper and lower handles.

C

Assembly Instructions

1

2

3

Starting and Stopping

E

F

D

H

J

1

To Start your Lawnmower

The Flymo Turbo Compact uses an advanced belt drive sys-
tem, between the motor and the blade which improves cut-
ting power and flotation in all conditions. Due to the high turn-
ing force (Torque) which this motor develops a light squeak
may be heard when the machine is started, this is quite nor-
mal and will not effect the performance of the product
1. Connect female extension cable connector to the

back of the switchbox. 

(D)

2. Form loop in mains cable and push the loop

through the slot as illustrated in picture 

(E)

3. To secure, position loop over the hook and pull the

cable back through the slot as illustrated in picture 

( F )

.

4. Connect plug to mains and switch on.
5. To prevent a ring being cut in your lawn and to

clear any residual grass in the collection chute, tilt
your lawnmower slightly 

(G)

.

The switchbox is provided with a lock-off button
(H1) to prevent accidental starting.

6. Press and hold the lock-off button 

(H)

on the

switchbox, then squeeze one of the Start/Stop
levers towards the upper handle 

(J)

.

7. Continue to squeeze the start/stop lever towards

the upper handle and release the lock-off button.

8. When the lawnmower has reached full speed

gently lower it onto the lawn.

N OT E : There are two start/stop lev e rs fitted. E i t h e r
one can be used for starting the law n m ow e r.
IMPORTANT: Do not use the start/stop levers
intermittently

To Stop your Lawnmower

1. To prevent a ring being cut in your lawn and to

clear any residual grass in the collection chute, tilt
your lawnmower slightly 

(G)

.

2. Release the pressure on the Start/Stop lever.

G

Summary of Contents for TURBO COMPACT 330

Page 1: ...For all customer enquiries or for replacement parts contact 01325 300303 www flymo com eop customer services electrolux co uk Turbo Compact ...

Page 2: ...are of severing toes or hands Do not put hands or feet near a rotating blade Blade continues to rotate after the machine is switched off Wait until all machine components have completely stopped before touching them Do not mow in the rain or leave the lawn mower outdoors while raining STOP cutting height spacers 1 fitted to lawnmower 2 in loose parts pack switchbox start stop levers electric cable...

Page 3: ...king cleaning or working on the appliance if you hit an object Do not use your lawnmower until you are sure that the entire lawnmower is in a safe operating condition if the lawnmower starts to vibrate abnormally Check immediately Excessive vibration can cause injury Maintenance and storage 1 Keep all nuts bolts and screws tight to be sure the lawnmower is in safe working condition 2 Check the gra...

Page 4: ...nce of the product 1 Connect female extension cable connector to the back of the switchbox D 2 Form loop in mains cable and push the loop through the slot as illustrated in picture E 3 To secure position loop over the hook and pull the cable back through the slot as illustrated in picture F 4 Connect plug to mains and switch on 5 To prevent a ring being cut in your lawn and to clear any residual g...

Page 5: ...t 1 Remove the blade bolt and blade as described in Removing the Blade and Fan 2 For a Lower Cut Add spacers to a maximum of 3 3 For a Higher Cut Take spacers away 4 Refit the blade as described in Fitting the Blade and Fan K L blade bolt blade fan spacers Removing the Blade and Fan 1 To remove the blade bolt hold the fan firmly and with the spanner provided loosen the blade bolt by turning it ant...

Page 6: ...s recommended that you clean your lawnmower straight after mowing while the grass is still wet 1 Remove grass from under the hood with the spanner scraper tool Q1 2 Remove the blade see Figure L to gain access to the fan and clean with a soft brush Q2 3 Lever the roller out of position and clean with a soft brush Q3 4 Remove grass clippings from all air intakes R grassbox S both sides of grassbox ...

Page 7: ...ue to the following are not covered therefore it is important that you read the instructions contained in this Operator s Manual and understand how to oper ate and maintain your machine Failures not covered by guarantee Replacing worn or damaged blades Failures as a result of not reporting an initial fault Failures as a result of sudden impact Failures as a result of not using the product in accor...

Page 8: ...s hand position was Type of Cutting Device Rotary Blade Identification of Series S ee Product Rating Label Conformity Assesment Procedure ANNEXVI Notified Body I T S Cleeve Road Leatherhead Surrey KT22 7SB England Other Directives 98 37 EEC 89 336 EEC 73 23 EEC applicable standards EN60555 2 1987 EN60555 3 1987 EN55014 1993 EN55014 1995 EN836 1997 IEC335 1 1991 IEC335 2 77 1996 Type A Width of Cut...

Reviews: