5
1
2
3
T1
T2
T3
T4
T5
T6
T7
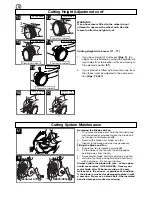
Cutting Height Adjustment cont’
Levers fitted
Lowest Cut Height
Highest Cut Height
Levers fitted
Levers fitted
Levers Fitted
Central
Levers Fitted
Semi Central
Lowest Cut Height
Highest Cut Height
Levers fitted
Levers fitted
WARNING:
If you have levers fitted to the wheel do not
attempt to unscrew the wheel hub. Use the
levers to alter the height of cut.
Cutting Height with Levers (T1 - T7)
1.
If you have Height of Cut levers
(Figs. T)
, the
height of cut is altered by pulling the adjustment
lever away from the location slots and moving to
the selected position
(T1)
.
2.
If your product is fitted with more than one lever
then these must be adjusted to the same posi-
tion
(Figs. T2 &T7)
.
Cutting System Maintenance
Removing the Blade and Fan
1.
To remove the blade bolt, hold the fan firmly and
with the spanner provided loosen the blade bolt
by turning it anti-clockwise
(U)
.
2.
Remove the blade bolt, blade, and fan.
3.
Inspect for damage and clean as necessary.
Fitting the Blade and Fan
1.
Ensure the fan is located correctly.
(V)
2.
Fit the blade to the fan with the sharp edges
pointing away from the fan.
3.
Re-assemble blade bolt through blade and fan.
4.
Hold the fan firmly and tighten blade bolt firmly
with a spanner. Do not over tighten.
Always handle the blade with care - sharp edges
could cause injury. USE GLOVES. Renew your
metal blade after 50 hours mowing or 2 years
whichever is the sooner - regardless of condition.
If the blade is cracked or damaged replace it with
a new one. Never use a blade bolt if the insulated
head is damaged cracked or missing.
U
V
Venturer 370
RE420/420c


