background image

www.fmiproducts.com

125598-01D

16

INSPECTING BURNERS

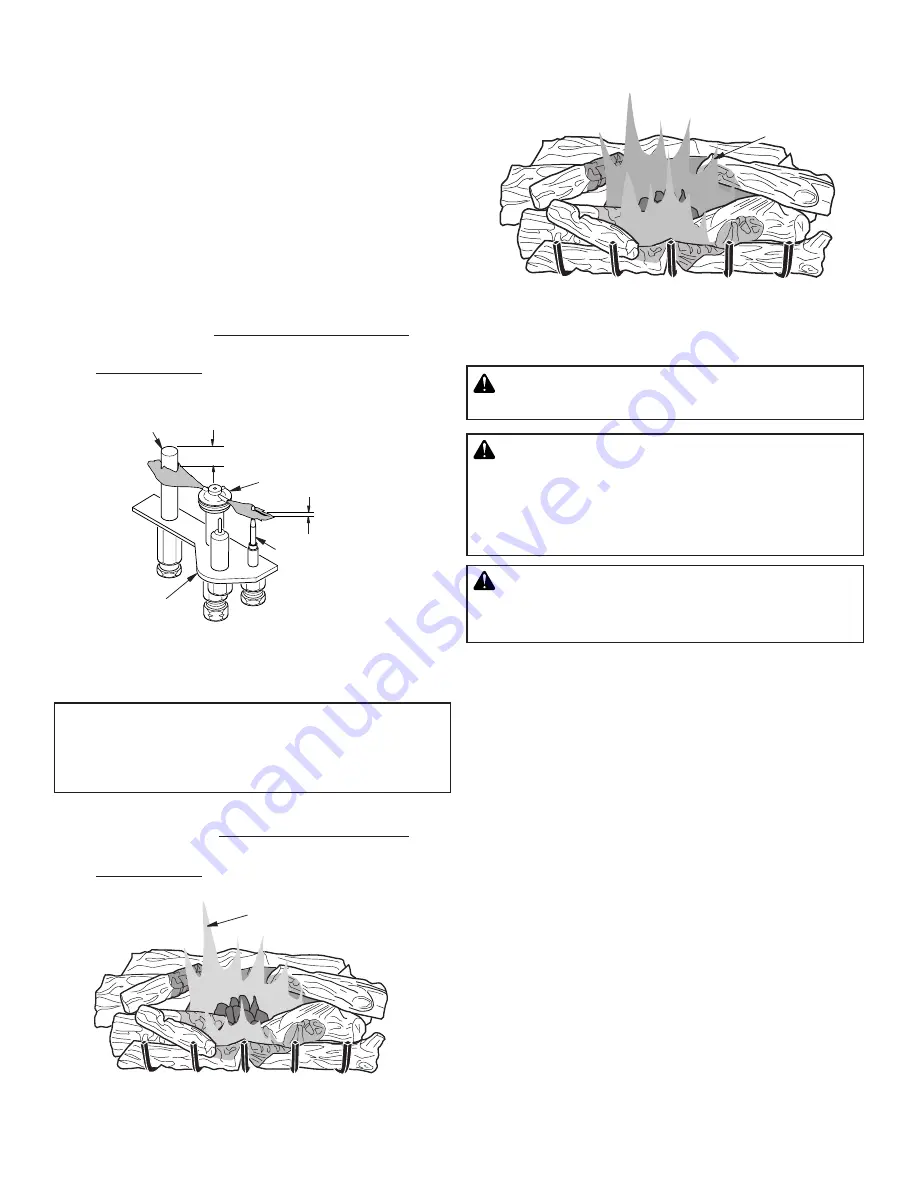
Check pilot flame pattern and burner flame patterns often.

PILOT ASSEMBLY

The  pilot  assembly  is  factory  preset  for  the  proper  flame 

height. Alterations may have occurred during shipping and 

handling. Call a qualified service person to readjust the pilot 

if necessary.
The height of the thermopile must be 3/8" to 1/2" above the 

pilot flame as shown in Figure 28. The thermocouple must be 

at a height of about 1/8" above the pilot flame. The flame from 

the pilot burner must extend beyond both the thermocouple 

and thermopile.
If your pilot assembly does not meet these requirements:
•  turn fireplace off (see 

To Turn Off Gas to Appliance

, page 

15)

•  see 

Troubleshooting

, page 17

Figure 28 - Pilot Assembly

Thermocouple

Thermopile

1/8"

Pilot Burner

Piezo 

Ignitor

3/8" to 1/2"

Figure 29 - Correct Burner Flame Pattern

Figure 30 - Incorrect Burner Flame Pattern

Dark Orange 

Flames

Yellow Flames with 

Orange Streaks

BURNER FLAME PATTERN

Figure 29 shows correct burner flame pattern.

NOTICE: Do not mistake orange flames with 

yellow tipping. Dirt or other fine particles are 

burned by appliance, causing brief patches of 

orange flame.

If burner flame pattern is incorrect, as shown in Figure 30.
•  turn appliance off (see 

To Turn Off Gas to Appliance

, page 

15)

•  see 

Troubleshooting

,

 page 19

CLEANING AND MAINTENANCE


WARNING: Turn off appliance and let cool 

before cleaning.

 CAUTION: You must keep control areas, 

burners and circulating air passageways of ap

-

pliance clean. Inspect these areas of appliance 

before  each  use.  Have  appliance  inspected 

yearly by a qualified service person. 

 WARNING: Failure to keep the primary air 

opening(s) of the burner(s) clean may result 

in sooting and property damage.

BURNER INJECTOR HOLDER AND PILOT AIR 

INLET HOLE

The primary air inlet holes allow the proper amount of air to 

mix with the gas. This provides a clean burning flame. Keep 

these holes clear of dust, dirt, lint and pet hair. Clean these air 

inlet holes prior to each heating season. Blocked air holes will 

create soot. We recommend that you clean the unit every three 

months during operation and have appliance inspected yearly 

by a qualified service person. 
We also recommend that you keep the burner tube and pilot 

assembly clean and free of dust and dirt. To clean these parts 

we recommend using compressed air no greater than 30 PSI. 

Your local computer store, hardware store or home center may 

carry compressed air in a can. If using compressed air in a 

can, please follow the directions on the can. If you don’t follow 

directions on the can, you could damage the pilot assembly.

1.  Shut off unit, including pilot. Allow unit to cool for at least 

thirty minutes.

2.  Inspect burner, pilot and primary air inlet holes on injector 

holder for dust and dirt (see Figure 31, page 17).

3.  Blow air through the ports/slots and holes in the burner.

4.  Check injector holder located at end of burner tube again. 

Remove any large particles of dust, dirt, lint or pet hair with 

a soft cloth or vacuum cleaner nozzle.

5.  Blow air into the primary air holes on the injector holder.

Summary of Contents for MF42ONR

Page 1: ...nnot reach your gas supplier call the fire department Installation and service must be performed by a qualified installer service agency or the gas supplier INSTALLER Leave this manual with the appliance CONSUMER Retain this manual for future reference WARNING Improper installation adjustment alteration service or maintenance can cause injury or property damage Read the installation operating and ...

Page 2: ...p selector switch in the OFF position to prevent children from turning on burners with remote WARNING Improper installation adjust ment alteration service or maintenance can cause injury or property damage Refer to this manual for correct installation and operational procedures For assistance or additional information consult a qualified installer service agency or the gas supplier WARNING Thisapp...

Page 3: ... Before using furniture polish wax carpet cleaner or similar products turn appliance off If heated the vapors from these products may create a white powder residue within burner box or on adjacent walls and furniture 9 Do not use this appliance as a wood burning appliance Use only the logs provided with the appliance Do not burn solid fuels in this appliance 10 Do not run appliance where flammable...

Page 4: ...tronic ignitor to light appliance fuel supply INSTALLATION WARNING Aqualified service person must install appliance Follow all local codes NOTICE State or local codes may only allow operation of this appliance in a vented con figuration Check your state or local codes WARNING Make sure the selector switch is in the OFF position before installing appliance WARNING Never install the appliance in a r...

Page 5: ...4 and 5 page 6 for minimum clearances IMPORTANT If you cannot meet these minimum clearances you must operate appliance with chimney flue damper open Go to Installing Damper Clamp Accessory for Vented Opera tion page 7 Heat Resistant Material A Figure 3 Heat Resistant Material Slate Marble Tile etc Above Fireplace Noncombustible Material Distance A Requirements for Safe Installation 12 or more Nonc...

Page 6: ...learances When Using Hood Minimum Non Combustible Material Minimum Non Combustible Material Height Distances to Underside of Mantel Top of Fireplace Opening Underside of Mantel Shelf 12 A 18 20 22 24 All minimum distances are in inches 2 1 2 6 8 10 Mantel Shelf Minimum Noncombustible Material 8 Min 12 15 18 20 2 1 2 6 8 10 12 Distances to Underside of Mantel Hood GA6050 or GA6053 Top of Fireplace ...

Page 7: ...e special care is needed You must raise the fire place floor to allow access to appliance control panel This will insure adequate air flow and guard against sooting and controls being dam aged Raisefireplacefloorwithnoncombustible material Make sure material is secure Installation Items Needed hardware package provided with appliance approved flexible gas hose and fittings provided if allowed by l...

Page 8: ...s This will prevent excess sealant from going into pipe Excess sealant in pipe could result in clogged appliance valves WARNING Use pipe joint sealant that is resistant to liquid petroleum LP gas Figure 11 External Regulator With Vent Pointing Down Propane LP Supply Tank External Regulator with Vent Pointing Down INSTALLATION Continued Figure 10 Attaching Base to Fireplace Floor Model Shown May Va...

Page 9: ...imum inlet pressure for purpose of input adjustment Figure 12 Gas Connection Pipe Cap Tee Nipple Joint Gas Control 3 Minimum Sediment Trap Equipment Shutoff Valve With 1 8 NPT Tap Approved Flexible Gas Hose if allowed by local codes PROPANE LP From External Regulator 11 W C to 14 W C Pressure NATURAL From Gas Meter 5 W C to 10 5 W C Pressure 2 Cap off open end of gas pipe where equipment shutoff v...

Page 10: ...hecking Gas Connections page 9 9 If logs were removed from appliance for install remote ac cessory replace logs see Installing Logs and Lava Rock Page 11 10 Place remote receiver on fireplace floor next to control valve Make sure the remote receiver and wires are not on or touching either gas burner on the log set Installing Batteries for Remote Receiver and Hand Held Remote Control Follow instruc...

Page 11: ...d Do not modify logs Only use logs supplied with appliance or as identified for use with the appliance as shown in Figure 18 Note Each log includes an identifying number cast in the log Look at each log when placing them on the burner system to be certain it is correct Note For additional information go to www fmiproducts com and click on the technical Support tab for access to log place ment vide...

Page 12: ...ertical portion of the burner tube Place this log on the base assembly by inserting it from the left side as shown in Figure 20 You will need to twist the log slightly to get it to fit against the burners properly It will rest even with the back edge of the pan Back Left Log D 060 D 018 or D026 Flat Part of Log Log Notch Burner Tube Burner Tube Log Notch Vertical Portion of Burner Tube 3 Find the ...

Page 13: ...F48 SC and VTGF36 inch models D 028 See Figures 23 and 23A The split side of the log faces forward The log has a notch that fits around the burner tube on the right side The left side of the burner tube fits into the notch on the back side of this log The log is placed properly when it sits parallel to the tube burner and the square peg is pointing up See figures for reference Charred Log Log Notc...

Page 14: ...p of the front right log 8 Find the back top log LMF36 SC and VFGT24 inch models D 062 or LMF42 SC and VFGT30 inch models D 023 or LMF48 SC and VTGF36 inch models D 029 See Figures 26 and 26A The left end of this log has a round hole that fits over the round peg that is on the top of the back left log The right end of this log has a rectan gular hole that fits over the rectangular peg on the top o...

Page 15: ... don t smell gas go on the next step 6 Press in and turn control knob counterclockwise to the PILOT position Press in control knob for five 5 seconds see Figure 27 7 With control knob pressed in press and release ignitor button This will light pilot If needed keep pressing ignitor button until pilot lights Note If pilot does not stay lit contact a qualified service person or gas supplier for repai...

Page 16: ...eas burnersandcirculatingairpassagewaysofap plianceclean Inspecttheseareasofappliance before each use Have appliance inspected yearly by a qualified service person WARNING Failure to keep the primary air opening s of the burner s clean may result in sooting and property damage BURNER INJECTOR HOLDER AND PILOT AIR INLET HOLE The primary air inlet holes allow the proper amount of air to mix with the...

Page 17: ...jector Holder Primary Air Inlet Holes Figure 32 Pilot Inlet Air Hole Your pilot may vary from pilot shown Thermocouple Thermopile 1 8 Pilot Burner Piezo Ignitor 3 8 to 1 2 LOGS If you remove logs for cleaning refer to Installing Logs and Lava Rock page 11 to properly replace logs Replace log s if broken or chipped dime sized or larger MAIN BURNER Periodically inspect all burner flame holes with ap...

Page 18: ... Pressure in of water Max 14 W C Min 11 W C For purpose of input adjustment MF42ONR MF48ONR VTDGT24NR VTDGT30NR AND VTDGT36NR Rating Variable 29 000 40 000 Btu Hr Type Gas Natural Ignition Electronic Manifold Pressure 3 4 W C Inlet Gas Pressure in of water Max 10 5 W C Min 5 W C For purpose of input adjustment To Thermopile To AUTO Terminal on Switch To OFF Terminal on Switch WIRING DIAGRAM REMOTE...

Page 19: ...stalled 5 Depleted gas supply propane LP only 6 ODS pilot is clogged 7 Gas regulator setting is not cor rect REMEDY 1 Reconnect ignitor cable 2 Free ignitor cable if pinched by any metal or tubing Keep ignitor cable dry 3 Replace ignitor cable 4 Replace ignitor 5 Replace pilot assembly 6 Replace pilot assembly 7 Install new alkaline battery in electronic ignitor Verify battery is installed correct...

Page 20: ...hts keep control knob pressed in 30 seconds 3 Wait one minute for safety in terlock system to reset Repeat ignition operation 4 Fully open equipment shutoff valve 5 A Contact local natural or pro pane LP gas company 5 B Clean ODS pilot see Cleaning and Maintenance page 16 or replace ODS pilot assembly 6 Hand tighten until snug then tighten 1 4 turn more 7 Replace pilot assembly 8 Replace control v...

Page 21: ...m line Have gas line checked by local natural or pro pane LP gas company 3 Observe minimum installation clearances see pages 9 through 11 4 Clean burner see Cleaning and Maintenance page 16 or replace burner orifice s 1 Turn appliance off when using fur niture polish wax carpet cleaners or similar products 1 Replace 9 volt batteries in re ceiver and hand held remote 1 This is normal with most appl...

Page 22: ...propane LP only 3 Gas leak See Warning state ment at top of page 1 Low line pressure 2 ODS pilot is partially clogged 1 Gas leak See Warning state ment at top of page 2 Control valve or gas control de fective 1 Foreign matter between control valve and burner 2 Gas leak See Warning state ment at top of page REMEDY 1 Open window to ventilate room Stop using odor causing products while appliance is r...

Page 23: ...ve fireplace Fits openings 28 to 48 wide RECEIVER AND HAND HELD REMOTE CONTROL KIT MRC REMOTE READY MODELS ONLY For all models Allows the fireplace to be turned on and off by using a hand held remote control WALL MOUNT ON OFF SWITCH GWMS2 REMOTE READY MODELS ONLY For all models Allows the gas log appliance to be turned on and off with a wall switch DAMPER CLAMP GA6080 For all models Permanently op...

Page 24: ...ts com 125598 01D 24 PARTS REMOTE READY CONTROL MODELS MF42ONR MF42OPR MF48ONR MF48OPR VTDGT24NR VTDGT24PR VTDGT30NR VTDGT30PR VTDGT36NR VTDGT36PR 1 2 5 6 8 9 10 13 14 15 16 17 18 19 20 21 23 24 25 22 11 12 12 7 3 4 ...

Page 25: ...01 Grate Stainlees MF42 1 125603 02 Grate Stainlees MF48 1 14 111435 01 Ignitor Electric 1 15 125019 01 Bracket Ignitor 1 16 116559 02 Shutter Air NG 1 116559 03 Shutter Air LP 1 17 099056 16 Orifice 0 12 NG 1 099056 31 Orifice 0 07 LP 1 18 124933 01 Orifice Holder 90 Degrees 1 19 111824 01 Nut Sleeve Brass Compression 1 20 111817 01 Tube Flex 3 8 X 15 1 21 120252 01 Nut 10 24 Black Hex 2 22 12561...

Page 26: ... NO DESCRIPTION QTY 1 125948 01 D 061 125573 01 D 019 125591 01 D 027 Log Front Right 1 2 125948 02 D 060 125573 02 D 018 125591 02 D 026 Log Back Left 1 3 125948 03 D 059 125573 03 D 017 125591 03 D 025 Log Front Left 1 4 125573 04 D 020 125573 04 D 020 125573 04 D 020 Log Charred 1 5 125948 04 D 063 125573 05 D 021 125591 04 D 028 Log Middle Split 1 6 125573 06 D 022 125573 06 D 022 125573 06 D ...

Page 27: ...chase date Usually we will ask you to return the part to the factory SERVICE HINTS When Gas Pressure Is Too Low pilot will not stay lit burners will have delayed ignition appliance will not produce specified heat propane LP gas supply may be low You may feel your gas pressure is too low If so contact your local propane LP or natural gas supplier TECHNICAL SERVICE You may have further questions abo...

Page 28: ...st be obtained through authorized dealers of this product and or FMI PRODUCTS LLC who will provide original factory replacement parts Failure to use original factory replacement parts voids this warranty Travel handling transportation diagnostic material laborandincidentalcostsassociatedwithwarrantyrepairs unlessexpresslycovered by this warranty are not reimbursable under this warranty and are the...

Reviews: