background image

RTM X42.Modbus Installation Manual and Operating Instructions


09.12.2019


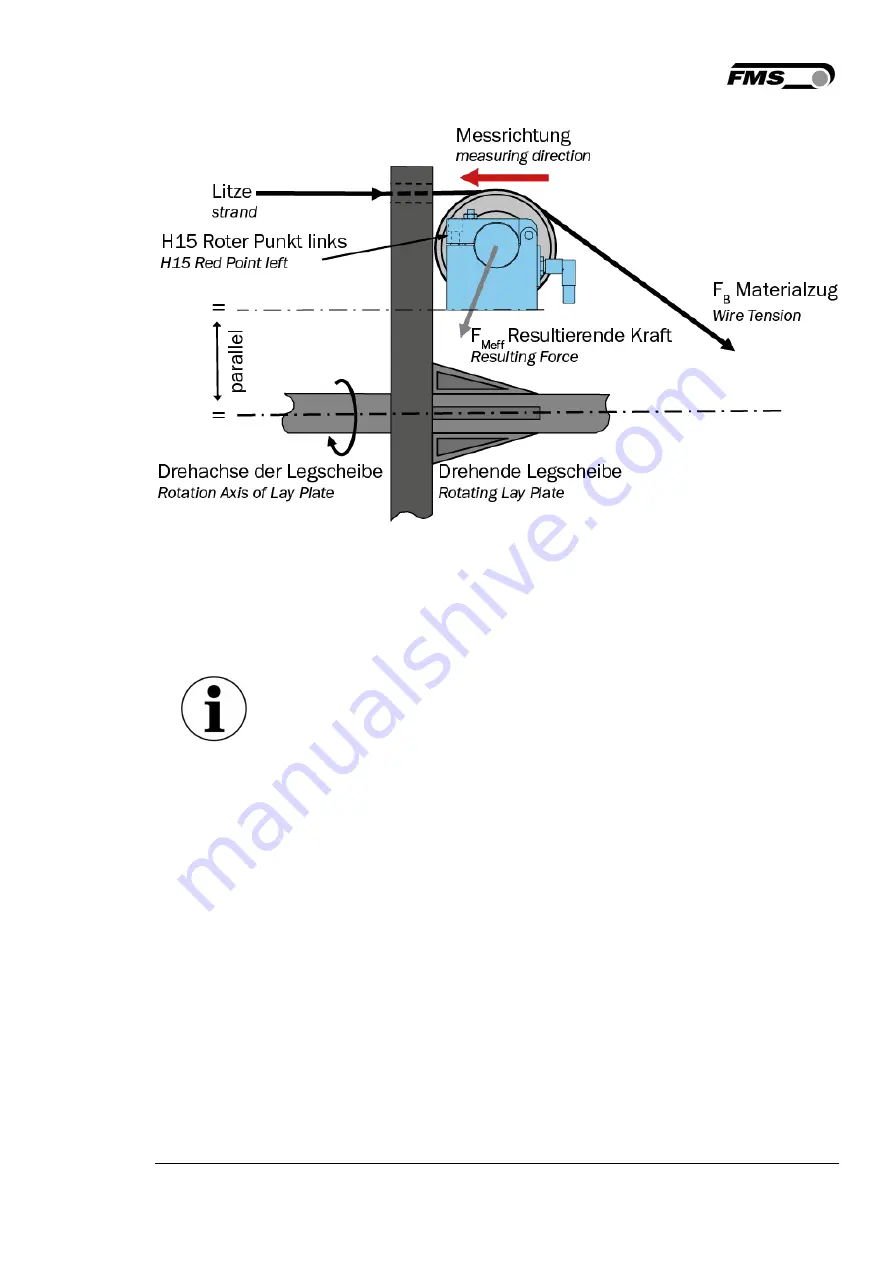
Figure 3: Force sensor alignment, here RMGZ200
 RMGZ200_NEU_2017_BA_Manual.ai 


Parallel alignment 
The exact, parallel alignment of the measuring direction to the axis 
of rotation of the machine is decisive for achieving precise measured 
data. 
Otherwise, measured value fluctuations occur during machine 

operation due to the high sensitivity of the FMS force sensors. These 
interfere with the assessment of the product quality later.  
 

Due to irregularities in the installation surfaces, the alignment may have to be 
readjusted very precisely. Some FMS force sensors feature an integrated mechanism 

facilitating this fine adjustment. For force sensors without such features, we 
recommend the use of shims or thin metal strips. 

4.3


Installation of the Electronics Components in the Rotating Part of 

the Machine 

The transmitter module and the channel extension modules should be mounted as 
closely as possible to the axis of rotation of the strander. This reduces the influencing 
centrifugal forces. 
During installation of the transmitter module, make sure that the centrifugal forces do 
not act in the direction of the fastening screws of the battery.  
Make also sure that the transmission path to the receiver module is free from obstacles. 
Mount the receiver as high as possible.  

Summary of Contents for RTM X42.Modbus

Page 1: ...nsion Measurements in Cage and Tubular Type Stranders Document version 3 20 Published author 12 2019 NS Diese Bedienungsanleitung ist auch in Englisch erhältlich Bitte kontaktieren Sie Ihren nächstgelegenen FMS Vertreter by FMS Force Measuring Systems AG CH 8154 Oberglatt All rights reserved ...

Page 2: ...er Module with battery 10 4 4 1 EMGZ482T Modbus 24VDC Receiver Module version without battery with 24VDC power supply via slip rings on the strander 11 4 5 EMGZ484T Modbus Channel Extension Module 13 4 5 1 EMGZ482R Modbus Receiver Module 13 5 OPERATION AND DISPLAY 15 5 1 Offset Compensation of the Force Sensors 16 5 2 Force Sensor Calibration 16 5 3 Charger 17 6 CONFIGURATION 18 6 1 Quick Start 18...

Page 3: ... Information 2 1 1 Danger that Could Result in Minor or Moderate Injuries Danger warning caution Type of danger and its source Possible consequences of nonobservance Measure for danger prevention 2 1 2 Note Regarding Proper Function Note Note regarding proper operation Simplification of operation Ensuring function 2 2 General Safety Information Flying parts If the battery is not secured correctly ...

Page 4: ... the components in the specified layout to one another Otherwise severe malfunctions may occur Thus the installation information on the following pages must be followed The local installation regulations ensure the safety of electrical systems They are not considered in these operating instructions However they must be met Poor grounding can result in electric shocks for persons malfunctions of th...

Page 5: ...ion yield during wire and cable production 3 2 System Extensions to the RTM X42 Measuring System RTM X42 CC Control Center Master controller with pre installed RTM Monitoring Control Software Clear presentation of measured values Storage printing of measured data quality documentation for your customers Integrated solution with user friendly interface Storage of recipes fast setup conversion to ot...

Page 6: ... sensor s according to your specifications 1b Channel extension module s 1c Transmitter module 1d Receiver module 1e Force sensor for core 1f Dig input for production length not shown Battery for transmitter module and charger for battery not shown Connection cable from force sensors to transmitter module resp extension modules not shown Patch cable for gateway or PLC connection not shown Measurin...

Page 7: ...channel extension module and or to receiver module pre fabricated connection cables of the channel extension modules to transmitter module RTM X42 system installation manual and operating instructions Options Transmitter module with 24VDC power supply instead of battery The following is not included in the scope of supply Pulleys installation material 24VDC power supply for receiver module cable f...

Page 8: ...Machine In rotating applications the force sensors are installed such that the centrifugal forces are compensated Note It is of utmost importance to compensate for the centrifugal forces generated through the rotation of the strander Non compensated force measuring rollers lead to faulty measurements In the case of FMS force sensors of the RMGZ series this is achieved by aligning the force sensor ...

Page 9: ...ay have to be readjusted very precisely Some FMS force sensors feature an integrated mechanism facilitating this fine adjustment For force sensors without such features we recommend the use of shims or thin metal strips 4 3 Installation of the Electronics Components in the Rotating Part of the Machine The transmitter module and the channel extension modules should be mounted as closely as possible...

Page 10: ...nd Operating Instructions 09 12 2019 10 Abbildung 4 Installation RTM_X42_Modbus_BA_Manual ai 4 4 Electrical Connection 4 4 1 EMGZ482T Modbus Receiver Module with battery The connection cables are pre fabricated with respective connectors ...

Page 11: ...ai 4 4 1 EMGZ482T Modbus 24VDC Receiver Module version without battery with 24VDC power supply via slip rings on the strander The connections between the force measuring rollers and transmitter are realized using a 2x2x0 25 mm2 AWG 23 cable with 2 shielded twisted pairs of strands The cables have connectors on both sides to facilitate installation ...

Page 12: ...RTM X42 Modbus Installation Manual and Operating Instructions 09 12 2019 12 Figure 6 EMGZ482T Modbus 24VDC electrical connection RTM_X42_Modbus_BA_Manual ai ...

Page 13: ...ule Figure 7 EMGZ484T Modbus electrical connection RTM_X42_Modbus_BA_Manual ai Bus Termination Plug All Bus Power Socket have to be connected Otherwise errors in communcaiton may occure Always insert the included bus termination plug to last channel extension module in the row out 4 5 1 EMGZ482R Modbus Receiver Module ...

Page 14: ...ength 14 Analog input for force sensor core 16 26 Relay 1 1 1 2 Configurable relay outputs 1 to 4 Tension value limits channel 1 2 tension value limits collective alarm limit pre alarm collective alarm radio connection battery state of charge core tension value 17 27 Relay 2 1 2 2 18 28 Relay 3 1 3 2 19 29 Relay 4 1 4 2 Table 2 EMGZ482R Modbus pin assignment The RTM X42 system has pre configured r...

Page 15: ...y RTM_X42_Modbus_BA_Manual ai Operation and Display Item Description 1 LED 2 Main operating panel with navigation buttons and confirmation button 3 PARA button for access to the configuration 4 Battery indicator in the EMGZ482T Modbus transmitter module 5 bars 100 charged 4 bars 80 charged 3 bars 60 charged 2 bars 40 charged 1 bar 20 charged battery replacement recommended 5 Visual indicator of th...

Page 16: ...he PLC so that the outputted value is 0 Figure 10 Lay plate alignment RTM_X42_Modbus_BA_Manual ai For the offset compensation of the force sensor for the core observe the operating manual of the measuring amplifier connected to this force sensor 5 2 Force Sensor Calibration Calibration is used for matching the measuring amplifier with the force sensor The so called gain factor is determined After ...

Page 17: ...ring amplifier connected to this force sensor 5 3 Charger Figure 12 Charger with battery RTM_Ladegerät_Akku_10Ah_01 png Connect battery to charger The state of charge LED lights up red if the battery is discharged The safety circuit protects the batteries from overcharging Charging is finished as soon as the battery pack reached its maximum charge capacity The charging process takes 3 4 hours The ...

Page 18: ...without battery is used Connect the EMGZ482R Modbus receiver module and the gateway using a patch cable Connect the gateway to the power supply 24 VDC Connect the EMGZ482R Modbus receiver module to the power supply 24 VDC Switch on the power supply for both devices The radio connection of the RTM X42 system is established automatically This can take approx 5 to 10 seconds After system start and es...

Page 19: ...tructions 09 12 2019 19 6 2 System Parameters The system parameter group contains the general parameters that control the operation of the RTM X42 system but do not influence the actual measurement Figure 13 System parameter 1 RTM_X42_Modbus_BA_Manual ai ...

Page 20: ...RTM X42 Modbus Installation Manual and Operating Instructions 09 12 2019 20 Figure 14 System parameter 2 RTM_X42_Modbus_BA_Manual ai ...

Page 21: ... Yes No Default No RTMX42 Modbus Relay functions specified R1 Radio connection OK R2 Radio connection lost R3 Battery OK R4 Battery state of charge low ModbusPC Selection when using RTM X42 CC Control Center The operating panel is blocked buttons are disabled Unit Values Modbus ModbusPC Default Modbus FiltMode Off Deactivated N Linear Non linear filter of second order Low pass Filter of first orde...

Page 22: ...0 IP Addr IP address static of the EMGZ482R Modbus receiver module Address is entered in 4 blocks Unit Min 0 Max 255 Default 192 168 000 090 Subnet Address of subnet mask Is entered in 4 blocks Unit Min 0 Max 255 Default 255 255 255 0 Gateway Gateway IP address static Is entered in 4 blocks Unit Min 0 Max 255 Default 192 168 000 100 Table 4 System Parameter Overview ...

Page 23: ... 2019 23 7 Gateway A gateway from Anybus is available as accessory item from FMS In the following the configuration of a Modbus TCP Profibus DP gateway is explained as example 7 1 Electrical Connection Figure 15 Gateway electrical connection RTM_X42_Modbus_BA_Manual ai ...

Page 24: ...s Integrate Gateway GSD file in the Profibus configuration tool download GSD file from http www anybus com products abxmtcp shtml Configure and start the Profibus network 7 3 RTM X42 Gateway Technical Data Gateway Technical Data Property Description Power supply 24VDC 15 to 20 Current consumption Max 300mA 24V typical 150mA 24V Ambient temperature Max 70 C 158 F 225mA and 24V Grounding PE Internal...

Page 25: ...with the gateway Table 7 Start Anybus IPconfig program It is possible to search for the listed gateway again using the Scan button Double clicking on the listed line opens the configuration window Table 8 Set the IP accordingly and switch off DHCP List of IP addresses Gateway 192 168 0 100 static RTM X42 192 168 0 090 static ...

Page 26: ...ateway can be accessed using a web browser and the following IP address 192 168 0 100 Figure 17 If a configuration file is available it can be loaded under Backup Restore Figure 18 Set the IP address subnet mask router IP address and DHCP accordingly under Modbus Client These are the settings of the RTM X42 gateway ...

Page 27: ...munication from the RTM X42 gateway to the RTM X42 are defined under Modbus Servers To do so click on the Add new server field Figure 20 A new server connection is inserted Changes become only effective after a restart Click on Edit Figure 21 Enter the alias name RTM_X42 and server address 192 168 0 90 and clock on OK ...

Page 28: ...ation Manual and Operating Instructions 09 12 2019 28 Figure 22 Next click on Transactions Figure 23 Insert a new communication transaction using the Add new transaction button Figure 24 Edit this new transaction using Edit ...

Page 29: ...9 29 Figure 25 Enter the data respectively and confirm with OK Figure 26 Here all wire tension data 50 registers are retrieved with a cycle time of 10ms from the RTM X42 device and transferred to the RTM X42 gateway The MODBUS register contains the data mapping information ...

Page 30: ...nstallation Manual and Operating Instructions 09 12 2019 30 Figure 27 The changes must still be saved with Apply under X gateway Management Figure 28 The RTM X42 gateway is restarted after confirming with the OK button ...

Page 31: ...is visible under Transaction Monitor 7 5 ANYBUS Gateway AB9001 Register The RTM X42 system provides a bit stream with the raw cable tension data of 42 channels every 10 ms The tension values of the Core measuring channel are transmitted on register 47 Notes on gateway configuration Read and write the MSB first Example 0x12345678 MODBUS offset 0 0x1234 MODBUS offset 1 0x5678 ...

Page 32: ... 6 7 INT16 1 Channel 7 8 INT16 1 Channel 8 9 INT16 1 Channel 9 10 INT16 1 Channel 10 11 INT16 1 Channel 11 12 INT16 1 Channel 12 13 INT16 1 Channel 13 14 INT16 1 Channel 14 15 INT16 1 Channel 15 16 INT16 1 Channel 16 17 INT16 1 Channel 17 18 INT16 1 Channel 18 19 INT16 1 Channel 19 20 INT16 1 Channel 20 21 INT16 1 Channel 21 22 INT16 1 Channel 22 23 INT16 1 Channel 23 24 INT16 1 Channel 24 25 INT1...

Page 33: ... 41 INT16 1 Channel 41 42 INT16 1 Channel 42 43 UINT32 2 Counter time Time counter 10 ms after restart 45 UINT32 2 Counter pulse production length Pulse counter after restart 47 UINT16 1 Analog input core Raw date in digits ADC value 0 to 8192 digits 0 to 10V 48 INT16 1 Battery pack Raw date in digits ADC value 2530 digits 100 2380 digits 80 2200 digits 60 1860 digits 40 1420 digits 20 2000 digits...

Page 34: ...n Manual and Operating Instructions 09 12 2019 34 8 Maintenance The force sensors are maintenance free If repairs are necessary we recommend contacting FMS Customer Service and sending the affected components for revision to FMS ...

Page 35: ...Operating Instructions 09 12 2019 35 9 Dimensions Figure 31 Dimensions of the EMGZ482R Modbus receiver module Figure 32 Dimensions of the EMGZ482T Modbus transmitter module Figure 33 Dimensions of the EMGZ484T Modbus channel extension module ...

Page 36: ...emove antennas from the interference range Channel X min limit Core min limit The faulty channel is active however not connected to a force sensor Connect force sensor to the respective connector of the EMGZ482T or EMGZ484T Modbus Error MODBUS connection faulty Contact FMS Service Center Very small force amplitudes to PLC Calibrated incorrectly Repeat calibration Changed parameters cannot be saved...

Page 37: ...ion 8192 digit 14 bit Analog inputs 1 and 2 1 strain gauge force sensor 350 Ω 0 to 5 4 mV max 7 4 mV Temperature range 0 to 50 C 32 to 122 F Protection class IP52 Weight 0 52 kg 1 15 lbs without battery Table 10 Transmitter module technical data 11 2 EMGZ482R Modbus Receiver Module EMGZ482R MODBUS Display LCD 2x 8 characters 5mm 2 LED bar indicators graphical force presentation Battery state of ch...

Page 38: ...uracy 0 05 FS Sensor excitation 3 0 VDC max 20mA highly stable Power supply 24 VDC supply via bus power cable from EMGZ482T MODBUS A D converter resolution 8192 digit 14 bit Analog inputs 1 to 4 1 strain gauge force sensor each 350 Ω 0 to 5 4 mV max 7 4 mV Temperature range 0 to 50 C 32 to 122 F Protection class IP52 Weight 0 45 kg 1 0 lbs Table 12 Channel extension module technical data 11 4 Cert...

Page 39: ...CC Rules Certification FCC Registration 0020311882 RTM X42 CAB Radio Certification for Japan Magnitude of Test Coverage Low power data communi FXD Art 38 24 Paragraph 1 of radio law Certification Article 2 Clause 1 Item 19 Certification ID 202WWSM10126721 Table 13 Radio Certification 11 5 Lloyd s Register Type Approval Certificate available upon request ...

Page 40: ...50 60 06 info fms technology com www fms technology com FMS USA Inc 2155 Stonington Avenue Suite 119 Hoffman Estates IL 60169 USA Tel 1 847 519 4400 Fax 1 847 519 4401 fmsusa fms technology com FMS UK Aspstrasse 6 8154 Oberglatt Switzerland Tel 44 0 1767 221 303 fmsuk fms technology com FMS Italy Aspstrasse 6 8154 Oberglatt Switzerland Tel 39 02 39487035 fmsit fms technology com ...

Reviews: