background image

1

FOR USE ONLY WITH DECORATIVE TYPE 

UNVENTED ROOM HEATERS.

Do not store or use gasoline or other flammable
vapors or liquids in the vicinity of this or any other
appliance.

WHAT TO DO IF YOU SMELL GAS

• DO NOT light any appliance.
• DO NOT touch any electrical switches.
• DO NOT use any phone in your building.
• Immediately call your gas supplier from a neighbor’s
phone.
Follow your gas suppliers instructions.
• If your gas supplier cannot be reached, call the fire
department.

Installation and service must be performed by a
qualified installer, service agency or the gas supplier.

WARNING: IF THE INFORMATION IN THIS MANUAL
IS NOT FOLLOWED EXACTLY, A FIRE OR
EXPLOSION MAY RESULT CAUSING PROPERTY
DAMAGE, PERSONAL INJURY OR LOSS OF LIFE.

V

VE

EN

NT

T  F

FR

RE

EE

E  G

GA

AS

S  F

FIIR

RE

EP

PL

LA

AC

CE

E

MODEL : F500116

WALL MOUNTED ROOM HEATER (PROPANE)

INSTALLATION INSTRUCTIONS

(Para Instrucciones en español, ver la página 13)

Installer And Consumer Are

To Retain The Appliance

Manual With The Installed

Appliance

WARNING: IMPROPER INSTALLATION, ADJUSTMENT,

ALTERATION, SERVICE OR MAINTENANCE CAN

CAUSE INJURY OR PROPERTY DAMAGE.  REFER TO

THIS MANUAL. FOR ASSISTANCE OR ADDITIONAL

INFORMATION CONSULT A QUALIFIED INSTALLER,

SERVICE AGENCY OR THE GAS SUPPLIER.

WARNING: DO NOT BUILD A WOOD FIRE. DO NOT

BURN WOOD OR OTHER MATERIAL IN THESE

APPLIANCES.

This is an unvented gas-fired heater. It uses air

(oxygen) from the room in which it is installed.

Provisions for adequate combustion and ventilation air

must be provided. Refer to Combustion and Ventilation

Air Section, Page 3.

This appliance may be installed in an aftermarket,

permanently located, manufactured (mobile) home,

where not prohibited by local codes.

The appliance is only for use with the type of gas

indicated on the rating plate. This appliance is not

convertible for use with other gases.

Issue A-07/07

INSTALLER: 

LEAVE THIS MANUAL WITH THE APPLIANCE.

CONSUMER:

RETAIN THIS MANUAL FOR FUTURE REFERENCE.

Due to high temperatures, the appliance should be

located out of traffic and away from furniture or

draperies. Do not place clothing or other materials on or

near this appliance.

317-F-09-5

Summary of Contents for F500116

Page 1: ...Manual With The Installed Appliance WARNING IMPROPER INSTALLATION ADJUSTMENT ALTERATION SERVICE OR MAINTENANCE CAN CAUSE INJURY OR PROPERTY DAMAGE REFER TO THIS MANUAL FOR ASSISTANCE OR ADDITIONAL IN...

Page 2: ...by a qualified professional as it may not be operating correctly 2 Section Contents Page No 1 0 General Information 2 2 0 Inventory 2 3 0 Appliance Data 2 4 0 Important Safety Information 2 5 0 Codes...

Page 3: ...ned from The American National Standards Institute Inc 1430 Broadway New York NY 10018 or National Fire Protection Association Inc Batterymarch Park Quincy MA 02269 Seller of unvented propane or natur...

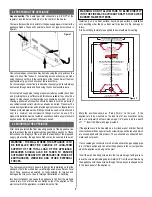
Page 4: ...d as a combustible material or surface Clearance to the sides of the appliance are 4 but curtains drapes and other fabrics are not permitted within a distance of 20 of the appliance sides No such mate...

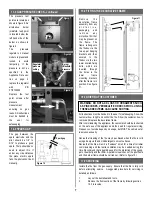
Page 5: ...r injury A full size fitting template is supplied to assist with wall mounting Mark the positions shown as Fixing Points on the wall If the appliance is to be mounted on the inner leaf of a convention...

Page 6: ...erating reliably The heater gas inlet connection is 3 8 NPT at the regulator located below the burner in the center of the heater When tightening up the joint to the regulator hold the regulator secur...

Page 7: ...omer how to light and control the fire Show the customer how to remove and replace the decorative frame After commissioning the appliance the customer should be instructed on the safe use of the appli...

Page 8: ...lass panel and burner unit as per servicing sec tion lint arrestor and pilot unit by using a screwdriver to remove the retaining screws Clean the pilot assembly with a soft brush and blow through Chec...

Page 9: ...r a few minutes to provide a flow through the firebox The burner is then shut off and a smoke pellet or match introduced at the base of the fire underneath the burner tray Large quantities of smoke wi...

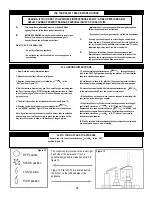
Page 10: ...l gas go to next step 5 The pilot is located on the left side behind the burner Figure 13 6 Depress control knob in and turn counterclockwise to the SPARK position Figure 12 and hold there for a few s...

Page 11: ...to fire check pressure with fire on high If pressure is low remove any restriction in pipework or valve Check all isolators are adequately sized and fully open Check meter pressure is adequate If the...

Page 12: ...AL INJURY As our policy is one of continuous improvement and development we hope therefore you will understand we must retain the right to amend details and or specifications without prior notice DO00...

Page 13: ...aparato instalado ADVERTENCIA LA INSTALACI N AJUSTE MODIFICACI N REVISI N O MANTENIMIENTO INADECUADOS PUEDEN CAUSAR LESIONES O DA OS MATERIALES CONSULTE ESTE MANUAL SI NECESITA AYUDA O INFORMACI N ADI...

Page 14: ...14 Secci n Contenido P gina N 1 0 Informaci n general 14 2 0 Inventario 14 3 0 Especificaciones del aparato 14 4 0 Informaci n de seguridad importante 14 5 0 Normativa 15 6 0 Aire de combusti n y ven...

Page 15: ...ational Fuel Gas Code ANSI Z223 1 o NFPA54 que pueden obtenerse en The American National Standards Institute Inc 1430 Broadway New York NY 10018 o National Fire Protection Association Inc Batterymarch...

Page 16: ...quier material susceptible de decolorarse derretirse o deformarse al estar expuesto a un calor moderado debe considerarse como material o superficie combustible Debe dejarse un espacio libre de 4 en l...

Page 17: ...i n del aparato en una pared que no es vertical puede provocar un incendio da os materiales o lesiones f sicas Se suministra una plantilla de instalaci n de tama o real para ayudar a realizar esta tar...

Page 18: ...ado debajo del quemador en el centro del calentador Al apretar el acoplamiento con el regulador sujete firmemente el regulador con una llave para evitar que ste se mueva Abra el suministro de gas y ve...

Page 19: ...retirar y volver a instalar el marco decorativo Despu s de la puesta en marcha del aparato se debe instruir al cliente sobre la seguridad en el uso del aparato y la necesidad de un mantenimiento regul...

Page 20: ...iones son las indicadas en la Secci n 3 Especificaciones del aparato Retire la carcasa el panel de vidrio y el conjunto del quemador seg n lo indicado en la secci n de mantenimiento el filtro de malla...

Page 21: ...endiendo el aparato durante unos minutos para generar un flujo de aire a trav s de la c mara de combusti n Apague el quemador e introduzca una pastilla de humo o un f sforo en la base del calentador d...

Page 22: ...uado en el lado izquierdo debajo del quemador Figura 13 6 Presione la perilla hacia dentro y h gala girar en el sentido contrario a las agujas del reloj a la posici n SPARK Figura 12 y mant ngala pres...

Page 23: ...UE EL PILOTO SE MANTENGA ENCENDIDO La llama del piloto se reduce cuando Flujo defectuoso de gas al calentador compruebe la presi n con el calentador en Alto el calentador est en Alto Si la presi n es...

Page 24: ...o que nuestra pol tica es de mejora y desarrollo continuos esperamos que usted entienda que debemos reservarnos el derecho a modificar detalles y o especificaciones sin previo aviso DO005940 0 27 0 UB...

Reviews: